Chevrolet Captiva Service & Repair Manual: Rocker Molding
Removal
|
Installation
| Reverse procedure to install. Torque rocker molding screws to 13 inch lbs. |
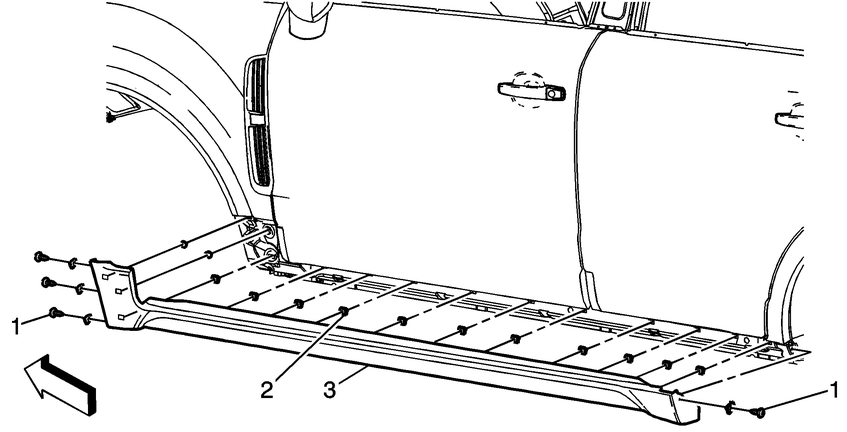
Fig. 1 Rocker molding removal
Servicing the rocker molding on a 2014 Chevrolet Captiva involves a systematic approach to ensure its proper functioning and aesthetic appeal. Begin by assessing the condition of the molding, looking for any signs of damage like cracks, chips, or wear. If the molding is damaged, it may need to be replaced with a new part obtained from an authorized dealer or automotive parts store.
Once you have the replacement part, thoroughly clean the surface of the vehicle's body where the molding attaches to remove any dirt, grime, or old adhesive. Follow the manufacturer's instructions for installing the new rocker molding, ensuring proper alignment and attachment using adhesive or clips as recommended. After installation, conduct a final inspection to check for secure attachment and functionality, such as pressing on the molding to ensure it doesn't move or feel loose.
Regular maintenance of the rocker molding is essential to preserve its appearance and functionality. Include cleaning and inspection of the molding in your routine vehicle maintenance schedule to address any issues promptly and maintain the overall aesthetics of your Chevrolet Captiva production 2006-present.
 Rear Frame Rail
Do not damage any inner panels
or reinforcements.
If the location of the original
plug weld holes can not be determined, space the plug weld holes every 1
1/2 inches ap ...
 Roof
Roof
If the location of the original
plug weld holes cannot be determined, or if structural weld thru adhesive
is present, space the plug weld holes every 1 1/2 inches apart.
Removal
...
More about:
Chevrolet Captiva Owners Manual > Storage: Additional Storage Features
Cargo Cover
For vehicles with a cargo cover, use
it to cover items in the rear of the
vehicle.
To remove the cover and remove it
from the vehicle, pull both ends
toward each other. To reinstall,
place each end of the cover in the
holes behind the rear seat.
Cargo Tie-Downs
Four cargo ...
Chevrolet Captiva Owners Manual
- Introduction
- In Brief
- Keys, Doors, and Windows
- Seats and Restraints
- Storage
- Instruments and Controls
- Lighting
- Infotainment System
- Climate Controls
- Driving and Operating
- Vehicle Care
- Service and Maintenance
- Technical Data
- OnStar
Chevrolet Captiva Service & Repair Manual
