Chevrolet Captiva Service & Repair Manual: ABS Control Module R&R
| Caution: Always connect or disconnect the wiring harness connector from the EBCM/EBTCM with the ignition switch in the OFF position. Failure to observe this precaution could result in damage to the EBCM/EBTCM. |
ABS Control Module Removal
| 1. |
Place the ignition switch in the OFF position. |
| 2. |
Remove the underhood electrical center. |
| 3. |
Without draining the coolant or removing the hoses, remove and position aside the radiator surge tank. |
| 4. |
Clean the electronic brake control module (EBCM) to brake pressure modulator valve (BPMV) area of any dirt or debris. |
| 5. |
Disconnect the EBCM electrical connector by lifting the locking lever upward. |
| 6. |
Disconnect the LF brake pipe fitting (1) from the BPMV. Cap the brake pipe fitting and plug the BPMV outlet port to prevent brake fluid loss and contamination, Fig. 1. |
| 7. |
Carefully position aside and secure the brake pipe to provide clearance for removal of the EBCM. |
| 8. |
Remove the four EBCM bolts (1), Fig. 2. |
| 9. |
Carefully pull the EBCM (1) from the BPMV. Do not pry the components apart, Fig. 3. |
| 10. |
Remove the 12 EBCM seals, if necessary. |
|
ABS Control Module Installation
| 1. |
Install the EBCM seals, if removed. |
| 2. |
Install the EBCM to the BPMV. |
| 3. |
Install the EBCM bolts and torque the bolts in a cross pattern to 27 inch lbs. |
| 4. |
Position the LF brake pipe to the BPMV. |
| 5. |
Connect the LF brake pipe fitting to the BPMV and torque to 16 ft. lbs. |
| 6. |
Install the radiator surge tank. |
| 7. |
Install the underhood electrical center. |
| 8. |
If installing a new EBCM, program the EBCM. |
| 9. |
Without starting the engine, place the ignition switch in the ON position. |
| 10. |
Perform the diagnostic system check. |
| 11. |
Observe the feel of the brake pedal after performing the diagnostic system check. If the pedal now feels spongy, air may have been in the secondary circuit of the brake modulator assembly, which may have been introduced into the primary circuit. If the pedal feels spongy, perform the antilock brake system automated bleed. |
|

Fig. 1
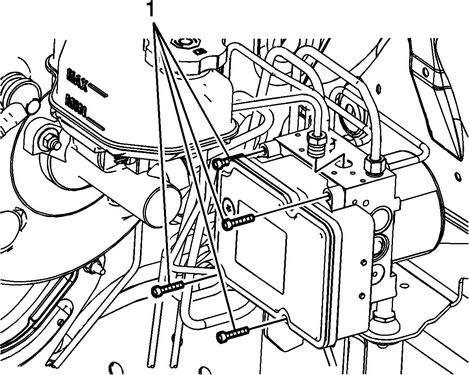
Fig. 2
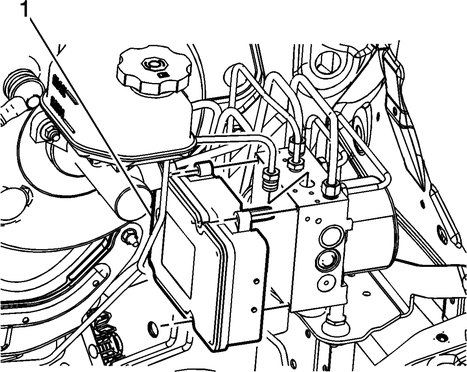
Fig. 3
The ABS control module in a Chevrolet Captiva is a critical component of its anti-lock braking system, ensuring safe and efficient braking performance. When troubleshooting issues related to the ABS system, it's essential to consult the Captiva's repair manual for detailed instructions. Begin by conducting a diagnostic check using an OBD-II scanner to identify specific faults and error codes. Disconnect the battery before accessing the ABS control module, which is typically located in the engine compartment or under the dashboard. Inspect electrical connections, sensors, and components for damage or wear. Clean the module and surrounding areas to maintain optimal functionality.
Testing sensors, wheel speed sensors, and brake fluid level sensors is crucial to pinpointing potential issues within the ABS system. Depending on the findings, you may need to repair or replace faulty components. Repairs may involve soldering or replacing damaged parts, while replacements may be necessary for irreparable modules. Follow the manufacturer's guidelines for software updates and ensure proper reassembly and testing post-repair. Document the repair process, including diagnostic results and parts replaced, for future reference and maintenance history. Consulting a professional mechanic or technician for complex ABS module repairs is advisable for safety and accuracy.
FAQ
What are the symptoms of a bad ABS control module?
A malfunctioning ABS control module in a Chevrolet Captiva can exhibit various symptoms, including the illumination of the ABS warning light on the instrument panel, spongy or soft brake pedal feel, erratic ABS system activation or disengagement, unusual noises during braking such as grinding or buzzing sounds, and the presence of diagnostic trouble codes (DTCs) related to the ABS system in the vehicle's computer system. These signs indicate potential issues with the anti-lock braking system and should prompt immediate inspection and diagnosis by a qualified technician to ensure optimal vehicle safety and braking performance.
How to test ABS module?
To test the ABS module in a Chevrolet Captiva, start by using a diagnostic scan tool to retrieve any stored Diagnostic Trouble Codes (DTCs) related to the ABS system. Conduct a visual inspection of the module and associated components for physical damage or loose connections. Perform a functional test using the scan tool to activate the ABS system and monitor its responsiveness and the ABS warning light. Check the wheel speed sensors for proper operation and inspect the hydraulic components for leaks or malfunctions. Finally, conduct a road test to assess the ABS module's performance under real-world driving conditions. Analyze the test results and consult with a professional technician for further diagnosis and repair recommendations if needed.
Where is the ABS control module located?
In the Chevrolet Captiva, the ABS control module is typically located in the engine compartment. It is often situated near the brake master cylinder or integrated with the hydraulic control unit (HCU) of the ABS system. The exact location can vary slightly depending on the model year and specific configuration of the vehicle. Typically, you can identify the ABS control module by following the brake lines from the master cylinder or looking for a unit with electrical connectors and hydraulic lines attached. It's always a good idea to consult the vehicle's service manual or seek assistance from a qualified mechanic for precise information regarding the ABS control module's location in your specific Captiva model.
What is the function of the ABS module?
ABS (Antilock Braking System) module in the Chevrolet Captiva serves a critical function in ensuring safe braking performance. Its primary purpose is to prevent the wheels from locking up during braking, especially in emergency or hard braking situations. The module continuously monitors the speed of each wheel using sensors and adjusts brake pressure to individual wheels as needed to maintain traction and control. This helps to prevent skidding and loss of steering control, particularly on slippery or uneven road surfaces.
When the ABS module detects that a wheel is about to lock up, it modulates the brake pressure to that wheel by rapidly pulsing the brake fluid. This action allows the driver to maintain steering control and stability while braking, reducing the risk of accidents and improving overall vehicle safety. The ABS module works in conjunction with other components of the ABS system, including sensors, hydraulic control unit, and the vehicle's onboard computer, to achieve optimal braking performance in various driving conditions.
1.
Verify that following areas function
as designed:
a.
Battery is fully charged and cables
are clean and tight.
...
Caution: Always connect or
disconnect the wiring harness connector from the EBCM/EBTCM with the ignition
switch in the OFF position. Failure to observe this precaution could result
...
 Antilock Brake System Diagnosis & Testing
 ABS Hydraulic Control Unit R&R