Chevrolet Captiva Service & Repair Manual: Instrument Panel
| Disconnect battery ground cable.
To avoid Body Control Module (BCM) damage, it is critical to disconnect
battery prior to removal of instrument panel assembly from vehicle. Failure
to disconnect battery prior to instrument panel removal will result in BCM
being supplied power while losing ground, resulting in internal BCM failure. |
| 1. |
Remove heater hoses from heater core. |
| 2. |
Remove air conditioning lines from
thermal expansion valve. |
| 3. |
Remove nuts securing heating control
module to module plate. |
| 4. |
Remove front floor console as outlined
under "Floor Console." |
| 5. |
Remove hood latch release handle screws. |
| 6. |
Release handle by pulling down cable
and unhooking from handle. |
| 7. |
Remove hood latch release handle. |
| 8. |
Remove driver knee bolster screw. |
| 9. |
Release knee bolster from retainer
clips. |
| 10. |
Remove knee bolster assembly. |
| 11. |
Open instrument panel compartment door
to access and remove instrument panel screws, Fig. 1. |
| 12. |
Release instrument panel molding assembly
from instrument panel retainer clips using a suitable flat-bladed
plastic trim tool. |
| 13. |
Remove instrument panel compartment
screws. |
| 14. |
Disconnect instrument panel compartment
electrical connections. |
| 15. |
Release instrument panel compartment
from four retainer clips. |
| 16. |
Remove front floor console storage
tray fastener cover and then fastener. |
| 17. |
Remove front floor console storage
tray assembly. |
| 18. |
Starting in lower lefthand corner of
upper accessory trim, insert a suitable flat-bladed plastic trim
tool between trim plate and edge of console. Pull on upper accessory
trim outward as you slide trim tool upward until all clips are disengaged. |
| 19. |
Repeat previous step on righthand side
of upper accessory trim plate. |
| 20. |
Remove front floor console as outlined
under "Floor Console." |
| 21. |
Disconnect lower accessory trim panel
electrical connections. |
| 22. |
Remove front floor console extension
trim panel screws, Fig. 2. |
| 23. |
Disconnect range select cable from
range select lever. |
| 24. |
Disconnect range select lever electrical
connector. |
| 25. |
Remove automatic transmission range
select lever nuts and then automatic transmission range select lever. |
| 26. |
Remove transmission control bracket
bolts and four transmission control bracket nuts. |
| 27. |
Remove transmission control bracket. |
| 28. |
Tether clip at upper portion of windshield
pillar garnish molding must be replaced every time windshield pillar
molding is removed. |
| 29. |
Starting at top, gently pull on garnish
molding to disengage clip. |
| 30. |
Remove lefthand and righthand windshield
pillar garnish moldings. |
| 31. |
Pull inward at front of carpet retainer
to disengage retainer clips from kick panel area, then pull up to
disengage remaining retainers. A-Pillar trim and floor carpet retainer
are all one piece. Do not attempt to disassemble. |
| 32. |
Remove front floor carpet retainers. |
| 33. |
Remove brake pedal bracket to tie bar
bolt. |
| 34. |
Turn steering wheel to straight ahead
position. |
| 35. |
Insert a small blunt ended punch, or
equivalent tool, through access openings on lefthand and righthand
side of steering wheel. |
| 36. |
Push spring fastener inward to release
steering wheel inflator from steering wheel. |
| 37. |
Release Connector Position Assurance
(CPA) retainer. |
| 38. |
Disconnect steering wheel inflatable
restraint module electrical connectors. |
| 39. |
Remove steering wheel nut. |
| 40. |
Disconnect any electrical connectors
as required. |
| 41. |
Remove steering wheel using puller
No. J-1859-A and puller legs No. J-36541-A, or equivalents. |
| 42. |
Remove steering column lower trim cover
screws. |
| 43. |
Steering column lower trim cover may
need to be turned slightly to maneuver it around steering column
tilt lever. |
| 44. |
Remove steering column lower trim cover. |
| 45. |
Remove steering column upper trim cover
bolts. |
| 46. |
Remove steering column upper trim cover.
Steering column upper trim cover consists of both cover and instrument
panel cluster trim plate bezel. Do not try and separate these pieces;
they are serviced as one component only. |
| 47. |
Remove driver knee bolster reinforcement
upper bolts. |
| 48. |
Remove driver knee bolster reinforcement
lower bolts. |
| 49. |
Remove driver knee bolster reinforcement. |
| 50. |
Disconnect driver knee bolster reinforcement
electrical connectors as required. |
| 51. |
Disconnect electrical connectors as
required from turn signal multifunction switch. |
| 52. |
Depress locking tabs and pull on turn
signal multifunction switch to remove it. |
| 53. |
Disconnect electrical connectors as
required from windshield wiper and washer switch. |
| 54. |
Depress locking tabs and pull on windshield
wiper and washer switch to remove it. |
| 55. |
Remove four inflatable restraint steering
wheel module coil bolts. |
| 56. |
Disconnect electrical connectors as
required from inflatable restraint steering wheel module coil. |
| 57. |
Remove steering wheel inflatable restraint
module coil. |
| 58. |
Remove ignition lock cylinder bolt. |
| 59. |
Disengage ignition lock cylinder bezel
light from bezel and remove ignition lock cylinder bezel. |
| 60. |
Disconnect any electrical connectors
as required, and remove theft deterrent module. |
| 61. |
Turn ignition lock cylinder to run
position. |
| 62. |
Depress ignition lock cylinder retaining
tab using a small pick type tool and pull it outwards to remove
ignition lock cylinder. |
| 63. |
Place match marks on steering shaft
coupling and on lower portion of steering column shaft using paint. |
| 64. |
Remove lefthand front tire and wheel
assembly. |
| 65. |
Place match marks on steering shaft
coupling and on steering gear pinion shaft using paint. |
| 66. |
Remove steering shaft coupling bolt
at steering gear. Discard bolt. |
| 67. |
Disconnect steering shaft coupling
from steering gear. |
| 68. |
Disengage steering shaft coupling seal
from body pass-through. |
| 69. |
Remove steering shaft coupling bolt
at steering column. Discard bolt. |
| 70. |
Disconnect steering shaft coupling
from steering column. |
| 71. |
Remove steering shaft coupling from
interior vehicle. |
| 72. |
Remove steering column assembly lower
bracket bolt. |
| 73. |
Remove steering column assembly upper
bracket bolts. |
| 74. |
Remove steering column assembly from
vehicle. |
| 75. |
Remove nuts securing instrument panel
tie bar to mod plate, Fig. 3. |
| 76. |
Remove instrument panel cluster screws. |
| 77. |
Disconnect instrument panel cluster
electrical connections. |
| 78. |
Remove instrument panel cluster assembly. |
| 79. |
Remove radio front speaker grille assembly
using a suitable plastic flat-bladed tool. |
| 80. |
Remove radio front speaker screws. |
| 81. |
Disconnect front speaker electrical
connector and remove front speaker. |
| 82. |
Release accessory bezel from instrument
panel using a suitable plastic flat-bladed tool. |
| 83. |
Disconnect instrument panel accessory
bezel electrical connectors. |
| 84. |
Release retainer clips and remove instrument
panel accessory bezel. |
| 86. |
Disconnect radio electrical connector. |
| 87. |
Disconnect radio antenna cable. |
| 89. |
Disconnect instrument panel wiring
harness connectors and ground straps at locations as follows: |
| |
a. |
At lefthand and righthand windshield
pillars. |
| |
b. |
At lefthand and righthand A-Pillars. |
| |
c. |
At steering column bracket. Note location
and routing of electrical harness prior to disconnecting or removing
in order to ensure proper installation. |
| 90. |
Remove fuse block accessory door. |
| 91. |
Remove instrument panel wiring harness
junction block screw. |
| 92. |
Disconnect instrument panel wiring
harness junction block electrical connector. |
| 93. |
Remove instrument panel wiring harness
junction block assembly. |
| 94. |
Remove instrument panel bolt covers,
Fig. 4. |
| 95. |
Remove instrument panel bolts. |
| 96. |
With aid of an assistant, remove instrument
panel assembly from vehicle. |
| 97. |
Reverse procedure to install, noting
following: |
| |
a. |
Torque instrument panel accessory
bezel screws to 27 inch lbs. |
| |
b. |
Torque instrument panel bolts
to 15 ft. lbs. |
| |
c. |
Torque instrument panel compartment
door and compartment door lock screws to 27 inch lbs. |
| |
d. |
Torque instrument panel inflatable
restraint lower bolts to 89 inch lbs. |
| |
e. |
Torque instrument panel molding
screws to 27 inch lbs. |
| |
f. |
Torque instrument panel retainer
nuts to 15 ft. lbs. |
| |
g. |
Torque instrument panel trim
panel bolts to 89 inch lbs. |
|
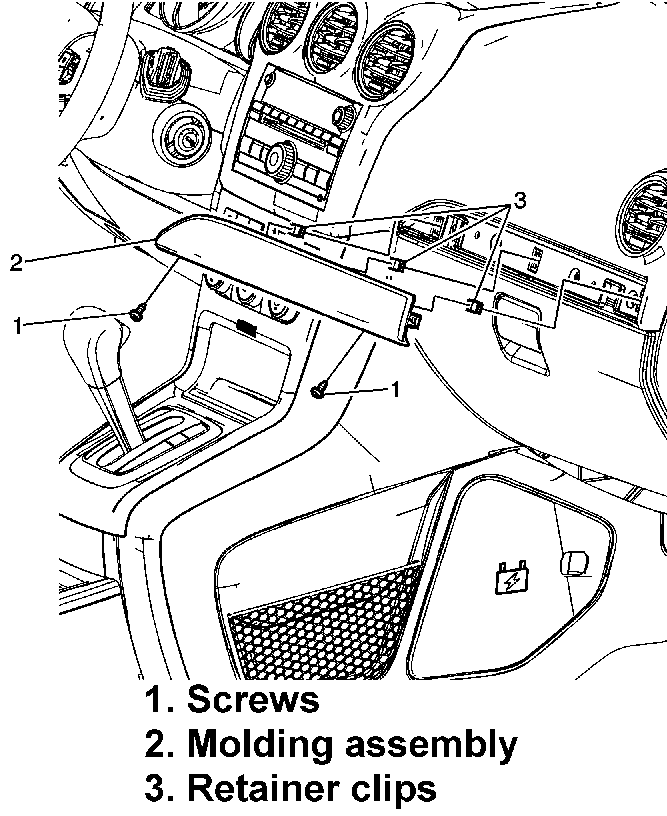
Fig.
1 Instrument panel molding replacement. Captiva Sport
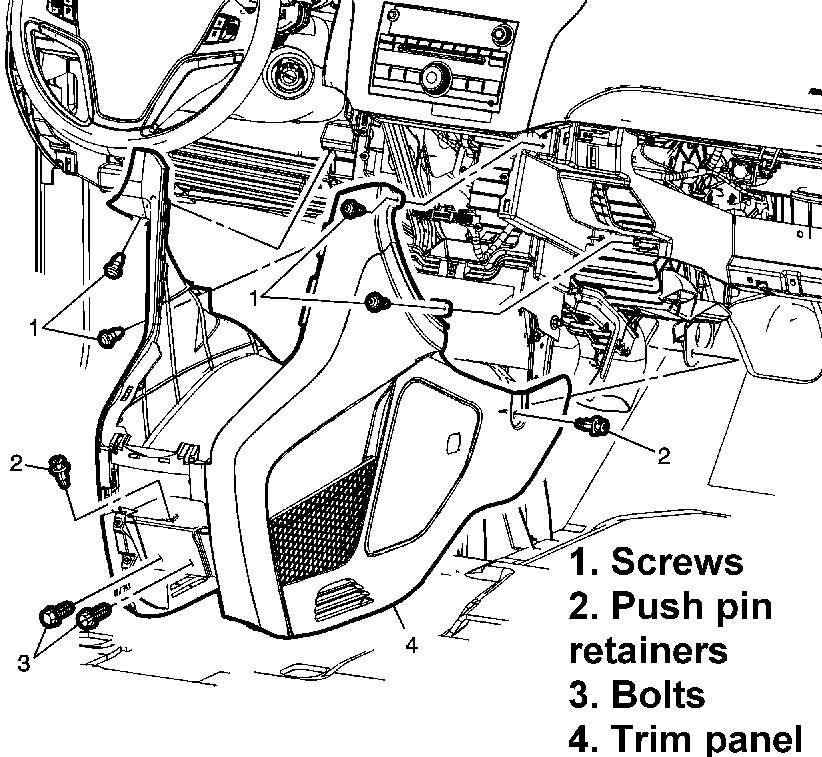
Fig.
2 Front floor console extension panel replacement. Captiva Sport

Fig.
3 Instrument panel tie bar to mod plate nuts replacement. Captiva Sport

Fig.
4 Instrument panel replacement. Captiva Sport
Removing the instrument panel in a Chevrolet Captiva 2011 is a meticulous process that requires attention to detail and the use of proper tools. Before starting, it's crucial to disconnect the negative terminal of the battery to prevent any electrical mishaps during the removal. This step ensures safety and prevents damage to sensitive electronic components.
As you pull out the instrument panel, disconnect the electrical connections to the instrument cluster, switches, and other controls mounted on the panel. Additionally, detach any air ducts or wiring harnesses connected to the back of the instrument panel. These connections may vary based on the specific model and options in your Captiva.
Once the instrument panel is removed, you'll have access to various components behind the dashboard, such as the instrument cluster, HVAC controls, radio, and potentially the heater core. This accessibility makes it easier to perform maintenance or repairs on these components. When reinstalling the instrument panel, ensure all electrical connections are securely reattached, and the panel is properly aligned before tightening the fasteners and reattaching the trim panels. Finally, reconnect the battery and test the functionality of all controls and gauges to ensure everything is working correctly.
Warning: When a hood hold open
device is being removed or installed, provide alternate support to avoid
possibility of damage to vehicle or personal injury.
...
Front
1.
Release tabs and gently pull down to
remove overhead console.
2.
Remove overhead console assembly and
disconnect electric ...
More about:
Chevrolet Captiva Owners Manual > Vehicle Checks: Engine Oil
To ensure proper engine
performance and long life, careful
attention must be paid to engine oil.
Following these simple, but
important steps will help protect
your investment:
Always use engine oil approved
to the proper specification and of
the proper viscosity grade. See
"Selectin ...
 Hood Support Strut R&R
 Overhead Console