Chevrolet Captiva Service & Repair Manual: Rear Quarter Trim Panel
Lower
| 1. |
Remove cargo accessory shelves. |
| 2. |
Remove rear seat belt anchor bolt. |
| 3. |
Lift storage compartment lid. |
| 4. |
Remove foam over spare tire. |
| 5. |
Release liftgate door sill plate clips
using a suitable flat-bladed plastic trim tool. |
| 6. |
Remove liftgate door sill plate. |
| 7. |
Rotate rear seats to forward position. |
| 8. |
Remove rear quarter lower trim panel
retaining screws, Fig. 1. |
| 9. |
Remove rear quarter lower trim panel
retainers. |
| 10. |
Disconnect rear quarter lower trim
panel electrical connectors. |
| 11. |
Remove rear quarter lower trim panel
assembly. |
| 12. |
Reverse procedure to install. Torque
rear quarter lower trim panel retaining screws to 53 inch lbs. |
|
Upper
| 1. |
Remove rear quarter lower trim panel
as outlined under "Rear Quarter Trim Panel, Lower." |
| 2. |
Loosen rear compartment opening weather-strip. |
| 3. |
Route seat belt through trim panel. |
| 4. |
Release rear quarter upper trim panel
clips, Fig. 2. |
| 5. |
Remove rear quarter upper trim panel
assembly. |
| 6. |
Reverse procedure to install. |
|
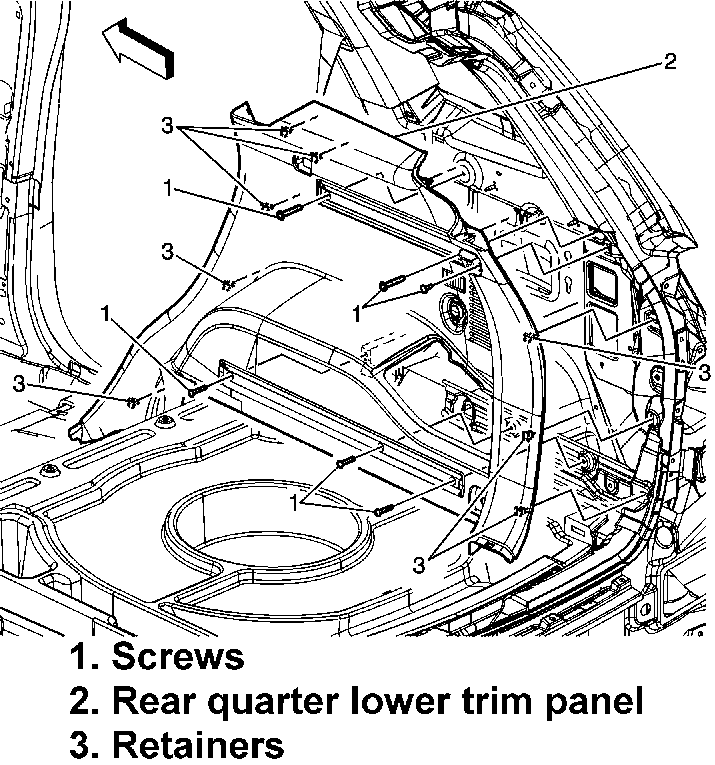
Fig.
1 Lower rear quarter trim panel replacement. Captiva Sport
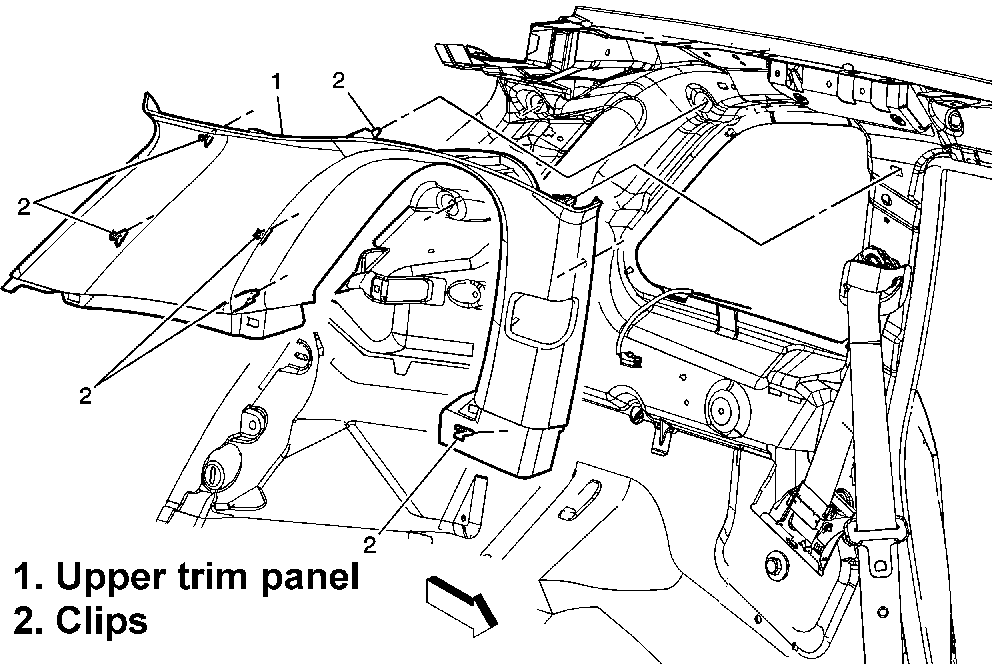
Fig.
2 Upper rear quarter trim panel replacement. Captiva Sport
Servicing the rear quarter trim panel in a Chevrolet Captiva involves several steps to ensure proper removal and installation. The trim panel covers various components and wiring within the rear quarter of the vehicle, including speakers, electrical connections, and access points to other vehicle systems. To service the rear quarter trim panel, it is necessary to first disconnect the battery to prevent any electrical mishaps.
Once the battery is disconnected, carefully remove any screws, clips, or fasteners securing the trim panel in place. Take note of the location of these fasteners as they may vary depending on the vehicle's model year and trim level. After removing the fasteners, gently pry the trim panel away from the vehicle's body, taking care not to damage any surrounding components or wiring.
During reinstallation, ensure all electrical connections are properly secured and that the trim panel is aligned correctly before fastening it back into place. Double-check for any loose connections or potential interference with other vehicle systems. Proper servicing of the rear quarter trim panel helps maintain the vehicle's interior aesthetics and ensures that all components within the panel function as intended.
Normalized Procedure
A window motor that has not been normalized will no longer perform express up and express down functions. This may occur during following co ...
Front
1.
Remove front door trim panel as outlined
under "Door Trim Panel."
2.
Remove front door water deflector.
...
More about:
Chevrolet Captiva Owners Manual > Lighting: Lighting Features
Entry Lighting
If the dome lamp override button is
in the out position, the lamps inside
the vehicle automatically come on
when any door is opened, or when
is pressed on the Remote
Keyless Entry (RKE) transmitter.
After the door is opened, the lamps
remain on and stay on for
20 s ...

 Power Window Reset
 Window Regulator