Chevrolet Captiva Service & Repair Manual: Disc Brake Caliper R&R
Front
Removal
| Caution: Support the brake
caliper with heavy mechanic wire, or equivalent, whenever it is separated
from its mount and the hydraulic flexible brake hose is still connected.
Failure to support the caliper in this manner will cause the flexible brake
hose to bear the weight of the caliper, which may cause damage to the brake
hose and in turn may cause a brake fluid leak. |
| DO NOT use any air tools to remove
or install the guide pin bolts. Use hand tools ONLY. |
| Install an open end wrench to
hold the caliper guide pin in line with the brake caliper while removing
or installing the caliper guide pin bolt. DO NOT allow the open end wrench
to come in contact with the brake caliper. Allowing the open end wrench
to come in contact with the brake caliper will cause a pulsation when the
brakes are applied. |
| 1. |
Raise and support the vehicle. |
| 2. |
Remove the tire and wheel assembly. |
| 3. |
Remove the brake caliper guide pin
bolts (1). Hold the brake caliper guide pins stationary when removing
the guide pin bolts, Fig. 1. |
| 4. |
Without disconnecting the brake caliper
hose, remove the brake caliper and support with heavy mechanics
wire or equivalent. |
| 5. |
Remove the inner brake pad (1). Note
the location of the wear sensor for correct installation, Fig.
2. |
| 6. |
Remove the outer brake pad (2),
Fig. 2. |
| 7. |
Remove the brake pad shims (1),
Fig. 3. |
| 8. |
Remove the brake caliper bracket bolts
(1), Fig. 4. |
| 9. |
Remove the brake caliper bracket (1),
Fig. 5. |
|
Installation
| If reusing the caliper bracket
bolts the threads of the caliper bracket bolts and the threads of the knuckle
mounting holes must be free of residue and debris prior to application of
threadlocker in order to ensure proper adhesion and fastener retention. |
| DO NOT use any air tools to remove
or install the guide pin bolts. Use hand tools ONLY. |
| Install an open end wrench to
hold the caliper guide pin in line with the brake caliper while removing
or installing the caliper guide pin bolt. DO NOT allow the open end wrench
to come in contact with the brake caliper. Allowing the open end wrench
to come in contact with the brake caliper will cause a pulsation when the
brakes are applied. |
| 1. |
Install the brake caliper bracket. |
| 2. |
Prepare the bolts and the threaded
holes for assembly, noting following: |
| |
a. |
Thoroughly clean the residue from the
bolt threads by using denatured alcohol or equivalent and allow
to dry. |
| |
b. |
Thoroughly clean the residue from the
threaded holes with denatured alcohol or equivalent and allow to
dry. |
| |
c. |
Apply threadlocker GM part No. 12345493,
or equivalent to 2/3 of the threaded length of the lower caliper
bracket bolts. |
| |
d. |
Ensure there are no gaps in the threadlocker
along the length of the filled area of the bolts. |
| |
e. |
Allow the threadlocker to cure approximately
10 minutes before installation. |
| 3. |
Install the brake caliper bracket bolts
and torque to 89 ft. lbs. |
| 4. |
Install the brake pad shims. |
| 5. |
Install the inner brake pad. Note the
location of the wear sensor for correct installation. |
| 6. |
Install the outer brake pad. |
| 7. |
Position the brake caliper to the bracket. |
| 8. |
Holding the brake caliper guide pins
stationary, install the brake caliper guide pin bolts and torque
to 20 ft. lbs. |
| 9. |
Install the tire and wheel assembly. |
|
Rear
Removal
| Caution: Support the brake
caliper with heavy mechanic wire, or equivalent, whenever it is separated
from its mount and the hydraulic flexible brake hose is still connected.
Failure to support the caliper in this manner will cause the flexible brake
hose to bear the weight of the caliper, which may cause damage to the brake
hose and in turn may cause a brake fluid leak. |
| DO NOT use any air tools to remove
or install the guide pin bolts. Use hand tools ONLY. |
| Install an open end wrench to
hold the caliper guide pin in line with the brake caliper while removing
or installing the caliper guide pin bolt. DO NOT allow the open end wrench
to come in contact with the brake caliper. Allowing the open end wrench
to come in contact with the brake caliper will cause a pulsation when the
brakes are applied. |
| 1. |
Raise and support the vehicle. |
| 2. |
Remove the tire and wheel assembly. |
| 3. |
Remove the brake caliper guide pin
bolts (1). Hold the brake caliper guide pins stationary when removing
the guide pin bolts, Fig. 6. |
| 4. |
Without disconnecting the brake caliper
hose, remove the brake caliper and support with heavy mechanics
wire or equivalent. |
| 5. |
Remove the outer brake pad (1),
Fig. 7. |
| 6. |
Remove the inner brake pad (2). Note
the location of the wear sensor for correct installation, Fig.
7. |
| 7. |
Remove the brake pad shims (1),
Fig. 8. |
| 8. |
Remove the brake caliper bracket bolts
(1), Fig. 9. |
| 9. |
Remove the brake caliper bracket (1),
Fig. 10. |
|
Installation
| If reusing the caliper bracket
bolts the threads of the caliper bracket bolts and the threads of the knuckle
mounting holes must be free of residue and debris prior to application of
threadlocker in order to ensure proper adhesion and fastener retention. |
| DO NOT use any air tools to remove
or install the guide pin bolts. Use hand tools ONLY. |
| Install an open end wrench to
hold the caliper guide pin in line with the brake caliper while removing
or installing the caliper guide pin bolt. DO NOT allow the open end wrench
to come in contact with the brake caliper. Allowing the open end wrench
to come in contact with the brake caliper will cause a pulsation when the
brakes are applied. |
| 1. |
Install the brake caliper bracket. |
| 2. |
Prepare the bolts and the threaded
holes for assembly, noting following: |
| |
a. |
Thoroughly clean the residue from the
bolt threads by using denatured alcohol or equivalent and allow
to dry. |
| |
b. |
Thoroughly clean the residue from the
threaded holes with denatured alcohol or equivalent and allow to
dry. |
| |
c. |
Apply threadlocker GM part No. 12345493,
or equivalent to 2/3 of the threaded length of the lower caliper
bracket bolts. |
| |
d. |
Ensure there are no gaps in the threadlocker
along the length of the filled area of the bolts. |
| |
e. |
Allow the threadlocker to cure approximately
10 minutes before installation. |
| 3. |
Install the brake caliper bracket bolts
and torque to 89 ft. lbs. |
| 4. |
Install the brake pad shims. |
| 5. |
Install the outer brake pad. |
| 6. |
Install the inner brake pad. Note the
location of the wear sensor for correct installation. |
| 7. |
Position the brake caliper to the bracket. |
| 8. |
Holding the brake caliper guide pins
stationary, install the brake caliper guide pin bolts and torque
to 20 ft. lbs. |
| 9. |
Install the tire and wheel assembly. |
|
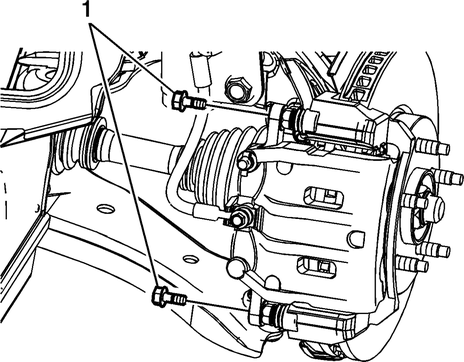
Fig.
1
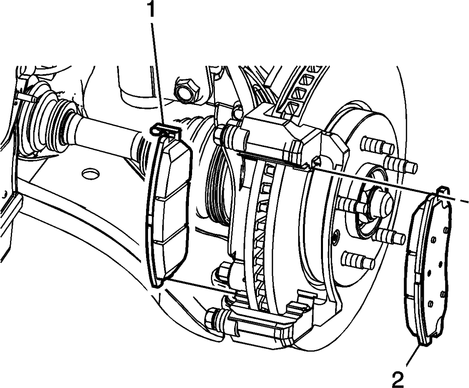
Fig.
2
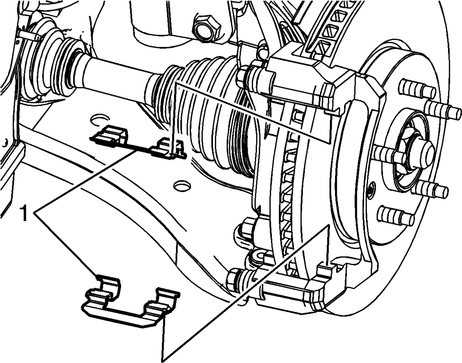
Fig.
3
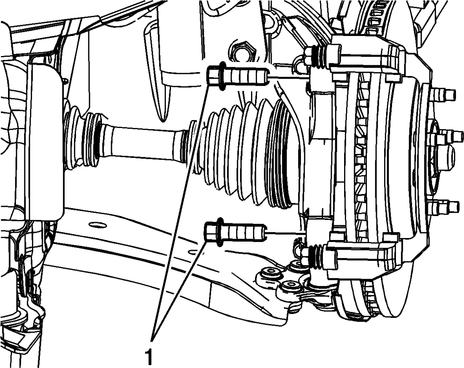
Fig.
4
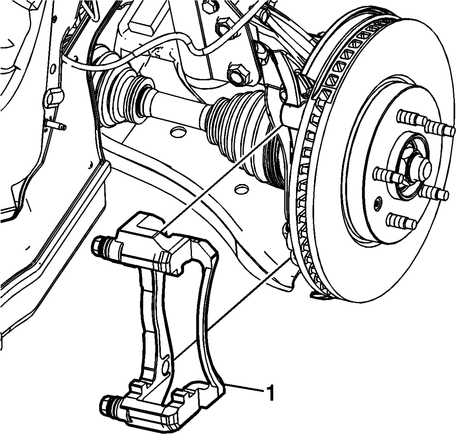
Fig.
5
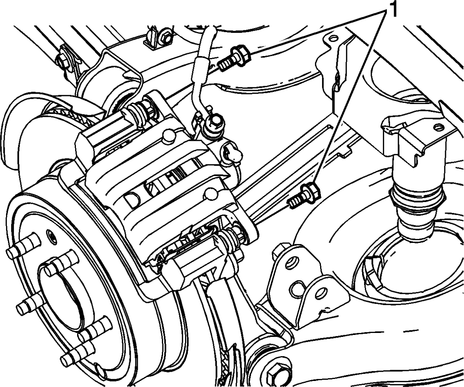
Fig.
6
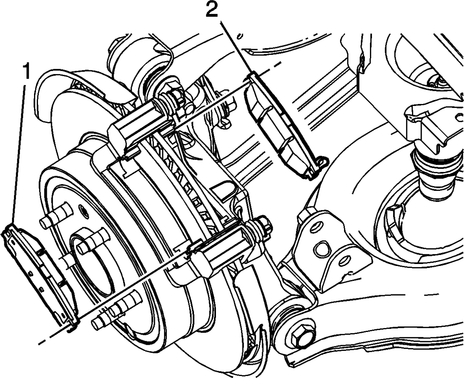
Fig.
7
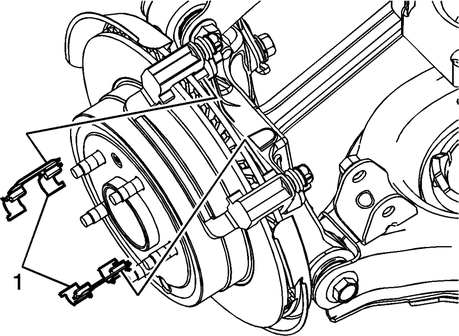
Fig.
8
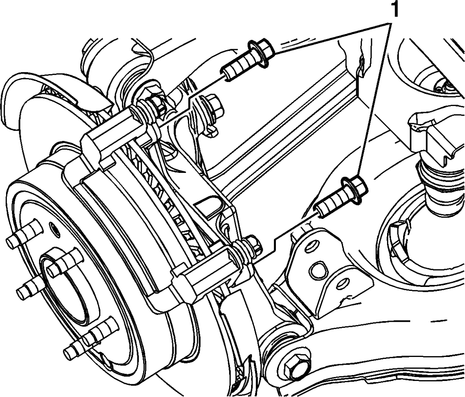
Fig.
9
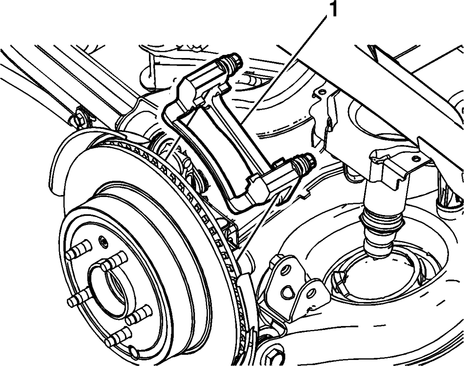
Fig.
10
Front
Removal
Caution: Support the brake
caliper with heavy mechanic wire, or equivalent, whenever it is separated
from its mount and the hydraulic flexible brake hose is still connec ...
If electrical connection for disc
brake wear sensor originates from brake pad, sensor is a chip integral to
brake pad and is replaced as an assembly.
1.
...
 Disc Brake Caliper R&I
 Disc Brake Pad Wear Sensor R&R