Chevrolet Captiva Service & Repair Manual: Suspension Coil Spring R&R
Front
Disassembly
| Caution: Do not allow absorber
rod to rotate during disassembly/assembly. Use hand tools to keep absorber
rod from rotating. If air tools are used, and rod is allowed to rotate,
damage to absorber may occur. |
| Caution: Do not handle top
mount assembly by plastic portion. Handle top mount assembly by metal portion
when removing/installing top mount from/to strut assembly. Holding top mount
assembly by plastic portion may loosen snap fit of bearing components and
cause bearing to fall apart. |
| Before removing any of front strut
assembly components, note alignment and orientation of all components to
aid in installation. |
| Ensure front suspension strut
assembly is vertical in spring compressor. |
| Use proper size socket to hold
front suspension strut shaft while loosening front suspension strut shaft
nut. |
| If any of front suspension strut
assembly components show signs of excessive wear or are damaged, replace
those components. |
| If front spring does not have
to be serviced, leave spring in spring compressor. |
| 1. |
Remove strut assembly. |
| 2. |
Remove front suspension strut shaft
nut cover (1), if equipped, Fig. 1. |
| 3. |
Position front suspension strut assembly
in compressor tool No. CH-45400, or equivalent and adjust upper
and lower legs so that they are properly positioned on front spring,
Fig. 2. |
| 4. |
Hand ratchet and proper socket (1) to
loosen front suspension strut shaft nut, using socket tool No. J-42991,
or equivalent (2), Fig. 3. |
| 5. |
Remove front suspension strut shaft
nut (1), Fig. 4. |
| 6. |
Remove front suspension strut mount (8),
front suspension strut mount bearing (7), front spring upper insulator (6),
front spring (5) (if required), front suspension strut dust
shield (4), front suspension strut bumper (3), front spring
lower insulator (2) and front suspension strut (1), Fig.
5. |
|
Assembly
| Caution: Do not handle top
mount assembly by plastic portion. Handle top mount assembly by metal portion
when removing/installing top mount from/to strut assembly. Holding top mount
assembly by plastic portion may loosen snap fit of bearing components and
cause bearing to fall apart. |
| Caution: Do not allow absorber
rod to rotate during disassembly/assembly. Use hand tools to keep absorber
rod from rotating. If air tools are used, and rod is allowed to rotate,
damage to absorber may occur. |
| Ensure that front suspension strut
assembly is vertical in spring compressor. |
| 1. |
If removed, position front spring in
compressor tool No. CH-45400, or equivalent and adjust upper and
lower legs so that they are properly positioned on front spring. |
| 2. |
Compress front spring enough to install
remaining front suspension strut assembly components, using compressor
tool No. CH-45400, or equivalent. |
| 3. |
Install front spring lower insulator,
front suspension strut bumper and front suspension strut dust shield
on front suspension strut. |
| 4. |
Position front suspension strut with
assembled components in compressor tool No. CH-45400, or equivalent. |
| 5. |
Install front spring upper insulator,
front suspension strut mount bearing and front suspension strut
mount on front suspension strut. |
| 6. |
Inspect to ensure that tab on front
spring upper insulator is aligned with tab on front spring lower
insulator and center of front suspension strut. |
| 7. |
Flat on front suspension strut mount
should be aligned with tab on front spring upper insulator. |
| 8. |
Ensure front spring is properly seated
on front spring lower insulator. |
| 9. |
Install front suspension strut shaft
nut. |
| 10. |
Torque front suspension strut
shaft nut to 63 ft. lbs., using socket tool No. J-42991, or equivalent,
torque wrench and proper socket. |
| 11. |
Remove front suspension strut assembly
from compressor tool No. CH-45400, or equivalent. |
| 12. |
Install front suspension strut shaft
nut cover, if equipped. |
| 13. |
Install strut assembly. |
|
Rear
Removal
| 1. |
Raise and support vehicle. |
| 2. |
Remove rear tire and wheel assembly. |
| 3. |
Remove stabilizer shaft link. |
| 4. |
Position a jack stand underneath lower
control arm. |
| 5. |
Raise jack stand slightly to compress
coil spring. |
| 6. |
Remove lower shock bolt and nut,
Fig. 6. |
| 7. |
Loosen lower control arm to support
frame nut and bolt, Fig. 7. |
| 8. |
Remove lower control arm to knuckle
nut and bolt, Fig. 8. |
| 9. |
Slowly lower control arm in order to
unload coil spring, Fig. 9. |
| 10. |
Remove coil spring and insulators,
Fig. 9. |
|
Installation
| 1. |
Inspect coil spring upper and lower
insulators, if damage exists replace insulators. If no damage exists,
transfer existing components. |
| 2. |
Position spring with rubber insulators
into vehicle. |
| 3. |
Raise jack stand to compress spring. |
| 4. |
Position lower control arm to knuckle
and install nut and bolt and torque bolt/nut to 118 ft.
lbs. |
| 5. |
Torque lower control arm to
support nut and bolt to 92 ft. lbs. |
| 6. |
Install shock to lower control arm
nut and bolt and torque to 81 ft. lbs. |
| 7. |
Remove jack stand from under vehicle. |
| 8. |
Install stabilizer shaft link. |
| 9. |
Install rear tire and wheel assembly. |
|
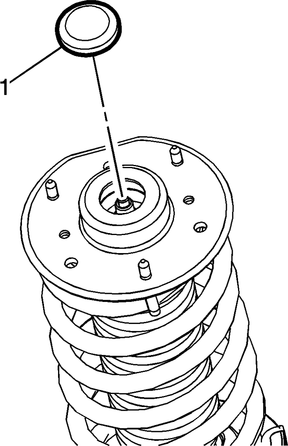
Fig.
1
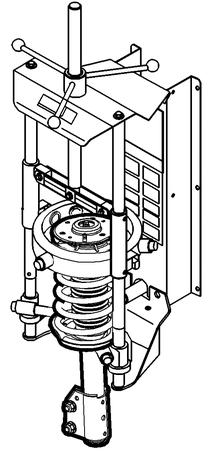
Fig.
2

Fig.
3

Fig.
4
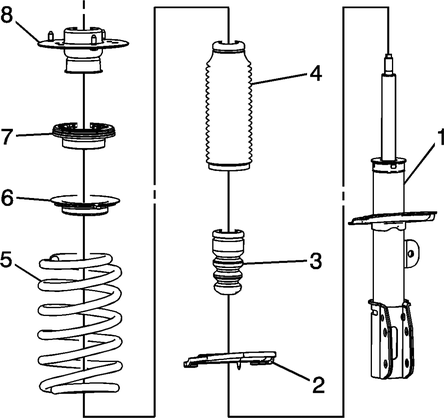
Fig.
5
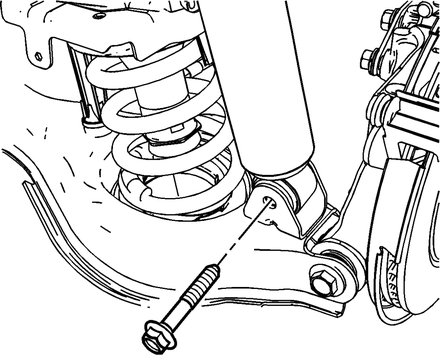
Fig.
6
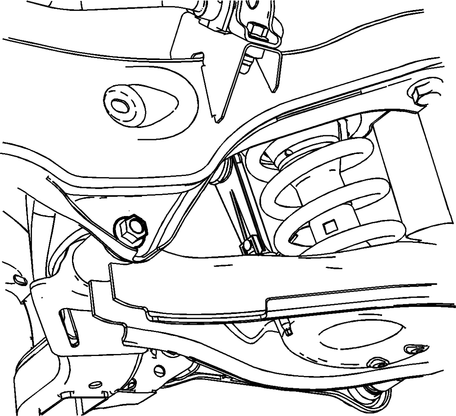
Fig.
7
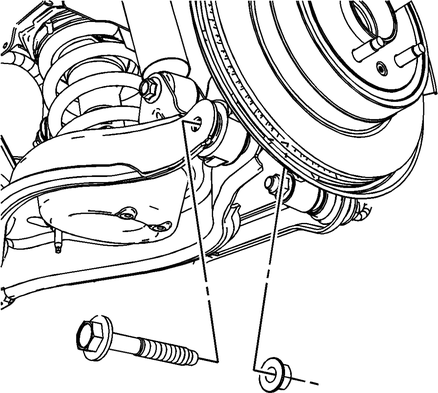
Fig.
8
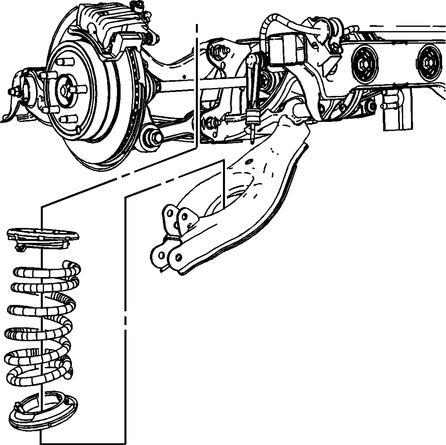
Fig.
9
Replacing a suspension coil spring in a Chevrolet Captiva Production 2006-present involves a detailed process outlined in the service manual. Begin by ensuring the vehicle is parked on a level surface and safely supported on jack stands. Wear safety gloves and eye protection throughout the procedure.
Locate the suspension coil spring, typically found between the suspension strut and the vehicle's body or axle. Before removing the old spring, use a spring compressor tool to compress the coil spring safely. This reduces tension and makes it easier to remove and install the spring.
Next, disconnect any components attached to the suspension strut or coil spring, such as sway bar links or brake lines. Carefully remove the suspension strut assembly, taking note of the orientation and position of components for reassembly.
Using the appropriate tools, compress and remove the old coil spring from the suspension strut. Install the new coil spring by reversing the removal steps. Ensure the spring is correctly seated and aligned before releasing the spring compressor.
Reconnect any components that were disconnected earlier, such as sway bar links or brake lines. Double-check all connections and tighten bolts to the manufacturer's specifications. Lower the vehicle from the jack stands and test the suspension to ensure proper operation. Following these steps and consulting the service manual ensures a safe and effective suspension coil spring replacement in the Captiva.
Lower
Removal
1.
Remove front lower control arm.
2.
Place front lower control arm (1) in
a vise (2) or suitable holding device, Fig. 1. ...
Front
1.
Remove front lower control arm.
2.
Place front lower control arm in a
vise or suitable holding device, Fig. 1.
...
 Suspension Ball Joint R&R
 Suspension Control Arm Bushings R&R