Chevrolet Captiva Owners Manual: Vehicle Identification
Vehicle Identification Number (VIN)
This legal identifier is in the front corner of the instrument panel, on the left side of the vehicle. It can be seen through the windshield from outside. The VIN also appears on the Vehicle Certification and Service Parts labels and certificates of title and registration.
Engine Identification
The eighth character in the VIN is the engine code. This code identifies the vehicle's engine, specifications, and replacement parts. See "Engine Specifications" under Capacities and Specifications on page 12-2 for the vehicle's engine code.
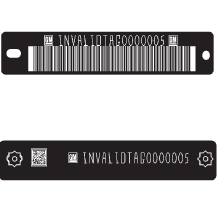
Service Parts Identification Label
This label, on the inside of the glove box, has the following information:
- Vehicle Identification Number (VIN)
- Model designation.
- Paint information.
- Production options and special equipment.
Do not remove this label from the vehicle.
Chevrolet Captiva Owners Manual contains crucial details regarding vehicle identification, focusing on the Vehicle Identification Number (VIN), Engine Identification, and the Service Parts Identification Label.
It explains the VIN, a unique alphanumeric code that identifies each vehicle, detailing its significance in terms of country of origin, manufacturer, vehicle type, and model year. Guidance on locating the VIN, typically near the windshield or on the driver's side door jamb, is often provided.
Information about engine identification is included, covering engine type, displacement, fuel system, and other specific details pertinent to the Chevrolet Captiva (C100, C140). The manual may also indicate where to find the engine identification number on the engine itself.
Additionally, the manual discusses the Service Parts Identification Label, typically found in the engine bay or door jamb. This label contains critical information such as the VIN, paint code, trim level, and other specifications, aiding in part identification and maintenance verification.
 Technical Data
...
 Vehicle Data
Capacities and Specifications
Engine Specifications
Engine Drive Belt Routing
2.4L L4 Engine
3.0L V6 Engine ...
More about:
Chevrolet Captiva Owners Manual > Instruments and Controls: Vehicle Messages
Messages are displayed on the DIC
to notify the driver that the status of
the vehicle has changed and that
some action may be needed by the
driver to correct the condition.
Multiple messages may appear one
after another.
Some messages may not require
immediate action, but you can press
...
Chevrolet Captiva Owners Manual
- Introduction
- In Brief
- Keys, Doors, and Windows
- Seats and Restraints
- Storage
- Instruments and Controls
- Lighting
- Infotainment System
- Climate Controls
- Driving and Operating
- Vehicle Care
- Service and Maintenance
- Technical Data
- OnStar
Chevrolet Captiva Service & Repair Manual
