Chevrolet Captiva Service & Repair Manual: Liftgate
Removal
| 2. |
Disconnect liftgate strut. |
| 3. |
Disconnect electrical connectors. |
| 4. |
Remove four liftgate hinge bolts,
Fig. 1. |
| 5. |
With aid of an assistant, remove liftgate,
Fig. 1. |
|
Installation
| 1. |
Reverse procedure to install. |
| 2. |
Torque hinge bolts to 18 ft.
lbs. |
|
Adjustment
| 1. |
Note original position of liftgate
latch striker. |
| 3. |
Loosen hinge to roof panel bolts for
forward or rearward adjustments, Fig. 2. |
| 4. |
If adjusting hinge to roof panel bolts,
lower rear headliner as required. |
| 5. |
Loosen liftgate to hinge bolts for
up and down adjustment. |
| 6. |
Move liftgate within liftgate opening
to achieve best alignment and operation. |
| 7. |
Install striker to approximately proper
position. |
| 8. |
Adjust striker to achieve best operation
and alignment of liftgate. |
| 9. |
Inspect seals for proper engagement. |
| 10. |
Tighten bolts when proper adjustment
is achieved. |
|
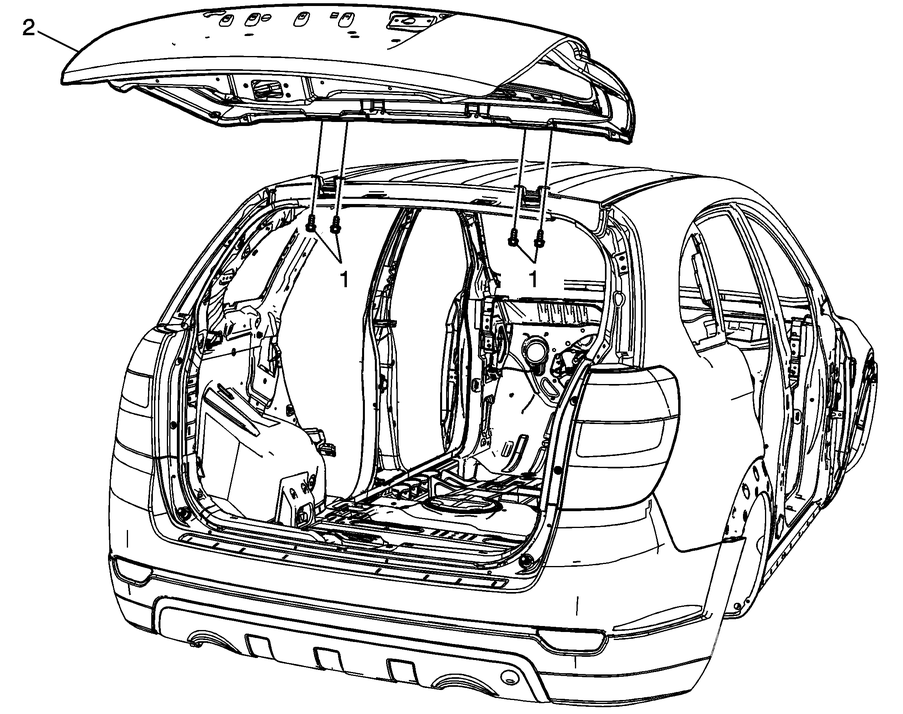
Fig.
1 Liftgate removal
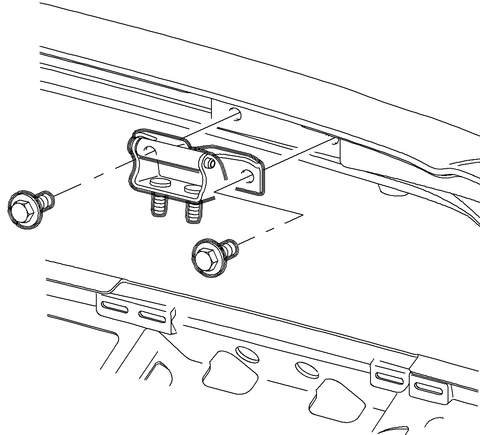
Fig.
2 Liftgate adjustment
Liftgate of a Chevrolet Captiva 2014 is an essential component that provides access to the vehicle's rear cargo area. It plays a crucial role not only in the convenience of loading and unloading items but also in the security and aesthetic appeal of the vehicle. Over time, the liftgate may require maintenance or repairs due to wear and tear, such as issues with the liftgate struts, latch mechanisms, or alignment. Proper functioning of the liftgate is vital to ensure it opens and closes smoothly, locks securely, and aligns correctly with the vehicle body.
Maintenance of the liftgate often involves inspecting and possibly replacing the gas struts that assist in the opening and closing process. These struts can lose their effectiveness over time, making the liftgate difficult to lift or causing it to close unexpectedly. The latch mechanism must be checked regularly to ensure it locks and unlocks properly, providing security for the cargo area. In some cases, realigning the liftgate may be necessary if it is not sitting flush with the vehicle body, which can lead to water leaks or wind noise.
Addressing liftgate issues promptly is crucial for maintaining the overall functionality and safety of the Chevrolet Captiva 2014. Regular inspections and timely repairs can prevent minor problems from becoming major inconveniences. Whether it's replacing worn-out struts, fixing latch issues, or adjusting the alignment, keeping the liftgate in good condition ensures the vehicle remains practical and reliable for everyday use.
Removal
1.
Remove radiator opening upper cover.
2.
Remove three latch mounting bolts,
Fig. 1.
3.
Remove hood ...
Removal
1.
Remove liftgate center applique.
2.
Disengage handle from studs on center
applique, Fig. 1.
3.
R ...
More about:
Chevrolet Captiva Owners Manual > Fuel: E85 or FlexFuel
Vehicles with a yellow fuel cap can use either unleaded gasoline or fuel containing up to 85% ethanol (E85).
All other vehicles should use only the unleaded gasoline as described in Recommended Fuel on page 9-36.
The use of E85 or FlexFuel is encouraged when the vehicle is designed to use it. E8 ...
 Hood Latch
 Liftgate Handle