Chevrolet Captiva Service & Repair Manual: Roof
| If the location of the original
plug weld holes cannot be determined, or if structural weld thru adhesive
is present, space the plug weld holes every 1 1/2 inches apart. |
Removal
| 2. |
Disconnect battery ground. |
| 3. |
Remove all related panels and components. |
| 4. |
Repair as much damage as possible to
factory specifications. |
| 5. |
Remove sealers and corrosion protection
materials from repair area. |
| 7. |
Remove liftgate as outlined in Liftgate. |
| 8. |
Locate and drill out all factory welds.
Note number and location of welds for installation of roof panel,
Fig. 1. |
| 9. |
With aid of an assistant, remove roof
panel, Fig. 2. |
|
Installation
| 1. |
Drill 5/16 inch holes for plug weld
as required on service component, in locations noted from original
assembly (1), Fig. 3. |
| 2. |
Prepare all mating surfaces as required. |
| 3. |
Apply 3M® Weld Thru Coating P/N 05916
or equivalent to all mating surfaces. |
| 4. |
With aid of an assistant, position
roof panel to body, Fig. 4. |
| 5. |
Plug weld accordingly, Fig.
5. |
| 6. |
Clean and prepare all welded surfaces. |
| 7. |
Apply sealers and corrosion protection
materials to repair area, as required. |
| 8. |
Refinish repaired area. |
| 9. |
Install all related panels and components. |
| 10. |
Connect battery ground. |
|
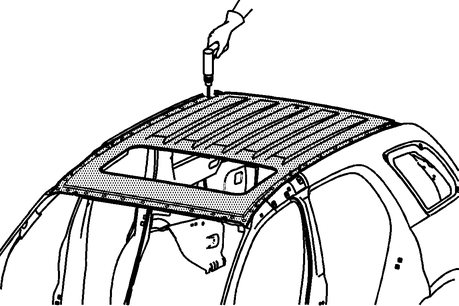
Fig.
1 Roof weld locations
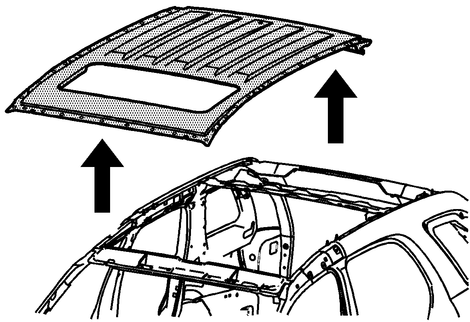
Fig.
2 Roof removal
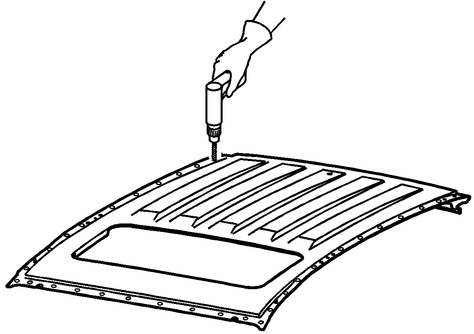
Fig.
3 Roof preparation
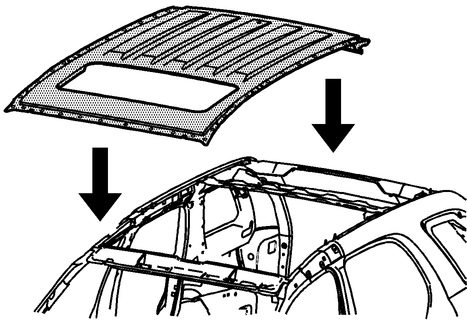
Fig.
4 Roof installation
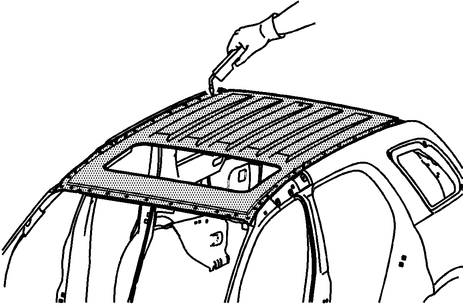
Fig.
5 Roof plug weld locations
Servicing the roof of a 2018 Chevrolet Captiva, including removal and installation, is a comprehensive process that requires careful planning and execution. Here's an overview of what this service might entail:
Firstly, the vehicle is prepared by parking it on a flat and stable surface. Safety precautions such as chocking the wheels and disconnecting the battery may be taken to ensure a safe working environment. Interior components like headliners, sunroof assemblies (if applicable), and roof rails are removed to access the roof structure without obstruction.
During the removal process, technicians meticulously remove any trim pieces, weatherstripping, and fasteners securing the roof to the vehicle's body. This step often involves using specialized tools to avoid damaging the paint or body panels. Once all attachments are loosened or removed, the roof can be carefully lifted away from the vehicle's frame.
After the removal, the technicians conduct a detailed inspection of the underlying roof structure. They look for any signs of damage, corrosion, or wear that may require repairs or replacements. Ensuring the integrity of the roof mounting points and surrounding areas is crucial before proceeding with the installation of a new or repaired roof. This meticulous approach helps maintain the vehicle's structural integrity and ensures a secure and functional roof system.
Removal
1.
Open body side doors on side that lower
rocker moldings will be serviced from.
2.
Remove four rocker molding screws,
Fig ...
Do not damage any inner panels
or reinforcements.
If the location of the original
plug weld holes can not be determined, space the plug weld holes every 1
1/2 inches ap ...
 Rocker Molding
 Upper Frame Rail