Chevrolet Captiva Service & Repair Manual: Door Handle
Exterior
Front
| 1. |
Remove front door trim panel as outlined
under "Door Trim Panel." |
| 2. |
Remove front door water deflector. |
| 3. |
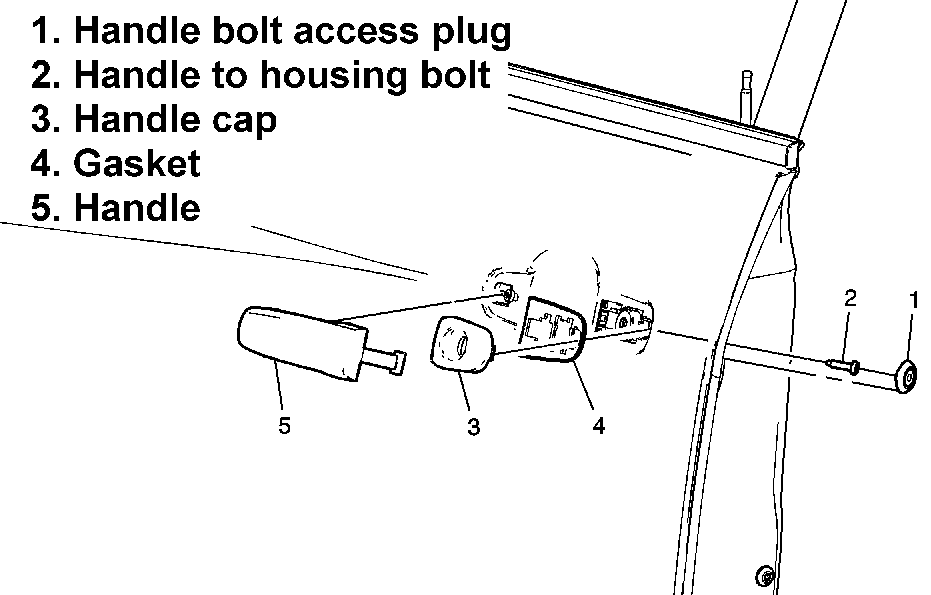
Remove front door exterior handle bolt
access plug, Fig. 1. |
| 4. |
Remove front door exterior handle to
housing bolts. |
| 5. |
Remove front door exterior handle cap. |
| 6. |
Remove front door exterior handle cap
gasket. |
| 7. |
Pull exterior handle rearward to release
it from interior handle housing. |
| 8. |
Remove front door exterior handle. |
| 9. |
Reverse procedure to install, noting
following: |
| |
a. |
Torque front door exterior handle
to cylinder screw to 44 inch lbs. |
| |
b. |
Torque front door exterior handle
to housing bolt to 89 inch lbs. |
|
Rear
| 1. |
Lower rear door latch. Do not remove
latch, pull downward to access rear handle housing bolt. |
| 2. |
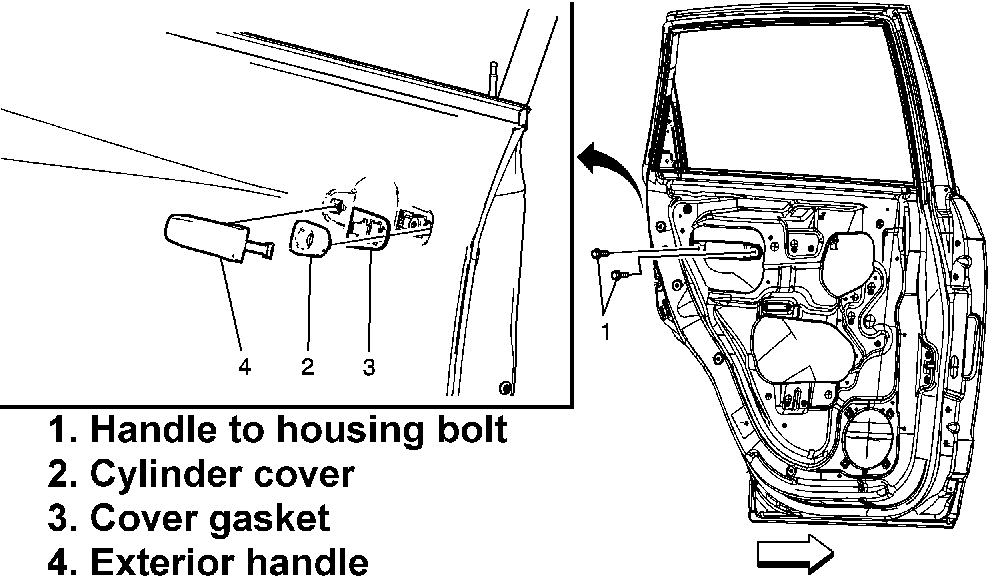
Remove rear door exterior handle to
housing bolts, Fig. 2. It is not required to
remove rear door exterior handle housing from door to replace handle. |
| 3. |
Remove rear door exterior handle cylinder
cover. |
| 4. |
Remove rear door exterior handle cover
gasket. |
| 5. |
Pull exterior handle rearward to release
it from interior handle housing. |
| 6. |
Remove rear door exterior handle. |
| 7. |
Reverse procedure to install. Torque
rear door exterior handle to housing bolts to 89 inch lbs. |
|
Interior
| 1. |
Remove door trim panel as outlined
under "Door Trim Panel." |
| 2. |
Remove door upper speaker screws. |
| 3. |
Disconnect speaker electrical connectors. |
| 4. |
Remove radio door upper speaker. |
| 5. |
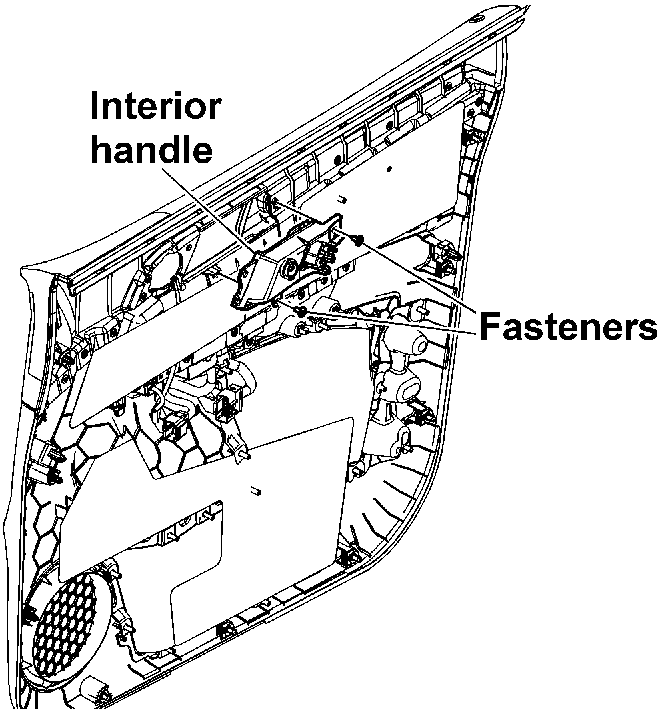
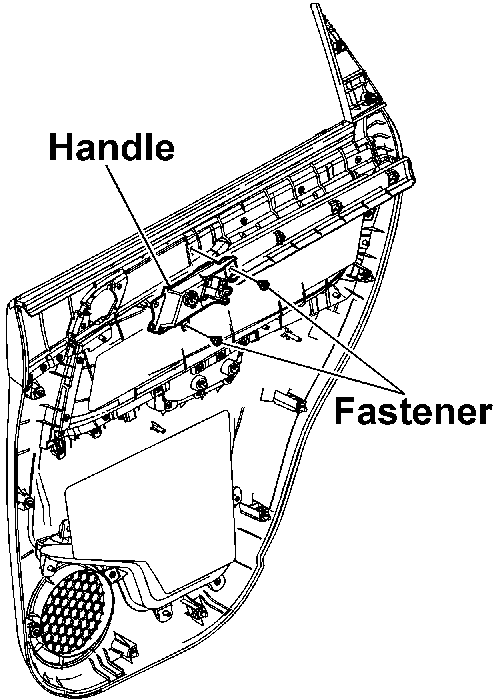
Remove door interior handle fasteners,
Figs. 3 and 4. |
| 6. |
Remove door interior handle assembly. |
| 7. |
Reverse procedure to install. |
|

Fig.
1 Front exterior door handle replacement. Captiva Sport

Fig.
2 Rear door exterior handle replacement. Captiva Sport

Fig.
3 Front door interior handle replacement. Captiva Sport

Fig.
4 Rear door interior handle replacement. Captiva Sport
Replacing the door handles on a Chevrolet Captiva model year (from 2006 to 2018) involves a systematic process outlined in the service and repair manual. For front exterior door handle replacement, start by gathering the necessary tools such as a screwdriver, trim panel removal tool, and the replacement handle. Remove the inner door panel carefully, disconnecting any wiring harnesses and rods connected to the old handle. Unbolt the old handle from the door frame and install the new handle in its place, securing it with screws. Reconnect the wiring and rods, then reassemble the inner door panel, ensuring all clips and screws are properly aligned and secured.
For rear exterior door handle replacement, follow a similar procedure tailored to the specific design of the rear handle. Adjust the steps accordingly to access and replace the rear handle securely. Similarly, for front and rear interior door handle replacement, gather the required tools and carefully remove the inner door panel. Unbolt the old handle, install the new one, reconnect any wiring or rods, and reassemble the door panel.
Always refer to the detailed instructions provided in the service and repair manual for accurate guidance and safety precautions during door handle replacements. Following the manual ensures that the replacement process is done correctly, minimizing the risk of damage to the vehicle's interior components. If unsure or uncomfortable with the procedure, seeking assistance from a professional mechanic is recommended to ensure the proper installation and functionality of the new door handles in 2014 Chevrolet Captiva.
1.
Remove door trim panel as outlined
under "Door Trim Panel."
2.
Remove door water deflector.
3.
...


 Interior Panels
 Door Latch