Chevrolet Captiva Owners Manual: Wiper Blade Replacement
Windshield wiper blades should be inspected for wear and cracking.
See Maintenance Schedule on page 11-2.
Replacement blades come in different types and are removed in different ways. For proper type and length, see Maintenance Replacement Parts on page 11-13.
Caution
Allowing the wiper arm to touch the windshield when no wiper blade is installed could damage the windshield. Any damage that occurs would not be covered by your warranty. Do not allow the wiper arm to touch the windshield.
Front Wiper Blade Replacement
To replace the windshield wiper blade:
- Lift the wiper arm away from the windshield.

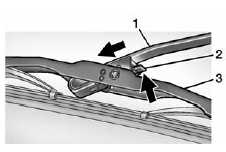
- Push the release lever (2) to disengage the hook and push the wiper arm (1) out of the blade assembly (3).
- Push the new blade assembly securely on the wiper arm until the release lever clicks into place.
- Lower the wiper arm.
Rear Wiper Blade Replacement
To replace the rear wiper blade:

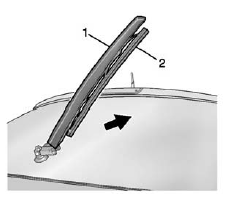
- Lift the rear wiper arm (1) from the window.
- Turn the bottom edge of the blade assembly (2) slightly away from the underside of the wiper arm.
- Apply downward pressure to the blade assembly and remove from the wiper arm.
- Install the new wiper blade.
- Return the wiper arm and blade assembly to the rest position on the window.
Replacing the wiper blades on your Chevrolet Captiva (C100/C140) is a straightforward process that can be done at home with minimal tools and effort. Start by parking the vehicle on a level surface and turning off the ignition. Lift the wiper arms away from the windshield until they lock in a vertical position, making it easier to access the blades. Next, carefully remove the old wiper blades by following the manufacturer's instructions or consulting the owner's manual for specific guidance.
When selecting replacement wiper blades, ensure they are compatible with your Captiva model year from 2006 to 2018. You can find this information in the owner's manual or by consulting an automotive parts store. Once you have the correct blades, align them with the wiper arms according to the manufacturer's guidelines and securely attach them. Lower the wiper arms back onto the windshield, ensuring the blades are properly seated and in contact with the glass.
After installing the new wiper blades, test them to ensure they operate smoothly and clear the windshield effectively. Turn on the ignition and activate the wipers to observe their performance. Check for any streaking, skipping, or uneven movement, as these could indicate improper installation or a need for further adjustment. Regularly inspecting and replacing worn wiper blades is essential for maintaining clear visibility and safe driving conditions, especially during rainy or snowy weather.
 Ignition Transmission Lock Check, Park Brake and P (Park) Mechanism Check
Ignition Transmission Lock Check
If equipped with a key type ignition,
while parked and with the parking
brake set, try to turn the ignition to
LOCK/OFF in each shift lever
position.
The igni ...
 Headlamp Aiming
Headlamp aim has been preset and
should need no further adjustment.
If the vehicle is damaged in a crash,
the headlamp aim may be affected.
If adjustment to the headlamps is
necessary, see yo ...
More about:
Chevrolet Captiva Service & Repair Manual > Steering & Suspension: Suspension Strut Cartridge R&R
Front
Disassembly
Caution: Do not allow absorber
rod to rotate during disassembly/assembly. Use hand tools to keep absorber
rod from rotating. If air tools are used, and rod is allowed to rotate,
damage to absorber may occur.
Caution: Do not handle top
mount ass ...
Chevrolet Captiva Owners Manual
- Introduction
- In Brief
- Keys, Doors, and Windows
- Seats and Restraints
- Storage
- Instruments and Controls
- Lighting
- Infotainment System
- Climate Controls
- Driving and Operating
- Vehicle Care
- Service and Maintenance
- Technical Data
- OnStar
