Chevrolet Captiva Service & Repair Manual: Cooling System Pressure, Test
| Caution: To avoid danger of
being burned, do not remove radiator cap while engine and radiator are still
hot, as fluid and steam can be blown out under pressure. |
| If radiator cap has contamination,
rinse it with water. |
| Before with a radiator pressure
tester, wet relief valve and pressure valve with engine coolant or water. |
| When performing pressure tests,
keep tester at an angle of over 30° above horizontal. |
| Refer to published specifications
to determine proper cooling system operating pressures. |
| 2. |
Attach cap to radiator pressure tester. |
| 3. |
Slowly pump tester and verify that
air is coming from vacuum valve. Push pump at constant speed. |
| 4. |
Pump tester quickly, about a one second
push, and measure relief valve opening pressure. Compare opening
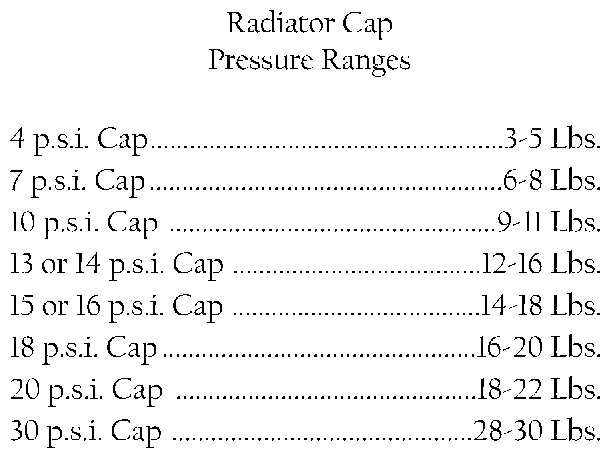
pressure to pressure listed on cap. Refer to Fig. 1
for cooling system pressure range chart. |
| 5. |
Remove pressure tester from cap. |
| 6. |
Fill radiator and overflow to proper
level with coolant. |
| 7. |
Inspect overflow tube and overflow
bottle for dents, kinks, or internal obstructions. |
| 8. |
Wipe out inside of filler neck. Inspect
lower inside sealing seat of filler neck for nicks, dirt and solder
bumps. |
| 9. |
Inspect cams on outside of filler neck.
If cams are bent down or up, seating of pressure cap valve and tester
seal will be affected. If cams are damaged, have filler neck replaced
by a reputable radiator repair service facility. |
| 10. |
Attach a radiator pressure tester and
rotate tester head until locking ears contact stops on radiator. |
| 11. |
Operate pump until indicator on gauge
reaches just beyond color band for recommended pressure for vehicle,
Fig. 1. |
| 12. |
Verify that pressure does not drop.
If pressure drops, inspect hoses, radiator or water pump for leaks.
If no external leaks are found and pressure drops, inspect heater
core, cylinder block and head. |
| 13. |
Remove tester and install radiator
cap. |
|

Fig.
1 Cooling system pressure chart
Conducting a cooling system pressure test on a Chevrolet Captiva (1st gen) 2006-2018 is a crucial diagnostic procedure to identify potential leaks and ensure the integrity of the vehicle's cooling system. This test involves using a specialized pressure tester to pressurize the cooling system to its operating pressure, allowing technicians to detect any drops in pressure that may indicate leaks. By identifying issues such as leaking hoses, a faulty radiator, or a compromised head gasket, a pressure test can prevent more severe engine problems caused by overheating or coolant loss.
The process begins with the engine cooled down to avoid the risk of burns from hot coolant. The radiator cap is removed, and the pressure tester is attached in its place. The system is then pressurized to the manufacturer's specified level, typically around 15-20 psi for most vehicles. Technicians monitor the pressure gauge for any drops, indicating a leak. Additionally, they inspect the cooling system components visually for signs of coolant escaping, such as wet spots or drips around hoses, the radiator, water pump, and engine block.
Performing a cooling system pressure test regularly, especially when there are signs of coolant loss or overheating, is vital for maintaining the health of the Chevrolet Captiva's engine. Early detection of leaks can prevent costly repairs and extend the lifespan of the vehicle. Ensuring the cooling system operates correctly protects the engine from overheating, maintains optimal performance, and provides peace of mind for the driver.
A visual inspection must always
be performed to confirm the presence of aftermarket components, potential
collision damage, or areas of concern.
Always clean all external c ...
1.
Drain engine coolant into suitable
container.
2.
Remove coolant expansion tank inlet
hose from expansion tank.
...
More about:
Chevrolet Captiva Owners Manual > OnStar: OnStar Overview
If equipped, this
vehicle has a
comprehensive, in-vehicle system that can connect to a live Advisor
for Emergency, Security, Navigation, Connection, and Diagnostic Services.
The OnStar system status light is
next to the OnStar buttons. If the
status light is:
Solid Green: System is rea ...

 Cooling System Leak, Inspection
 Engine Coolant Expansion Tank, Replace