Chevrolet Captiva Owners Manual: Jump Starting
For more information about the vehicle battery, see Battery on page 10-23.
If the vehicle battery has run down, you may want to use another vehicle and some jumper cables to start your vehicle. Be sure to use the following steps to do it safely.
Warning
Batteries can hurt you. They can be dangerous because:
- They contain acid that can burn you.
- They contain gas that can explode or ignite.
- They contain enough electricity to burn you.
If you do not follow these steps exactly, some or all of these things can hurt you.
Caution
Ignoring these steps could result in costly damage to the vehicle that would not be covered by the vehicle warranty. Trying to start the vehicle by pushing or pulling it will not work, and it could damage the vehicle.
- Check the other vehicle. It must have a 12-volt battery with a negative ground system.
Caution
If the other vehicle does not have a 12-volt system with a negative ground, both vehicles can be damaged. Only use a vehicle that has a 12-volt system with a negative ground for jump starting.
- Get the vehicles close enough
so the jumper cables can reach,
but be sure the vehicles are not
touching each other. If they are,
it could cause a ground
connection you do not want. You
would not be able to start your
vehicle, and the bad grounding
could damage the electrical
systems.
To avoid the possibility of the vehicles rolling, set the parking brake firmly on both vehicles involved in the jump start procedure. Put the transmission in P (Park) before setting the parking brake.
Caution
If any accessories are left on or plugged in during the jump starting procedure, they could be damaged. The repairs would not be covered by the vehicle warranty. Whenever possible, turn off or unplug all accessories on either vehicle when jump starting.
- Turn off the ignition on both vehicles. Unplug unnecessary accessories plugged into the cigarette lighter or the accessory power outlet. Turn off the radio and all lamps that are not needed. This will avoid sparks, helping save both batteries and the radio.
- Open the hood on the other
vehicle and locate the
positive (+) and negative (−)
terminal locations on that
vehicle.
Open the hood on your vehicle and find the remote positive (+) and remote negative (−) jump starting terminals.

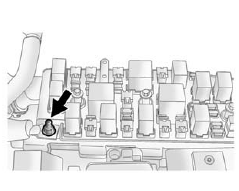
Your vehicle is equipped with a remote positive (+) terminal. This is located in the engine compartment on the driver side of the vehicle, on the underhood fuse block. See Engine Compartment Overview on page 10-4 for more information on location.
To uncover the remote positive (+) terminal, press the tab on the bottom of the fuse block and lift the cover up.

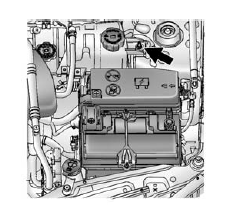
Your vehicle is equipped with a remote negative (−) terminal.
This is a stud next to the engine coolant surge tank, located at the back of the engine compartment on the driver side of the vehicle. See Engine Compartment Overview on page 10-4 for more information on location.
Warning
An electric fan can start up even when the engine is not running and can injure you. Keep hands, clothing and tools away from any underhood electric fan.
Warning
- Using an open flame near a
battery can cause battery gas to
explode. People have been hurt
doing this, and some have been
blinded. Use a flashlight if you
need more light.
Be sure the battery has enough water. You do not need to add water to the battery installed in your new vehicle. But if a battery has filler caps, be sure the right amount of fluid is there. If it is low, add water to take care of that first. If you do not, explosive gas could be present.
Battery fluid contains acid that can burn you. Do not get it on you. If you accidentally get it in your eyes or on your skin, flush the place with water and get medical help immediately.
- Fans or other moving engine parts can injure you badly. Keep your hands away from moving parts once the engine is running.
- Check that the jumper cables do
not have loose or missing
insulation. If they do, you could
get a shock. The vehicles could
also be damaged.
Before you connect the cables, here are some basic things you should know. Positive (+) will go to positive (+) or to a remote positive (+) terminal if the vehicle has one. Negative (−) will go to a heavy, unpainted metal engine part or to a remote negative (−) terminal if the vehicle has one.
Do not connect positive (+) to negative (−) or you will get a short that would damage the battery and maybe other parts.
Do not connect the negative (−) cable to the negative (−) terminal on the dead battery because this can cause sparks.
- Connect the red positive (+) cable to the positive (+) terminal on the vehicle with the dead battery. Use a remote positive (+) terminal if the vehicle has one.
- Do not let the other end touch metal. Connect it to the positive (+) terminal of the good battery. Use a remote positive (+) terminal if the vehicle has one.
- Now connect the black
negative (−) cable to the
negative (−) terminal of the good
battery. Use a remote
negative (−) terminal if the
vehicle has one.
Do not let the other end touch anything until the next step. The other end of the negative (−) cable does not go to the dead battery. It goes to a heavy, unpainted metal engine part or to a remote negative (−) terminal on the vehicle with the dead battery.
- Connect the other end of the negative (−) cable away from the dead battery, but not near engine parts that move. The electrical connection is just as good there, and the chance of sparks getting back to the battery is much less.
- Now start the vehicle with the good battery and run the engine for a while.
- Press the unlock symbol on the remote keyless entry transmitter to disarm your security system, if equipped.
- Try to start the vehicle that had the dead battery. If it will not start after a few tries, it probably needs service.
Caution
If the jumper cables are connected or removed in the wrong order, electrical shorting may occur and damage the vehicle. The repairs would not be covered by the vehicle warranty.
Always connect and remove the jumper cables in the correct order, making sure that the cables do not touch each other or other metal.
Jumper Cable Removal
Reverse the sequence exactly when removing the jumper cables.
2018 Chevrolet Captiva Owners Manual provides detailed instructions for jump-starting the vehicle, an essential procedure in case of a dead battery. Firstly, the manual emphasizes safety precautions, such as ensuring both vehicles are in Park or Neutral and turning off all electrical accessories. It also advises against contact between jumper cables and moving engine parts to prevent accidents.
After the jumper cables are securely connected, the manual advises starting the engine of the donor vehicle and letting it run for a few minutes. This allows the Captiva's battery to receive a charge from the donor vehicle. Once sufficient time has passed, owners can attempt to start the engine of the Captiva. If successful, both vehicles should be allowed to run for a few more minutes to ensure the battery receives a full charge.
Once the Captiva is running, the manual provides guidance on safely disconnecting the jumper cables. It recommends removing the cables in the reverse order of connection: negative from the Captiva, negative from the donor vehicle, positive from the donor vehicle, and finally positive from the Captiva. Following this sequence minimizes the risk of electrical arcing or damage during cable removal.
Manual suggests performing post-jump start procedures, such as checking the battery and charging system to ensure everything is functioning correctly. It may also recommend driving the vehicle for a certain period to allow the battery to recharge fully. These post-jump start steps help owners verify the success of the jump start and ensure the vehicle is ready for continued use.
 Towing the Vehicle
Caution
Incorrectly towing a disabled
vehicle may cause damage. The
damage would not be covered by
the vehicle warranty. Do not lash
or hook to the chassis
components — including the front
an ...
More about:
Chevrolet Captiva Owners Manual > Infotainment System: Phone
Bluetooth
For vehicles equipped with
Bluetooth capability, the system can
interact with many cell phones,
allowing:
Placement and receipt of calls in
a hands-free mode.
Sharing of the cell phone’s
address book or contact list with
the vehicle.
To minimize driver distraction,
be ...
Chevrolet Captiva Owners Manual
- Introduction
- In Brief
- Keys, Doors, and Windows
- Seats and Restraints
- Storage
- Instruments and Controls
- Lighting
- Infotainment System
- Climate Controls
- Driving and Operating
- Vehicle Care
- Service and Maintenance
- Technical Data
- OnStar
