Chevrolet Captiva Service & Repair Manual: Air Conditioning Compressor R&R
| Tighten air conditioning compressor
mounting fasteners in sequence. |
| Refer to Fig. 1
for A/C compressor service. |
| 1. |
Recover air conditioning system refrigerant. |
| 3. |
Raise and support vehicle. |
| 4. |
Disconnect air conditioning compressor
connector. |
| 5. |
Remove air conditioning compressor
hose from compressor. |
| 6. |
Remove air conditioning compressor
nut. |
| 7. |
Remove air conditioning compressor
stud. |
| 8. |
Remove air conditioning compressor
bolt. |
| 9. |
Remove air conditioning compressor
assembly. |
| 10. |
Remove and discard sealing washers
and replace with NEW sealing washers. |
| 11. |
When replacing air conditioning compressor,
balance compressor oil. |
| 12. |
Reverse procedure to install, noting
following: |
| |
a. |
Torque air conditioning compressor
nut to 16 ft. lbs. |
| |
b. |
Torque air conditioning compressor
stud to 80 inch lbs. |
| |
c. |
Torque air conditioning compressor
bolt to 16 ft. lbs. |
|
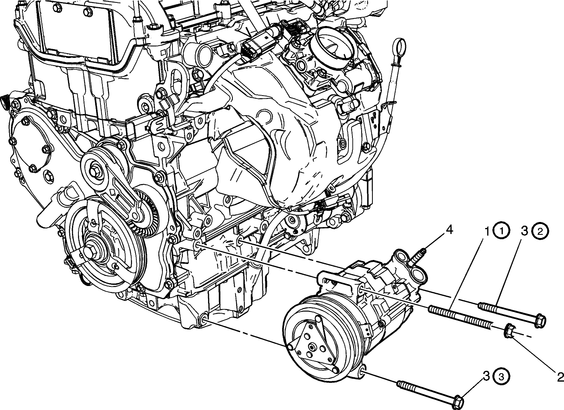
Fig.
1
Firstly, ensure that the vehicle is parked on a flat and stable surface, and engage the parking brake. Turn off the engine and remove the keys from the ignition to ensure safety during the procedure. Locate the air conditioning compressor in the engine compartment. It is typically located at the front of the engine and is connected to the engine's crankshaft via a belt. The compressor is identifiable by its pulley and the refrigerant lines attached to it.
Before starting the removal process in your 2018 Chevrolet Captiva, it is essential to disconnect the negative terminal of the battery. This step is crucial to prevent any electrical mishaps or accidents during the removal and installation process. If the refrigerant has not been evacuated from the system, it is necessary to have a certified technician properly recover and recycle the refrigerant following environmental regulations. Never release refrigerant into the atmosphere as it is harmful to the environment.
Once the refrigerant has been properly drained, you can proceed with removing the air conditioning compressor. Begin by using an appropriate wrench or socket to release tension on the drive belt connected to the compressor. Carefully slide the belt off the compressor pulley. Next, disconnect any electrical connectors attached to the compressor. This includes the compressor clutch connector and any sensors that may be present. Take note of the connector locations for reinstallation later.
Install the new air conditioning compressor by following the reverse procedure of removal. Start by positioning the compressor in its mounting location and securing it with the appropriate bolts. Tighten the bolts to the manufacturer's specifications. Reconnect the refrigerant lines to the compressor, ensuring a proper seal and using new O-rings if necessary. Connect the electrical connectors back to the compressor, including the compressor clutch connector and any sensors.
Slide the drive belt back onto the compressor pulley and adjust the tension as per the manufacturer's recommendations. Ensure that the belt is properly aligned on all pulleys. After completing the installation, take the vehicle to a qualified technician to recharge the air conditioning system with the proper amount of refrigerant and lubricant. They will also perform a leak test and verify the system's functionality.
It's important to follow safety protocols throughout the process and consider seeking professional assistance if you're unfamiliar with automotive air conditioning systems or refrigerant handling. Additionally, always refer to Chevrolet Captiva First generation (C100/C140) service manual for specific instructions and precautions.
The ACR 2000 air conditioning
service center tool No. J 43600, or equivalent, recovers, recycles, evacuates
and recharges A/C refrigerant quickly, accurately and automatically. The
...
More about:
Chevrolet Captiva Owners Manual > Vehicle Checks: Engine Air Cleaner/Filter
See Engine Compartment Overview
on page 10-4 for the location of the
engine air cleaner/filter.
When to Inspect the Engine Air
Cleaner/Filter
Inspect and replace the air cleaner/
filter at the scheduled maintenance
intervals. See the Maintenance
Schedule on page 11-2. If driving in
dusty/di ...

 Air Conditioning Refrigerant Recover