Chevrolet Captiva Service & Repair Manual: Refrigerant Line O-Ring, Replace
| Caution: Air conditioning R-134a
liquid refrigerant is capable of harming eyes or freezing skin. Always wear
safety goggles and avoid contact with liquid refrigerant. Failure to follow
these instructions may result in serious personal injury. |
| Caution: Air conditioning R-134a
refrigerant gas is capable of displacing the air required for breathing
in a confined space and can produce toxic gasses if burned at high temperatures.
Do not release a large quantity of R-134a gas within a confined space or
allow it to be exposed to a high temperature flame (such as a torch). Consult
the Material Safety Data Sheet for further information. Failure to follow
these instructions may result in serious personal injury or death. |
| Caution: Use extreme care and
observe all safety and service precautions related to the use of refrigerants
as outlined on refrigerant tank and on recovery and charging equipment.
Failure to follow these instructions may result in serious personal injury. |
| Any time air conditioning components
are removed the O-rings need to be replaced. |
| Do not reuse air conditioning
O-ring seals. |
Removal
| 1. |
Disassemble A/C refrigerant components,
as required. |
| 2. |
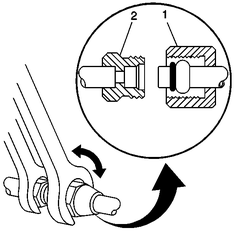
For compression style fittings, use
a back-up wrench on fitting (2) and loosen fitting nut (1), Fig.
1. |
| 3. |
For banjo style fittings, remove bolt
retaining banjo type fitting. |
| 4. |
Remove O-ring seal from A/C refrigerant
component. |
| 5. |
Inspect O-ring seal for signs of damage.
Inspect A/C refrigerant components for damage or burrs. |
| 6. |
Cap or tape A/C refrigerant components
immediately to prevent system contamination. |
|
Installation
| Do not allow any of the refrigerant
oil on new O-ring seal to enter refrigerant system. |
| Do not reuse O-ring seals. |
| 1. |
Inspect new O-ring seal for any sign
of cracks, cuts, or damage. |
| 2. |
Remove cap or tape from A/C refrigerant
components. |
| 3. |
Carefully clean sealing surfaces of
A/C refrigerant components with a lint free clean, dry cloth. |
| 4. |
Lightly coat new O-ring seal with refrigerant
oil. |
| 5. |
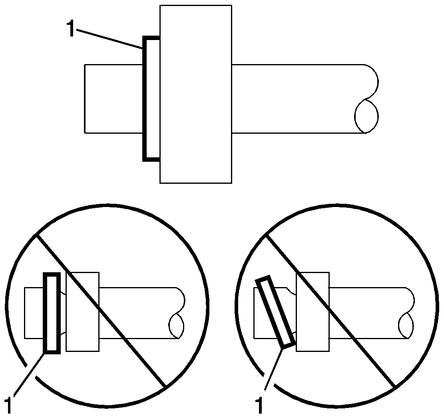
Carefully slide new O-ring seal (1)
onto A/C refrigerant component, Fig. 2. O-ring
seal must be fully seated. |
| 6. |
Assemble A/C components, as required. |
|

Fig.
1 Compression fitting nut removal

Fig.
2 A/C refrigerant component O-ring seal installation
When it comes to servicing the refrigerant line O-ring in a Chevrolet Captiva (C100/C140), attention to detail and precision are crucial. Begin by identifying the location of the O-ring, usually found at connection points in the refrigerant lines. Prioritize safety by turning off the engine, wearing protective gear, and working in a well-ventilated area.
To replace the O-ring, carefully remove the old one using suitable tools and ensure the mating surfaces and O-ring groove are meticulously cleaned. Applying a compatible lubricant to the new O-ring aids in installation and promotes a secure seal. Take care to position the O-ring correctly without any twists or damage to the mating surfaces during reassembly.
Once the new O-ring is in place, perform a leak check to verify the integrity of the refrigerant system. This involves inspecting for any signs of leaks around the O-ring or other connections. Finally, recharge the system as needed according to manufacturer specifications. Following these steps diligently ensures optimal performance and safety of the refrigerant system in your Chevrolet Captiva.
Caution: Air conditioning R-134a
liquid refrigerant is capable of harming eyes or freezing skin. Always wear
safety goggles and avoid contact with liquid refrigerant. Failure to follow ...


 Refrigerant Filter, Replace
