Chevrolet Captiva Service & Repair Manual: Rear Frame Rail
| Do not damage any inner panels
or reinforcements. |
| If the location of the original
plug weld holes can not be determined, space the plug weld holes every 1
1/2 inches apart. Some panels may have structural weld thru adhesive. It
is required to replace the weld thru adhesive with an additional spot weld
between each factory spot weld. |
Complete
Removal
| 2. |
Disconnect battery ground. |
| 3. |
Remove all related panels and components. |
| 4. |
Repair as much damage as possible to
factory specifications. |
| 5. |
Remove sealers and corrosion protection
materials from repair area. |
| 6. |
Locate and drill out all factory welds.
Note number and location of welds for installation of rear frame
rail. |
| 7. |
Remove damaged rear frame rail. |
|
Installation
| 1. |
Drill 5/16 inch holes for plug weld
as required on service component, in locations noted from original
assembly. |
| 2. |
Prepare all mating surfaces as required. |
| 3. |
Apply 3M® Weld Thru Coating P/N 05916,
or equivalent, to all mating surfaces. |
| 4. |
Position new component to vehicle using
three dimensional measuring equipment and clamp into place. |
| 5. |
Plug weld accordingly. |
| 6. |
Clean and prepare all welded surfaces. |
| 7. |
Apply sealers and corrosion protection
materials to repair area, as required. |
| 8. |
Refinish repaired area. |
| 9. |
Install all related panels and components. |
| 10. |
Connect battery ground. |
|
Section
Removal
| 2. |
Disconnect battery ground. |
| 3. |
Remove all related panels and components. |
| 4. |
Repair as much damage as possible to
factory specifications. |
| 5. |
Remove sealers and corrosion protection
materials from repair area. |
| 6. |
Locate and drill out all factory welds
in rear spring seat and No. 5 bar extension. Note number and location
of welds for installation of components. |
| 7. |
Locate and drill out all factory welds
in rear rail section. Note number and location of welds for installation
of rear rail section, Fig. 1. |
| 8. |
Remove damaged rear rail section,
Fig. 2. |
|
Installation
| 1. |
Drill 5/16 inch holes for plug weld
as required on service component, in locations noted from original
assembly, Fig. 3. |
| 2. |
Prepare all mating surfaces as required. |
| 3. |
Apply 3M® Weld Thru Coating P/N 05916,
or equivalent, to all mating surfaces. |
| 4. |
Position new component to vehicle using
three dimensional measuring equipment and clamp into place, Fig.
4. |
| 5. |
Plug weld accordingly, Fig.
5. |
| 6. |
Position rear spring seat and No. 5
bar extension to vehicle using three dimensional measuring equipment.
Clamp components into place. |
| 7. |
Plug weld accordingly. |
| 8. |
Clean and prepare all welded surfaces. |
| 9. |
Apply sealers and corrosion protection
materials to repair area, as required. |
| 10. |
Refinish repaired area. |
| 11. |
Install all related panels and components. |
| 12. |
Connect battery ground. |
|
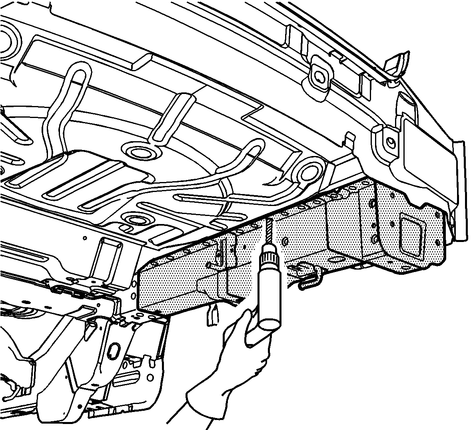
Fig.
1 Rear rail section weld locations
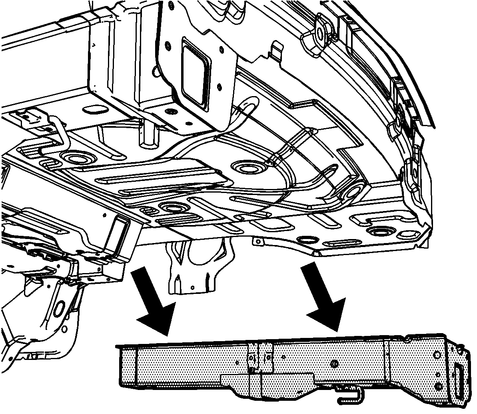
Fig.
2 Rear rail section removal
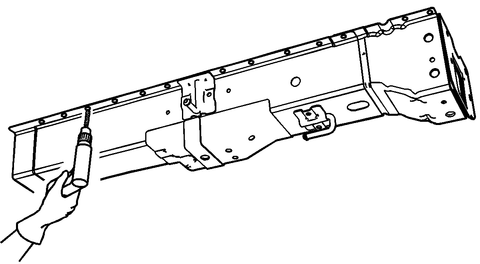
Fig.
3 Rear rail section preparation
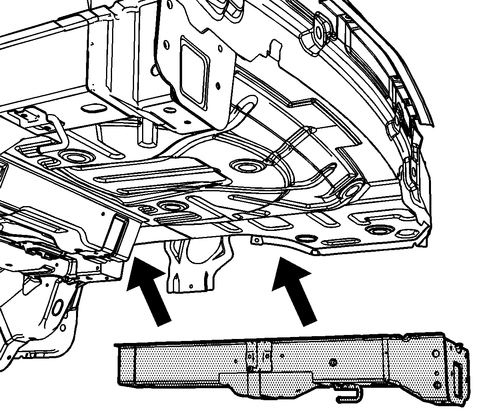
Fig.
4 Rear rail section installation

Fig.
5 Rear rail section plug weld locations
Servicing the rear frame rail on a Chevrolet Captiva First generation (C100/C140) typically involves addressing issues related to structural integrity, damage, or corrosion. Begin by ensuring the vehicle is safely supported on a lift or jack stands, and all necessary safety precautions are taken.
To access the rear frame rail, you may need to remove components such as the rear bumper, exhaust system, and any other parts obstructing access. This process varies depending on the specific model year and configuration of the Captiva.
Once access is gained, inspect the rear frame rail for any signs of damage, rust, or structural issues. If damage is localized, you may be able to repair it using welding techniques and reinforcing materials. However, severe damage or extensive corrosion may require replacing the entire rear frame rail assembly.
To remove the rear frame rail, disconnect any electrical connectors, brake lines, and other components attached to it. Unbolt the frame rail from the vehicle's chassis and carefully maneuver it out of position. Take note of the orientation and placement of any mounting brackets or reinforcement plates for accurate reinstallation.
When installing a new rear frame rail, ensure it is aligned correctly with the vehicle's chassis and all mounting points. Use new bolts and hardware as needed, and torque them to the manufacturer's specifications. Reconnect any disconnected components, and perform a thorough inspection to verify proper fitment and structural integrity before reassembling the remaining parts of the vehicle.
Do not damage any inner panels
or reinforcements.
If the location of the original
plug weld holes can not be determined, space the plug weld holes every 1
1/2 inches ap ...
Removal
1.
Open body side doors on side that lower
rocker moldings will be serviced from.
2.
Remove four rocker molding screws,
Fig ...
 Rear Floor
 Rocker Molding