Chevrolet Captiva Service & Repair Manual: Tie Rod R&R
Inner
Removal
| Caution: Do not change steering
gear preload adjustment before moving inner tie rod from steering gear.
Changing steering gear preload adjustment before moving inner tie rod could
result in damage to pinion and steering gear. |
| Caution: Pipe wrench must be
placed at valve end of steering gear and positioned up against inner tie
rod housing. Placing pipe wrench in any other location will cause damage
to steering gear. |
| 1. |
Raise and support vehicle. |
| 2. |
Remove steering gear boot. |
| 3. |
Bend tabs in order to release steering
linkage inner tie rod retaining washer (1), Fig. 1. |
| 4. |
Place a pipe wrench on steering gear
rack next to steering linkage inner tie rod housing. |
| 5. |
Place a wrench on flats of steering
linkage inner tie rod housing (2), Fig. 1. |
| 6. |
Rotate steering linkage inner tie rod
housing counterclockwise while holding steering gear rack stationary
until steering linkage inner tie rod separates from steering gear
rack. |
| 7. |
Remove steering linkage inner tie rod
retaining washer. Discard washer. |
|
Installation
| 1. |
Position NEW steering linkage inner
tie rod retaining washer on steering gear rack. |
| 2. |
Install steering linkage inner tie
rod to steering gear rack. |
| 3. |
Place a pipe wrench on steering gear
rack next to steering linkage inner tie rod housing. |
| 4. |
Place a torque wrench with a crows
foot wrench attachment on flats of steering linkage inner tie rod
housing and torque to 65 ft. lbs. |
| 5. |
Bend tabs over on steering linkage
inner tie rod retaining washer in order to secure inner tie rod. |
| 6. |
Install steering gear boot. |
| 7. |
Measure and adjust front toe. |
|
Outer
| Caution: Do not free ball stud
by using a pickle fork or a wedge-type tool. Damage to seal or bushing may
result. |
| Do NOT tighten steering linkage
inner tie rod nut during installation. Tighten nut after adjusting front
toe. |
| 1. |
Remove front tire and wheel assembly. |
| 2. |
Loosen steering linkage outer tie rod
nut, Fig. 2. |
| 3. |
Place match marks on steering linkage
inner tie rod nut and steering linkage inner tie rod. |
| 4. |
Loosen steering linkage inner tie rod
nut, Fig. 2. |
| 5. |
Separate steering linkage outer tie
rod from steering knuckle, using puller tool No. CH-24319-B, or
equivalent, Fig. 2. |
| 6. |
Clean tapered surface of steering knuckle. |
| 7. |
Inspect steering linkage inner tie
rod for bent or damaged threads. Replace steering linkage inner
tie rod, as required. |
| 8. |
Measure and adjust front toe. |
| 9. |
Reverse procedure to install, noting
following: |
| |
a. |
To seat steering linkage inner tie
rod in steering knuckle, install installer tool No. J-44015, or
equivalent and torque to 30 ft. lbs. |
| |
b. |
Remove installer tool No. J-44015,
or equivalent and start steering linkage outer tie rod nut. Torque
nut to 15 ft. lbs. and turn an additional 110°-130°. |
|

Fig.
1
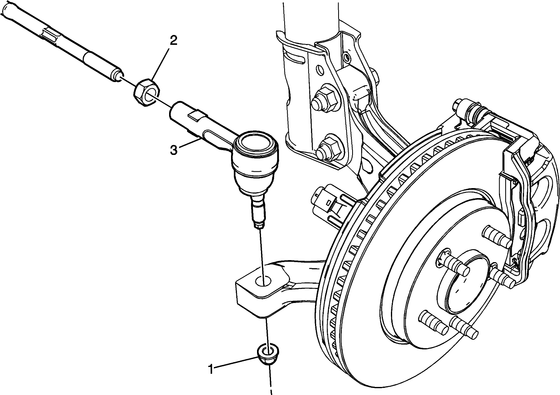
Fig.
2
The tie rod removal and replacement (R&R) process for the Chevrolet Captiva 2013 is a critical procedure in maintaining the vehicle's steering and suspension system.
To remove the inner tie rod, first, raise and support the vehicle securely. Remove the steering gear boot and bend the tabs to release the inner tie rod retaining washer. Use a pipe wrench on the steering gear rack and a regular wrench on the inner tie rod housing to rotate it counterclockwise and separate it from the steering gear rack. Discard the old retaining washer.
For the outer tie rod, start by removing the front tire and wheel assembly. Loosen the outer tie rod nut and place match marks on the inner tie rod nut. Use a puller tool to separate the outer tie rod from the steering knuckle and clean the tapered surface. Inspect the inner tie rod for any damage and replace it if necessary.
During reinstallation, position a new retaining washer, attach the inner tie rod to the steering gear rack, and use a torque wrench to secure it to 65 ft. lbs. Bend the tabs over the retaining washer to secure it and reinstall the steering gear boot. For the outer tie rod, use the installer tool to seat it in the steering knuckle, torque the nut, and adjust the front toe to ensure proper alignment.
A visual inspection must always
be performed to confirm the presence of aftermarket components, potential
collision damage, or areas of concern.
1.
Ins ...
A statically balanced wheel is
balanced in one plane, around center line of wheel. This prevents simple
up and down movement relative to center line of the wheel. A dynamically
bala ...
More about:
Chevrolet Captiva Owners Manual > Seats and Restraints: Airbag System
The vehicle has the following
airbags:
A frontal airbag for the driver.
A frontal airbag for the front
outboard passenger.
A seat-mounted side impact
airbag for the driver.
A seat-mounted side impact
airbag for the front outboard
passenger.
A roof-rail airbag for the driver
an ...
 Suspension System Inspect
 Tire & Wheel Assembly Balance