Chevrolet Captiva Service & Repair Manual: Brake Master Cylinder Reservoir R&R
Removal
| 1. |
Using a suitable tool, remove the brake
fluid from the brake master cylinder reservoir. |
| 2. |
Discard the brake fluid into an approved
container. |
| 3. |
Remove the underhood electrical center. |
| 4. |
Without draining the coolant or removing
the hoses, remove and position aside the radiator surge tank. |
| 5. |
Disconnect the master cylinder fluid
level sensor electrical connector (1), Fig. 1. |
| 6. |
Remove the master cylinder reservoir
retaining pins (2) by compressing the locking tabs. Do not reuse
the master cylinder reservoir retaining pins, Fig. 1. |
| 7. |
Discard the retaining pins. |
| 8. |
Carefully remove the master cylinder
reservoir (1) by pulling the reservoir straight up, Fig.
2. |
| 9. |
Remove the master cylinder reservoir
seals (1), Fig. 3. |
|
Installation
| 1. |
Lightly lubricate the master cylinder
reservoir seals with GM approved brake fluid from a clean, sealed
brake fluid container. |
| 2. |
Install the master cylinder reservoir
seals. |
| 3. |
Install the master cylinder reservoir
to the master cylinder. |
| 4. |
Ensure the master cylinder reservoir
bayonets are fully seated in the master cylinder. |
| 5. |
Connect the master cylinder fluid level
sensor electrical connector. |
| 6. |
Install new master cylinder reservoir
retaining pins. |
| 7. |
Ensure the retaining pins are fully
seated and the locking tabs are fully deployed. |
| 8. |
Install the radiator surge tank. |
| 9. |
Install the underhood electrical center. |
| 10. |
Fill the master cylinder reservoir
to the proper level. |
| 11. |
Observe the brake pedal feel after
filling the master cylinder reservoir. If the pedal feels spongy,
bleed the hydraulic brake system. |
|
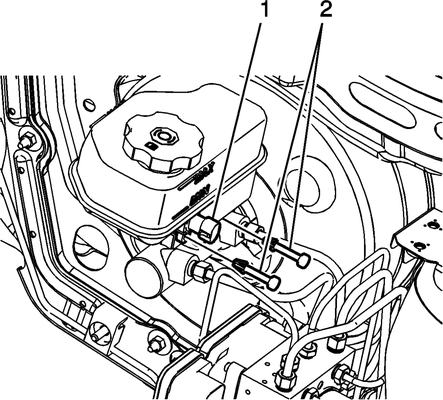
Fig.
1
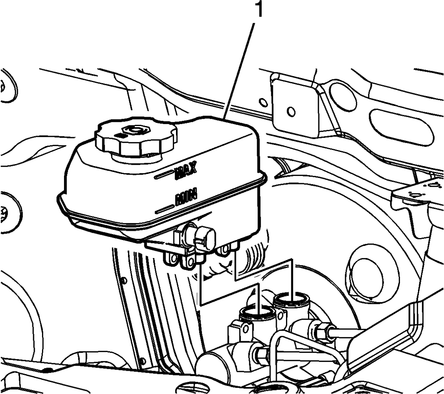
Fig.
2
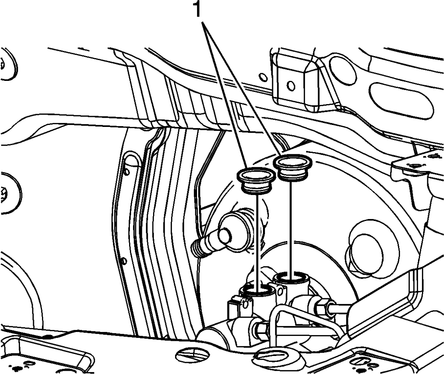
Fig.
3
To remove and install the brake master cylinder reservoir in a Chevrolet Captiva, start by ensuring the vehicle is parked on a flat surface with the engine turned off. Locate the reservoir near the firewall in the engine compartment and use appropriate tools to loosen and remove the bolts or clips securing it to the master cylinder assembly. Carefully detach any hoses or lines connected to the reservoir and lift it away from the assembly, taking note of their positions for reinstallation. Inspect the new reservoir for compatibility and damage before positioning it in place, reconnecting hoses or lines securely, and tightening the bolts or clips to the specified torque. Finally, refill the reservoir with the recommended brake fluid and bleed the brake system if needed for optimal performance and safety. Following these steps ensures a proper removal and installation of the brake master cylinder reservoir in your Chevrolet.
Removal
1.
Using a suitable tool, remove the brake
fluid from the brake master cylinder reservoir.
2.
Discard the brake fluid into an ap ...
Warning: Avoid taking the following
actions when you service wheel brake parts: Do not grind brake linings,
do not sand brake linings and do not clean wheel brake parts with a dry
b ...
More about:
Chevrolet Captiva Owners Manual > Keys, Doors, and
Windows: Windows
Warning
Never leave a child, a helpless
adult, or a pet alone in a vehicle,
especially with the windows
closed in warm or hot weather.
They can be overcome by the
extreme heat and suffer
permanent injuries or even death
from heat stroke.
Power Windows
Warning
Children could be serio ...
 Brake Master Cylinder R&R
 Brake Pads R&R