Chevrolet Captiva Service & Repair Manual: Brake Power Booster Unit Check Valve R&R
2.4L
| A small amount of denatured alcohol
may be used to ease assembly. Do not use soap. |
| 1. |
With the engine OFF, apply and release
the brake pedal several times until the brake pedal becomes firm
to deplete the power vacuum brake booster vacuum reserve. |
| 2. |
Remove the power brake booster vacuum
check valve (1) from the power vacuum brake booster, Fig.
1. |
| 3. |
Release the spring clamp and remove
the power brake booster vacuum check valve and hose assembly (1)
from the intake manifold vacuum port, Fig. 2. |
| 4. |
Reverse procedure to install. |
|
3.0L
| A small amount of denatured alcohol
may be used to ease assembly. Do not use soap. |
| 1. |
With the engine OFF, apply and release
the brake pedal several times until the brake pedal becomes firm
to deplete the power vacuum brake booster vacuum reserve. |
| 2. |
Remove the intake manifold cover. |
| 3. |
Disconnect the power brake booster
vacuum sensor electrical connector. |
| 4. |
Release the spring clamp (1) and remove
the power brake booster vacuum hose from the intake manifold vacuum
port, Fig. 3. |
| 5. |
Remove the power brake booster vacuum
sensor (2) from the power vacuum brake booster, Fig. 3. |
| 6. |
Disconnect the power brake booster
vacuum hose quick connect (3) from the power brake booster pump,
Fig. 3. |
| 7. |
Remove the power brake booster vacuum
hose and check valve assembly. |
|
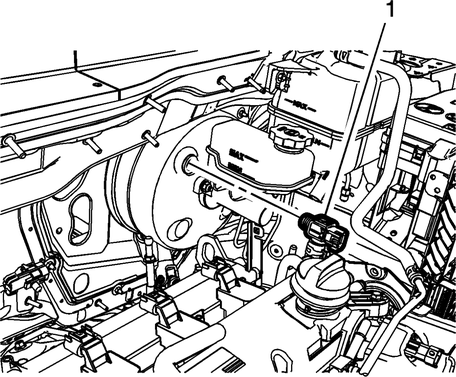
Fig.
1
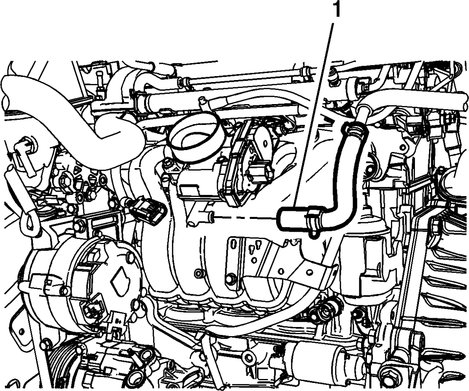
Fig.
2
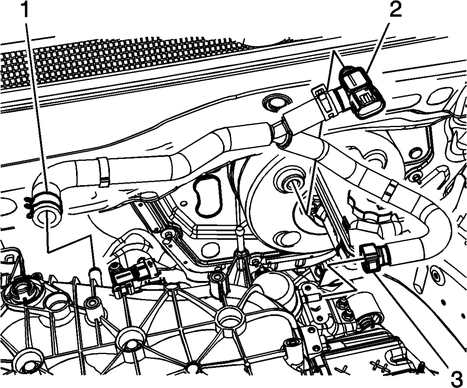
Fig.
3
When performing a Brake Power Booster Unit Check Valve R&R (Removal and Replacement) on a Chevrolet Captiva First generation, it's essential to follow the detailed instructions provided in the service and repair manual. This procedure ensures the proper functioning of the brake power booster system, which enhances braking performance and driver safety.
Locate the brake power booster unit and identify the check valve, which is typically connected to the vacuum hose between the engine and the brake booster. Inspect the check valve for any signs of damage, wear, or malfunction that may require replacement.
To remove the old check valve, carefully disconnect the vacuum hose from the check valve by loosening the hose clamp or connector. Then, use a suitable wrench or socket to loosen and remove the check valve from the brake power booster unit. Take note of the check valve's orientation and position for proper installation of the new valve.
Install the new check valve by securely attaching it to the brake power booster unit and reconnecting the vacuum hose. Ensure the hose clamp or connector is tightened to prevent air leaks.
Once the new check valve is installed, perform a visual inspection to confirm that all connections are secure and there are no loose components. Start the engine and test the brakes to ensure proper operation and responsiveness.
Finally, check for any brake system warning lights on the dashboard and address any issues promptly. Following these steps and consulting the service manual ensures a successful Brake Power Booster Unit Check Valve R&R on the Chevrolet Captiva, maintaining optimal brake performance and safety while driving.
Warning: Avoid taking the following
actions when you service wheel brake parts: Do not grind brake linings,
do not sand brake linings and do not clean wheel brake parts with a dry
b ...
Removal
Ensure the foam insulator on the
mounting surface of the power vacuum brake booster withdraws with the booster.
1.
Remove the underhood electrical ...
 Brake Pads R&R
 Brake Power Booster Unit R&R