Chevrolet Captiva Service & Repair Manual: Brake Power Booster Unit R&R
Removal
| Ensure the foam insulator on the
mounting surface of the power vacuum brake booster withdraws with the booster. |
| 1. |
Remove the underhood electrical center. |
| 2. |
Without draining the engine coolant
or removing the hoses, remove and position aside the surge tank. |
| 3. |
Disconnect the power brake booster
vacuum check valve and hose from the vacuum brake booster and position
aside. |
| 4. |
Remove the master cylinder. |
| 5. |
Remove the brake pressure modulator
valve (BPMV) assembly. |
| 6. |
Remove the driver knee bolster. |
| 7. |
Remove the power vacuum brake booster
pushrod retainer (1), Fig. 1. |
| 8. |
Disconnect the power vacuum brake booster
pushrod from the brake pedal. |
| 9. |
Remove the vacuum brake booster nuts
(1), Fig. 2. |
| 10. |
Carefully pull the power vacuum brake
booster forward until the mounting studs clear the instrument panel. |
| 11. |
Remove the vacuum brake booster (1),
Fig. 3. |
| 12. |
Inspect the power vacuum brake booster
gasket (1) for damage and replace if necessary, Fig. 4. |
|
Installation
| Ensure the foam insulator on the
mounting surface of the power vacuum brake booster is properly installed
on the booster. |
| 1. |
Install the power vacuum brake booster
gasket. |
| 2. |
While guiding the power vacuum brake
booster pushrod and mounting studs through the instrument panel,
install the power vacuum brake booster. |
| 3. |
Install the power vacuum brake booster
nuts and torque to 18 ft. lbs. |
| 4. |
Connect the power vacuum brake booster
pushrod to the brake pedal. |
| 5. |
Install the power vacuum brake booster
pushrod retainer. |
| 6. |
Rotate the power vacuum brake booster
pushrod retainer 360° to ensure it is properly installed. |
| 7. |
Install the driver knee bolster. |
| 9. |
Install the master cylinder. |
| 10. |
Connect the power vacuum brake booster
vacuum check valve and hose to the vacuum brake booster. |
| 11. |
Install the surge tank. |
| 12. |
Install the underhood electrical center. |
|
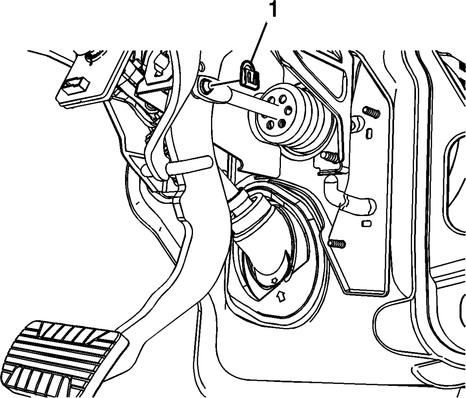
Fig.
1
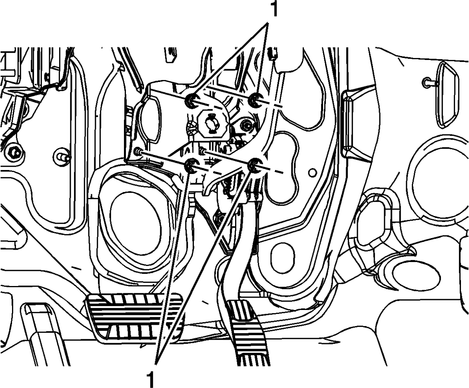
Fig.
2

Fig.
3
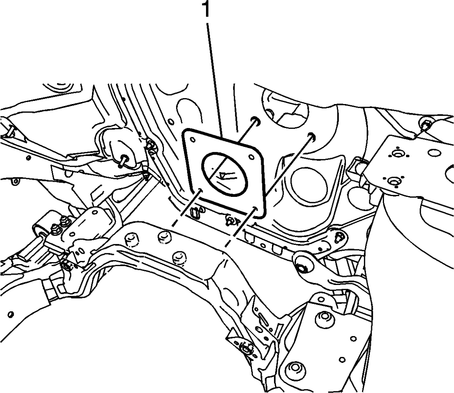
Fig.
4
The brake power booster unit in a 2014 Chevy Captiva is a crucial component that enhances the braking system's efficiency by reducing the effort required by the driver to apply the brakes. This vacuum-assisted device amplifies the force exerted on the brake pedal, ensuring that the vehicle can stop more effectively and safely. Over time, the brake power booster can wear out or develop issues such as leaks or diaphragm failures, which can lead to a hard brake pedal and reduced braking performance.
Replacing the brake power booster unit involves several detailed steps. First, the vehicle must be safely parked and the battery disconnected to prevent any electrical issues. The brake master cylinder is then carefully detached from the booster unit without disconnecting the brake lines, which requires precise handling to avoid brake fluid leakage. The booster unit is typically located against the firewall, and its removal may involve disassembling various components such as the brake pedal linkage and any obstructing parts in the engine bay. Once the old booster is removed, the new unit is installed by reversing the removal steps, ensuring all connections are secure and the system is free of leaks.
After the replacement, it is crucial to test the brake system thoroughly to confirm that the new booster is functioning correctly. This involves checking for a responsive brake pedal and ensuring there are no unusual noises or brake fluid leaks. Proper installation and testing of the brake power booster unit are essential to maintaining the vehicle's braking performance and safety. Regular maintenance and timely replacement of worn components like the brake power booster contribute significantly to the overall reliability and safety of the 2014 Chevy Captiva.
2.4L
A small amount of denatured alcohol
may be used to ease assembly. Do not use soap.
1.
With the engine OFF, apply and release
the brake pedal se ...
A small amount of denatured alcohol
may be used to ease assembly. Do not use soap.
1.
With the engine OFF, apply and release
the brake pedal several ...
 Brake Power Booster Unit Check Valve R&R
 Brake Pressure Sensor R&R