Chevrolet Captiva Service & Repair Manual: Brake Pressure Sensor R&R
| A small amount of denatured alcohol
may be used to ease assembly. Do not use soap. |
| 1. |
With the engine OFF, apply and release
the brake pedal several times until the brake pedal becomes firm
to deplete the power vacuum brake booster vacuum reserve. |
| 2. |
Remove the intake manifold cover. |
| 3. |
Remove the power brake booster vacuum
sensor (1) from the power vacuum brake booster, Fig. 1. |
| 4. |
Release the spring clamp and remove
the power brake booster vacuum sensor (1) from the power brake booster
vacuum hose, Fig. 2. |
|
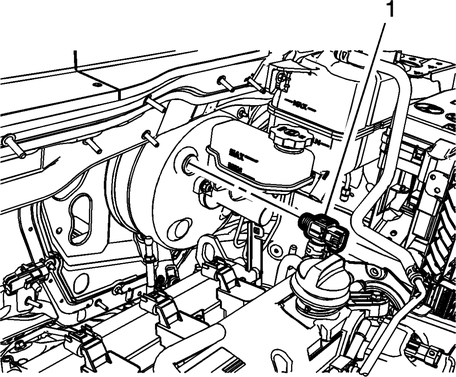
Fig.
1

Fig.
2
Replacing the brake pressure sensor in Chevrolet Captiva 2014 involves a methodical approach to ensure proper functioning of the braking system. Begin by parking the vehicle on a level surface and engaging the parking brake. Allow the engine to cool down completely before starting. Gather the necessary tools, including a socket set, wrenches, and a new brake pressure sensor.
Locate the brake pressure sensor, which is typically mounted on the brake master cylinder. Use a socket set or wrench to carefully remove the bolts securing the sensor to the master cylinder. Disconnect the electrical connector attached to the sensor. Remove the old sensor from its position, taking care not to damage any surrounding components. Install the new brake pressure sensor by connecting the electrical connector and securing it with the bolts. Ensure it is properly aligned and tightened to prevent leaks. Test the braking system to verify the sensor's functionality and address any issues before driving the vehicle. This process ensures accurate monitoring of brake pressure, contributing to overall safety and performance.
Removal
Ensure the foam insulator on the
mounting surface of the power vacuum brake booster withdraws with the booster.
1.
Remove the underhood electrical ...
Caution: Whenever brake rotor
has been separated from wheel bearing flange, clean any rust or foreign
material from mating surface of rotor and flange with a suitable hub cleaning
k ...
 Brake Power Booster Unit R&R
 Brake Rotor Deglaze