Chevrolet Captiva Service & Repair Manual: Floor Console
| 1. |
Remove front seat assembly bolts. |
| 2. |
Lift seat upward at rear of seat. |
| 3. |
Disconnect seat electrical connectors. |
| 4. |
Slide seat rearward to disengage adjuster
hooks holding seat to floor pan. |
| 6. |
Slide front floor console cup holder
to full rearward position. |
| 7. |
Remove front floor console compartment
liner. |
| 8. |
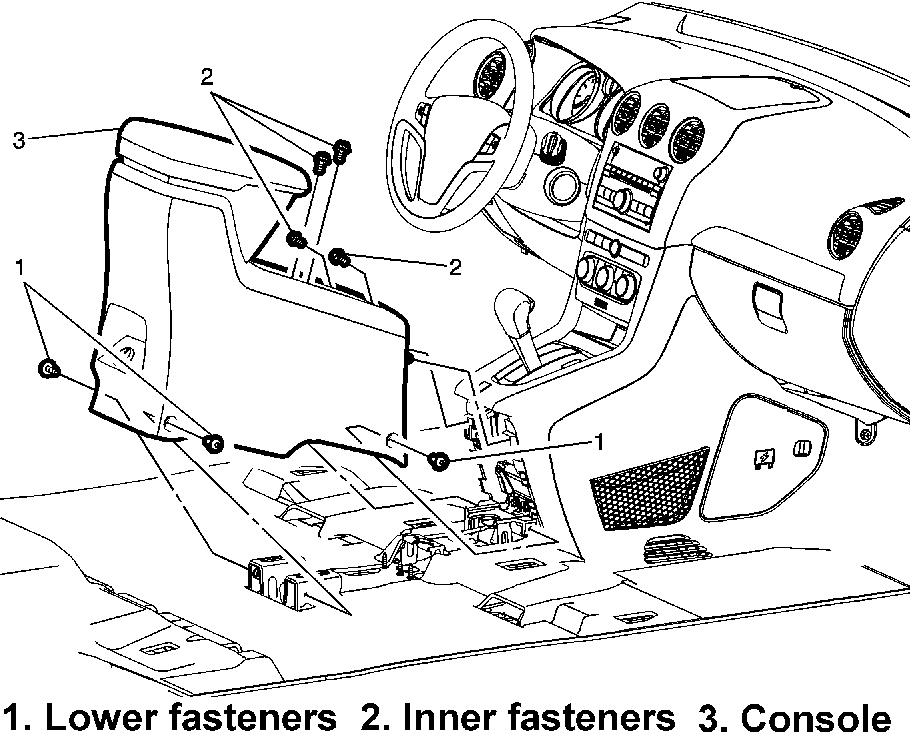
Remove front floor console lower fasteners,
Fig. 1. |
| 9. |
Remove front floor console interior
fasteners. |
| 10. |
Disconnect front floor console electrical
connections. |
| 11. |
Remove front floor console assembly. |
| 12. |
Reverse procedure to install, noting
following: |
| |
a. |
Torque front floor console accessory
trim plate screws to 18 inch lbs. |
| |
b. |
Torque front floor console bolts
to 70 inch lbs. |
| |
c. |
Torque front floor console screws
to 18 inch lbs. |
|

Fig.
1 Floor console replacement. Captiva Sport
Floor console in a Chevrolet Captiva First generation serves as a convenient and functional component that enhances the vehicle's interior storage and accessibility. Located between the front seats, the floor console provides multiple features designed for driver and passenger convenience.
One of the primary functions of the floor console is to offer ample storage space. It typically includes a covered compartment for storing personal items such as wallets, phones, and small accessories, keeping them secure and within easy reach. Additionally, the console often features cup holders, which are essential for holding beverages securely while driving, reducing the risk of spills.
The floor console may also include a sliding armrest, which can be adjusted to provide comfortable support for the driver and front passenger. This armrest often doubles as a lid for the storage compartment, ensuring that items inside are concealed and protected from view.
For vehicles with advanced features, the floor console might include controls for heated seats, traction control, or other vehicle functions. These controls are strategically placed for easy access, allowing the driver to adjust settings without taking their eyes off the road.
The design of the floor console in the Chevrolet Captiva is often tailored to complement the vehicle's interior aesthetics, using high-quality materials and finishes that enhance the overall look and feel of the cabin. This attention to detail ensures that the console is both functional and visually appealing.
Regular maintenance of the floor console involves keeping it clean and free of clutter. Wipe down surfaces with a damp cloth to remove dust and spills, and periodically check the functionality of any integrated features such as power outlets or USB ports.
In summary, the floor console in a Chevrolet Captiva Production 2006-present is a versatile and essential component that enhances storage, convenience, and comfort for both the driver and passengers. Its thoughtful design and practical features make it a valuable part of the vehicle's interior.
1.
Remove front door trim panel as outlined
under "Door Trim Panel."
2.
Remove exterior rearview mirror cover
using a sui ...
Refer to Fig. 1
when performing following procedures.
1.
Remove windshield garnish molding.
2.
Remove sunshade anchors, sunsha ...

 Exterior Rearview Mirrors
 Headliner