Chevrolet Captiva Service & Repair Manual: Overhead Console
Front
| 1. |
Release tabs and gently pull down to
remove overhead console. |
| 2. |
Remove overhead console assembly and
disconnect electrical connectors. |
| 3. |
Reverse procedure to install. |
|
Rear
| 1. |
Ensure that all washers on mounting
screws are accounted for. If any washers are off screw and loose,
discard to prevent rattle. Washers were required only for assembly
plant installation, and can be used if still on screw or they can
be discarded, Fig. 1. |
| 2. |
Remove video display assembly and disconnect
electrical connector. |
| 3. |
Remove overhead console assembly and
disconnect electrical connectors. |
| 4. |
Reverse procedure to install. Torque
video display assembly screws to 22 inch lbs. |
|
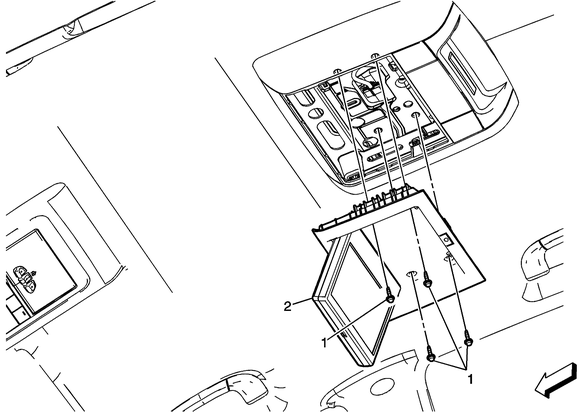
Fig.
1 Rear video display removal. Captiva Sport
The overhead console in the Chevrolet Captiva 2013 offers both functionality and convenience, featuring sections for front and rear controls. To remove the front overhead console, begin by carefully releasing the tabs and gently pulling it down to disconnect the electrical connectors. This process requires attention to detail to avoid damaging the tabs or wiring.
For the rear overhead console, it's crucial to account for all washers on the mounting screws to prevent any rattling or loose fittings. Begin by removing the video display assembly, which involves unscrewing the mounting screws and carefully disconnecting the electrical connectors. Following this, the rear overhead console assembly can be removed. Reinstallation requires reversing these steps, ensuring that each component is securely fastened and the electrical connections are properly reattached.
The overhead console's installation and removal procedures are essential for accessing or repairing the vehicle's interior components. Proper handling and attention to detail are necessary to maintain the integrity of the vehicle's interior panels and ensure that all electrical connections function correctly.
Disconnect battery ground cable.
To avoid Body Control Module (BCM) damage, it is critical to disconnect
battery prior to removal of instrument panel assembly from vehicle. Failure
...
Normalized Procedure
A window motor that has not been normalized will no longer perform express up and express down functions. This may occur during following co ...
 Instrument Panel
 Power Window Reset