Chevrolet Captiva Service & Repair Manual: Window Regulator
Front
| 1. |
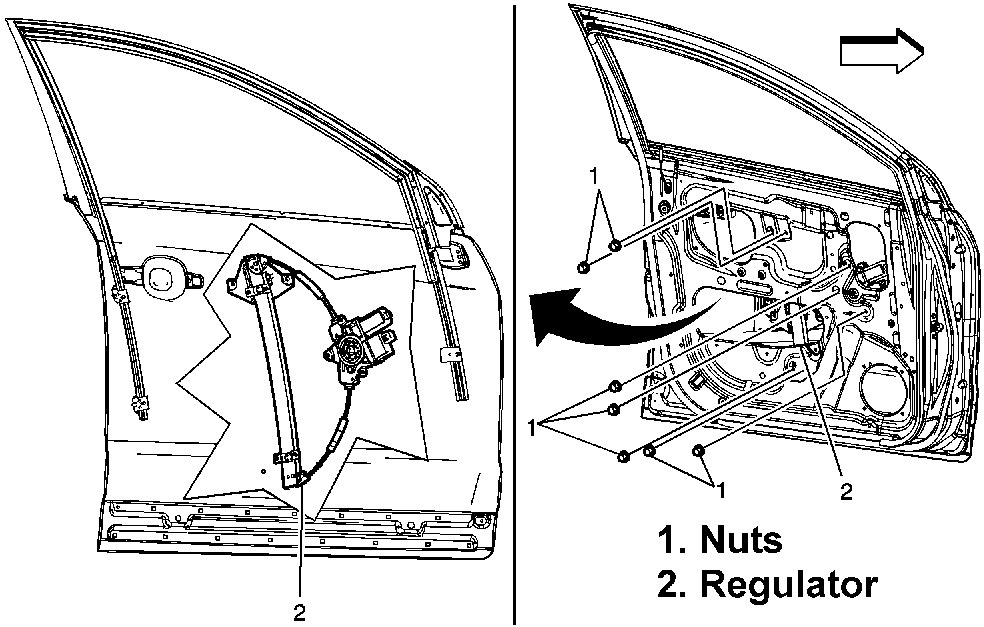
Remove front door trim panel as outlined
under "Door Trim Panel." |
| 2. |
Remove front door water deflector. |
| 3. |
Remove front door window regulator
nuts, Fig. 1. |
| 4. |
Disconnect electrical connector from
motor. |
| 5. |
Remove front door window, as outlined
under "Door Window." |
| 6. |
Remove front door window regulator
and window regulator motor. Window regulator motor is not serviced
separately. |
| 7. |
Reverse procedure to install. Torque
front door window regulator nuts to 71 inch lbs. |
|
Rear
| 1. |
Remove rear door trim panel as outlined
under "Door Trim Panel." |
| 2. |
Remove rear door water deflector. |
| 3. |
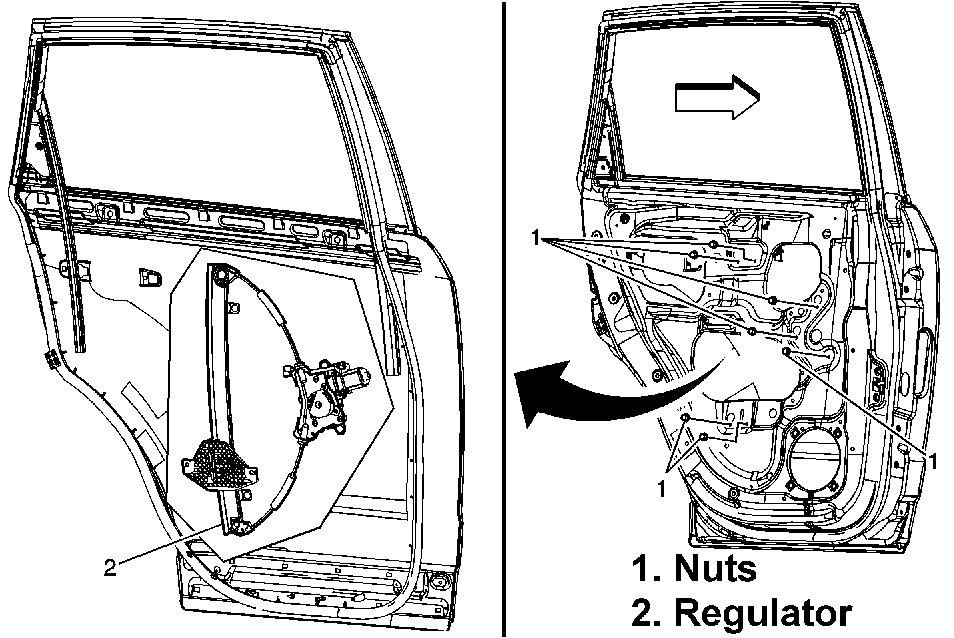
Remove rear door window regulator nuts,
Fig. 2. |
| 4. |
Disconnect electrical connector from
window regulator motor. |
| 5. |
Remove rear door window, as outlined
under "Door Window." |
| 6. |
Remove rear door window regulator and
window regulator motor. Window regulator motor is not serviced separately. |
| 7. |
Reverse procedure to install. Torque
rear door window regulator nuts to 71 inch lbs. |
|

Fig.
1 Front door window regulator replacement. Captiva Sport

Fig.
2 Rear door window regulator replacement. Captiva Sport
The window regulator 2014 Chevy Captiva is a critical component responsible for controlling the movement of the windows. This mechanism enables drivers and passengers to raise or lower the windows smoothly and securely. Over time, the window regulator can wear out due to frequent use, leading to issues such as slow or uneven window operation, grinding noises, or complete window failure. Addressing these issues promptly by replacing the faulty window regulator is essential for maintaining convenience, comfort, and safety within the vehicle.
The process of replacing the window regulator typically involves accessing the inner door panel 2014 Chevy Captiva, where the regulator is located. This may require removing the door panel carefully to avoid damage to the panel or surrounding components. Once the regulator is accessible, it is disconnected from the window glass and electrical connections, and the mounting hardware securing it to the door is removed. A new window regulator, compatible with the vehicle's make and model, is then installed by reversing the removal steps. Proper installation ensures smooth and reliable window operation, allowing occupants to adjust the windows effortlessly for ventilation, visibility, and comfort.
Lower
1.
Remove cargo accessory shelves.
2.
Remove rear seat belt anchor bolt.
3.
Lift storage compartment lid.
...


 Rear Quarter Trim Panel
 Maintenance