Chevrolet Captiva Service & Repair Manual: Battery Cable R&R
Removal
| Warning: Unless directed otherwise,
the ignition and start switch must be in the OFF or LOCK position, and all
electrical loads must be OFF before servicing any electrical component.
Disconnect the battery ground cable to prevent an electrical spark should
a tool or equipment come in contact with an exposed electrical terminal.
Failure to follow these precautions may result in personal injury and/or
damage to the vehicle or its components. |
| For Vehicles equipped with OnStar®
with Back-Up Battery: The Back-Up Battery is a redundant power supply to
allow limited OnStar® functionality in the event of a main vehicle battery
power disruption to the VCIM (OnStar® module). Do not disconnect the main
vehicle battery or remove the OnStar® fuse with the ignition key in any
position other than OFF. Retained accessory power should be allowed to time
out or be disabled (simply opening the driver door should disable retained
accessory power) before disconnecting power. Disconnecting power to the
OnStar® module in any way while the ignition is ON, or with retained accessory
power activated, may cause activation of the OnStar® Back-Up Battery system
and will discharge and permanently damage the Back-Up Battery. Once the
Back-Up Battery is activated, it will stay on until it has completely discharged.
The Back-Up Battery is not rechargeable and once activated, the Back-Up
Battery must be replaced. |
| 1. |
Disconnect battery ground cable from
battery. |
| 2. |
Remove front transmission mount. |
| 3. |
Remove power brake booster auxiliary
pump. |
| 4. |
Remove underhood fuse block cover. |
| 5. |
Remove battery ground cable nut (1)
and terminal (2), from underhood fuse block, Fig. 1. |
| 6. |
Remove battery positive cable nut (1)
and cable (4) from fuse block, Fig. 2. |
| 7. |
Loosen battery positive clamp nut (1)
and remove battery positive cable (3) from battery, Fig.
2. |
| 8. |
Remove starter heat shield screw (1)
and starter heat shield (2), from starter, Fig. 3. |
| 9. |
Remove battery positive cable nut (1)
and cable (2) from starter solenoid, Fig. 4. |
| 10. |
Remove battery ground cable ground
bolt (1) from engine block, Fig. 5. |
| 11. |
Remove ground terminal (2) from transmission
housing, Fig. 5. |
| 12. |
Remove battery positive and ground
cable (1) from engine compartment, Fig. 6.
Observe how battery positive and ground cable was routed within
engine compartment. |
|
Installation
| 1. |
Install battery positive cable (2)
to starter solenoid and torque nut (1) to 89 inch lbs.,
Fig. 4. |
| 2. |
Install starter heat shield (2) and
screw (1) to starter, Fig. 3. |
| 3. |
Install battery ground cable terminal
(2) and bolt (1) to engine block and torque to 18 ft. lbs.,
Fig. 5. |
| 4. |
Secure battery positive and ground
cable to engine with fasteners. |
| 5. |
Install battery ground cable (4) and
bolt (1) to engine fuse block and torque to 89 inch lbs.,
Fig. 2. |
| 6. |
Install battery positive cable clamp
to battery post and torque nut (2) to 89 inch lbs., Fig.
2. |
| 7. |
Install battery ground cable (2) and
nut (1) to fuse block and torque to 106 inch lbs., Fig.
1. |
| 8. |
Install power brake booster auxiliary
pump. |
| 9. |
Install front transmission mount. |
| 10. |
Connect battery ground cable to battery. |
| 11. |
Install fuse block cover. |
|
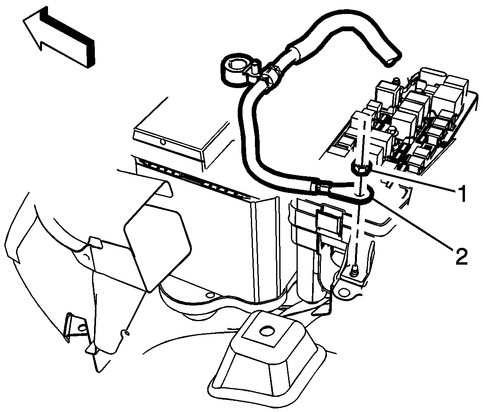
Fig.
1 Ground cable disconnection from underhood fuse block
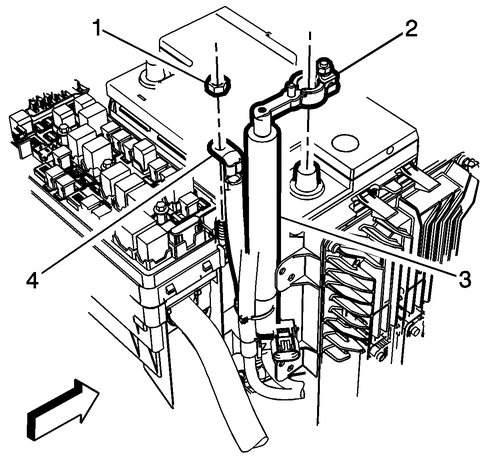
Fig.
2 Positive cable disconnection from underhood fuse block & battery
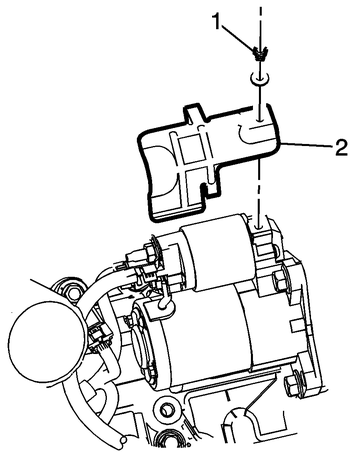
Fig.
3 Heat shield removal from starter
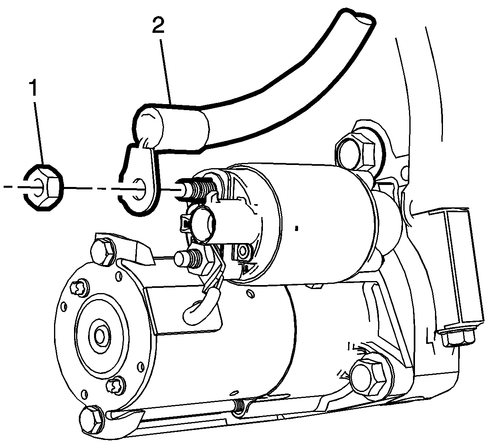
Fig.
4 Positive cable removal from starter
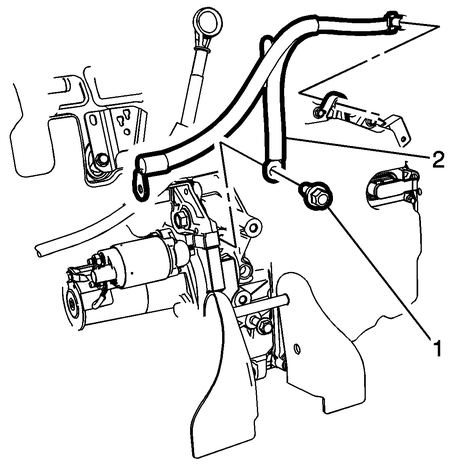
Fig.
5 Ground cable removal from transmission housing
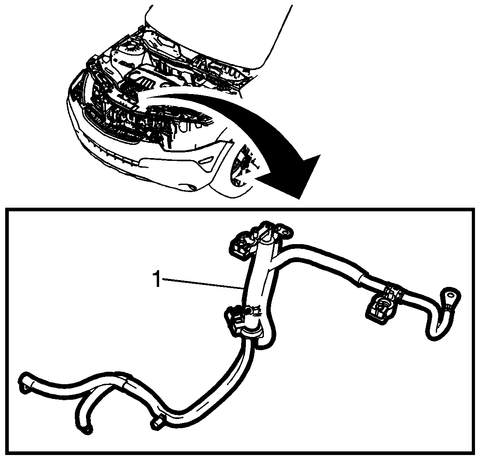
Fig.
6 Battery positive & ground cable removal
Replacing the battery cables in a Chevrolet Captiva is a crucial maintenance task outlined in the Chevrolet Captiva (2006-2018) Service & Repair Manual. These cables are essential for transferring electrical power from the battery to various components of the vehicle's electrical system, including the starter, alternator, and accessories.
Start by parking the vehicle on a level surface and engaging the parking brake. Ensure the engine is turned off before beginning the Battery Cable R&R (Removal and Replacement) process. Safety gloves and eye protection should be worn throughout the procedure.
Locate the battery cables connected to the battery terminals. There are typically two cables: the positive (+) cable, usually red, and the negative (-) cable, usually black. Inspect both cables for any signs of damage, corrosion, or wear that may necessitate replacement.
To remove the old battery cables, start with the negative (-) cable. Use a suitable wrench or socket to loosen and remove the terminal clamp nut securing the negative cable to the battery terminal. Carefully detach the cable from the terminal, taking note of its routing and connections to other components.
Next, proceed to remove the positive (+) cable using the same method. Loosen and remove the terminal clamp nut, then detach the cable from the battery terminal.
Inspect the battery terminals for any corrosion or buildup that may hinder electrical conductivity. Clean the terminals using a wire brush or terminal cleaner to ensure a good connection with the new cables.
Install the new battery cables by reversing the removal steps. Begin with the positive (+) cable, attaching it to the positive battery terminal and tightening the terminal clamp nut securely. Repeat this process for the negative (-) cable, ensuring it is securely attached to the negative battery terminal.
After installing the new cables, perform a visual inspection to confirm that all connections are secure and there are no loose components. Start the engine and check for proper electrical system functionality, including lights, accessories, and starting capability.
The Battery Cable R&R procedure outlined in the Service & Repair Manual ensures reliable electrical power distribution in the Chevrolet Captiva, maintaining optimal vehicle performance and electrical system integrity. Regular inspection and replacement of battery cables as needed contribute to the vehicle's overall reliability and safety.
 Maintenance