Chevrolet Captiva Service & Repair Manual: Drive Belt Idler Pulley R&R
|

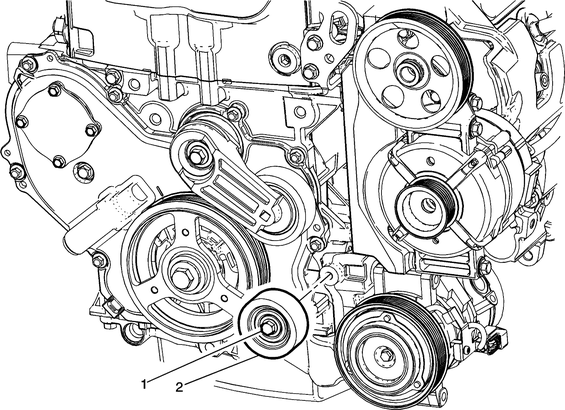
Fig. 1 Drive belt idler pulley removal
To remove the drive belt idler pulley in a Chevrolet Captiva, start by ensuring the engine is turned off and cool for safety. Begin by disconnecting the negative battery cable to prevent any accidental starts or electrical issues. Locate the drive belt idler pulley within the engine compartment, typically mounted on a bracket near the front of the engine.
After installing the new idler pulley, reattach the drive belt onto the idler pulley and tensioner pulley according to the belt routing diagram in our Chevrolet Captiva owner's manual. Finally, reconnect the negative battery cable and start the engine to verify the proper operation of the drive belt and idler pulley.
Always refer to the specific instructions and diagrams in your Chevrolet Captiva's service manual or owner's manual for accurate and vehicle-specific guidance on drive belt idler pulley removal and replacement. Following these steps ensures safe and effective maintenance of your vehicle's engine components.
 Accessory Drive Belt Adjust
Accessory drive belt is equipped
with automatic belt tension adjuster, no manual adjustment is required.
...
 Drive Belt R&R
1.
Remove air cleaner assembly.
2.
Remove righthand engine splash shield.
3.
Rotate drive belt tensioner, using
...
More about:
Chevrolet Captiva Service & Repair Manual > Tires: Description
The TPMS (Tire Pressure Monitor
System) warns the driver when a significant loss or gain of tire pressure
occurs in any of the four tires and allows the driver to display the individual
tire pressures and their locations on the DIC (Driver Information Center)
display. The syst ...
Chevrolet Captiva Owners Manual
- Introduction
- In Brief
- Keys, Doors, and Windows
- Seats and Restraints
- Storage
- Instruments and Controls
- Lighting
- Infotainment System
- Climate Controls
- Driving and Operating
- Vehicle Care
- Service and Maintenance
- Technical Data
- OnStar
