Chevrolet Captiva Service & Repair Manual: Suspension Ball Joint R&R
Lower
Removal
| 1. |
Remove front lower control arm. |
| 2. |
Place front lower control arm (1) in
a vise (2) or suitable holding device, Fig. 1. |
| 3. |
Remove front lower control arm ball
joint (3), noting following, Fig. 1: |
| |
a. |
Drill through ball joint rivets using
an 5/16 inch drill bit. |
| |
b. |
Enlarge holes in control arm using
a 31/64 inch drill bit. |
| |
c. |
Remove OLD ball joint from control
arm. |
| |
d. |
Remove any burs from control arm and
NEW ball joint. |
|
Installation
| Front lower control arm must be
clean and free of debris before installing NEW front lower control arm ball
joint. |
| Only use hardware provided with
NEW front lower control arm ball joint. |
| NEW front lower control arm ball
joint bolts MUST be installed with bolt head on top side of front lower
control arm ball joint. |
| 1. |
Position NEW front lower control arm
ball joint (1) on front lower control arm, Fig. 2. |
| 2. |
Install NEW front lower control arm
ball joint bolts (2) and NEW nuts (3) and Fig. 2.
Torque to 50 ft. lbs. |
| 3. |
Install front lower control arm. |
|
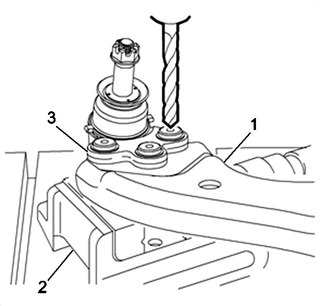
Fig.
1
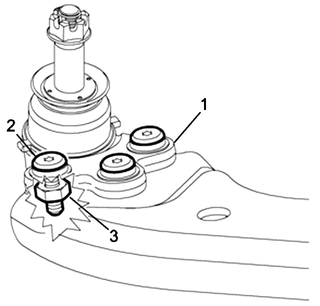
Fig.
2
To remove and install the suspension ball joint on a 2014 Chevrolet Captiva, start by ensuring the vehicle is safely supported on a flat surface. Engage the parking brake, lift the front of the vehicle with a jack, and secure it with jack stands. Remove the front wheel to access the suspension components. Detach the control arm by loosening and removing the bolts that secure it to the vehicle's frame. Use a ball joint separator to disconnect the ball joint from the steering knuckle, and carefully remove any retaining clips or cotter pins. Depending on the design, either press out the old ball joint using a ball joint press or unbolt it if it's secured with bolts.
Installing the new ball joint requires precision to ensure proper alignment and secure fitment. If the new ball joint is a press-fit type, use the ball joint press to install it into the control arm, ensuring it is fully seated. If it is a bolted type, align it with the mounting holes and secure it with the provided bolts, tightening them to the manufacturer's specifications. Reattach the ball joint to the steering knuckle, securing it with any retaining clips or cotter pins and tightening the nut to the specified torque. Reinstall the control arm to the frame, ensuring all bolts are torqued correctly. After reassembling any other removed suspension components, reinstall the wheel, lower the vehicle, and tighten the lug nuts.
Front
1.
Remove front wheel bearing and hub
assembly.
2.
Separate steering linkage outer tie
rod at steering knuckle.
...
Front
Disassembly
Caution: Do not allow absorber
rod to rotate during disassembly/assembly. Use hand tools to keep absorber
rod from rotating. If air tools are used, and rod is allowe ...
More about:
Chevrolet Captiva Owners Manual > Vehicle Checks: Hood
To open the hood:
Pull the handle with this
symbol.
It is located below the instrument
panel to the left of the steering
wheel.
Go to the front of the vehicle and
lift up on the secondary hood
release lever.
Lift the hood.
To close the hood:
Before closing the ...
 Steering Knuckle R&R
 Suspension Coil Spring R&R