Chevrolet Captiva Service & Repair Manual: Suspension Strut Mount Assembly R&R
Front
Disassembly
| Caution: Do not allow absorber
rod to rotate during disassembly/assembly. Use hand tools to keep absorber
rod from rotating. If air tools are used, and rod is allowed to rotate,
damage to absorber may occur. |
| Caution: Do not handle top
mount assembly by plastic portion. Handle top mount assembly by metal portion
when removing/installing top mount from/to strut assembly. Holding top mount
assembly by plastic portion may loosen snap fit of bearing components and
cause bearing to fall apart. |
| Before removing any of front strut
assembly components, note alignment and orientation of all components to
aid in installation. |
| Ensure front suspension strut
assembly is vertical in spring compressor. |
| Use proper size socket to hold
front suspension strut shaft while loosening front suspension strut shaft
nut. |
| If any of front suspension strut
assembly components show signs of excessive wear or are damaged, replace
those components. |
| If front spring does not have
to be serviced, leave spring in spring compressor. |
| 1. |
Remove strut assembly. |
| 2. |
Remove front suspension strut shaft
nut cover (1), if equipped, Fig. 1. |
| 3. |
Position front suspension strut assembly
in compressor tool No. CH-45400, or equivalent and adjust upper
and lower legs so that they are properly positioned on front spring,
Fig. 2. |
| 4. |
Hand ratchet and proper socket (1) to
loosen front suspension strut shaft nut, using socket tool No. J-42991,
or equivalent (2), Fig. 3. |
| 5. |
Remove front suspension strut shaft
nut (1), Fig. 4. |
| 6. |
Remove front suspension strut mount (8),
front suspension strut mount bearing (7), front spring upper insulator (6),
front spring (5) (if required), front suspension strut dust
shield (4), front suspension strut bumper (3), front spring
lower insulator (2) and front suspension strut (1), Fig.
5. |
|
Assembly
| Caution: Do not handle top
mount assembly by plastic portion. Handle top mount assembly by metal portion
when removing/installing top mount from/to strut assembly. Holding top mount
assembly by plastic portion may loosen snap fit of bearing components and
cause bearing to fall apart. |
| Caution: Do not allow absorber
rod to rotate during disassembly/assembly. Use hand tools to keep absorber
rod from rotating. If air tools are used, and rod is allowed to rotate,
damage to absorber may occur. |
| Ensure that front suspension strut
assembly is vertical in spring compressor. |
| 1. |
If removed, position front spring in
compressor tool No. CH-45400, or equivalent and adjust upper and
lower legs so that they are properly positioned on front spring. |
| 2. |
Compress front spring enough to install
remaining front suspension strut assembly components, using compressor
tool No. CH-45400, or equivalent. |
| 3. |
Install front spring lower insulator,
front suspension strut bumper and front suspension strut dust shield
on front suspension strut. |
| 4. |
Position front suspension strut with
assembled components in compressor tool No. CH-45400, or equivalent. |
| 5. |
Install front spring upper insulator,
front suspension strut mount bearing and front suspension strut
mount on front suspension strut. |
| 6. |
Inspect to ensure that tab on front
spring upper insulator is aligned with tab on front spring lower
insulator and center of front suspension strut. |
| 7. |
Flat on front suspension strut mount
should be aligned with tab on front spring upper insulator. |
| 8. |
Ensure front spring is properly seated
on front spring lower insulator. |
| 9. |
Install front suspension strut shaft
nut. |
| 10. |
Torque front suspension strut
shaft nut to 63 ft. lbs., using socket tool No. J-42991, or equivalent,
torque wrench and proper socket. |
| 11. |
Remove front suspension strut assembly
from compressor tool No. CH-45400, or equivalent. |
| 12. |
Install front suspension strut shaft
nut cover, if equipped. |
| 13. |
Install strut assembly. |
|
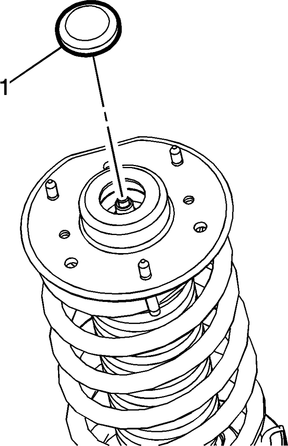
Fig.
1
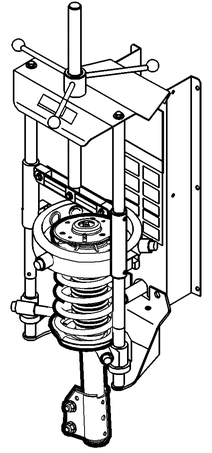
Fig.
2
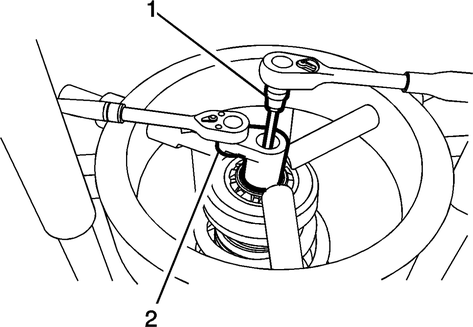
Fig.
3
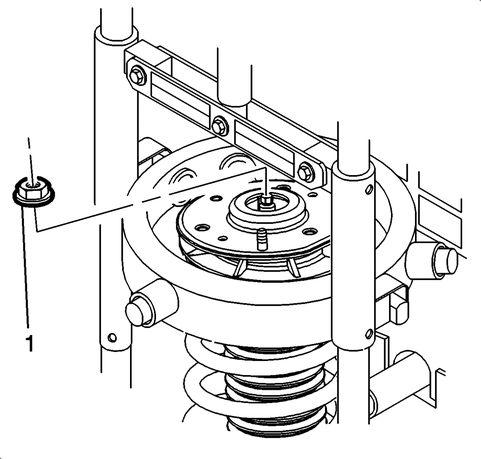
Fig.
4
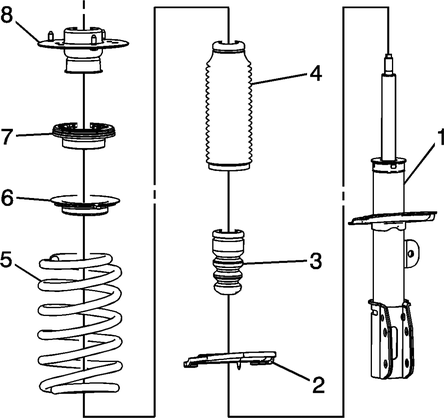
Fig.
5
Servicing the suspension strut mount in a Chevrolet Captiva is an important aspect of maintaining optimal vehicle performance and safety. The strut mount plays a key role in connecting the suspension strut to the vehicle's body or suspension system. Over time, the strut mount can wear out due to constant vehicle movement, road vibrations, and exposure to the elements. Signs of a worn or failing strut mount include clunking noises when driving over bumps, uneven tire wear, and reduced handling and stability.
To service the suspension strut mount, begin by safely elevating the vehicle and removing the wheel and tire assembly to access the suspension components. Disassemble the strut mount carefully, inspecting each component for wear, damage, or corrosion. Replace any worn or damaged parts with genuine OEM components to ensure proper fit and performance. Reassemble the strut mount following manufacturer guidelines and torque specifications, and conduct a thorough test drive to verify that the suspension is functioning correctly.
Regular maintenance and timely replacement of worn suspension components like the strut mount are essential for preserving the vehicle's ride comfort, handling, and overall safety. It's recommended to consult the Chevrolet Captiva service manual or seek professional assistance if you're unfamiliar with suspension system repairs to ensure the work is done accurately and safely.
Front
Disassembly
Caution: Do not allow absorber
rod to rotate during disassembly/assembly. Use hand tools to keep absorber
rod from rotating. If air tools are used, and rod is allowe ...
A visual inspection must always
be performed to confirm the presence of aftermarket components, potential
collision damage, or areas of concern.
1.
Ins ...
 Suspension Strut Cartridge R&R
 Suspension System Inspect