Chevrolet Captiva Service & Repair Manual: Trailing Arm R&R
| 1. |
Raise and support vehicle. |
| 2. |
Remove tire and wheel. |
| 3. |
Remove park brake cable bolt from trailing
arm and from frame. |
| 4. |
Remove trailing arm bracket to body
bolts, Fig. 1. |
| 5. |
Remove trailing arm bushing to bracket
nut and bolt, Fig. 2. |
| 6. |
Remove trailing arm to knuckle bolts (1),
Fig. 2. |
| 8. |
Reverse procedure to install, noting
following: |
| |
a. |
Apply an approved threadlocker on trailing
arm bolts. |
| |
b. |
Install trailing arm to knuckle bolts
and torque to 44 ft. lbs. plus 30°. |
| |
c. |
Torque trailing arm bushing
to bracket nut and bolt to 118 ft. lbs. |
|
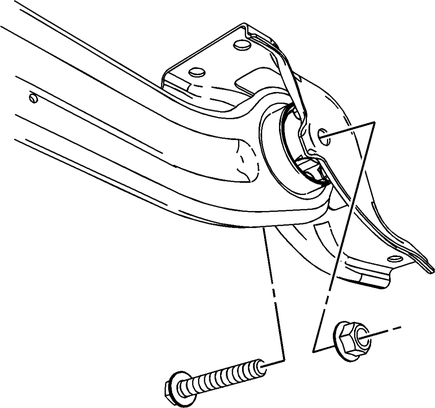
Fig.
1
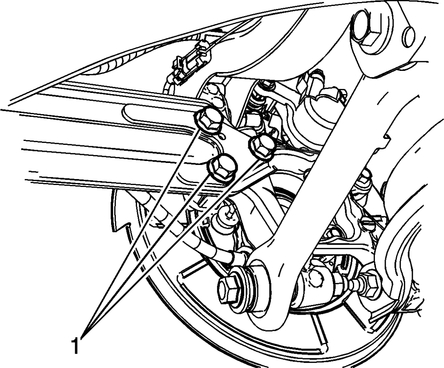
Fig.
2
To remove the trailing arm on a Chevrolet Captiva, you'll need to begin by preparing the vehicle. Ensure it's parked on a level surface and securely supported on jack stands or a lift. Engage the parking brake and chock the wheels for added safety. Next, locate the trailing arm assembly, typically situated at the rear suspension of the vehicle. Depending on your model year and trim, you may need to remove certain components or panels to access the trailing arm more easily.
Once you have clear access, the next step is to disconnect any suspension components attached to the trailing arm. This may include the sway bar link, shock absorber, or other components. Using appropriate tools, carefully loosen and remove any fasteners securing these components to the trailing arm. Be sure to keep track of washers, nuts, or bolts that come off during this process. With the suspension components disconnected, you can then move on to removing the bolts that secure the trailing arm to the vehicle's frame or subframe. Carefully maneuver the trailing arm out of its mounting position, taking care not to damage any surrounding components or wiring.
After removing the trailing arm, it's essential to inspect it thoroughly for any signs of wear, damage, or corrosion. If necessary, replace the trailing arm with a new one that meets the manufacturer's specifications. When reinstalling, follow the removal steps in reverse order, ensuring all bolts are tightened to the recommended torque specifications. Conduct a visual inspection and test drive the vehicle to verify proper suspension operation before considering the job complete. If you're unsure about any step or lack the necessary tools and experience, it's advisable to seek assistance from a qualified mechanic.
1.
Raise and support vehicle using a suitable
lift.
2.
Inspect tires for wear and proper inflation
pressure.
...
Front
Allow threadlocker to cure approximately
10 minutes before installing front wheel bearing and hub assembly bolts.
1.
Separate front wheel drive shaf ...
 Tire Rotate
 Wheel Hub & Bearing Assembly R&R