Chevrolet Captiva Owners Manual: Compass
The vehicle may have a compass in the Driver Information Center (DIC).
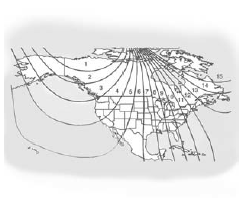
Compass Zone
The zone is set to Zone 8 upon leaving the factory. Your dealer will set the correct zone for your location.
Under certain circumstances, such as during a long distance cross-country trip or moving to a new state or province, it will be necessary to compensate for compass variance by resetting the zone through the DIC if the zone is not set correctly.
Compass variance is the difference between the earth's magnetic north and true geographic north. If the compass is not set to the zone where you live, the compass may give false readings. The compass must be set to the variance zone in which the vehicle is traveling.
To adjust for compass variance, use the following procedure:
Compass Variance (Zone) Procedure
- Do not set the compass zone
when the vehicle is moving. Only
set it when the vehicle is in
P (Park).
Press the vehicle information button until PRESS
 TO SET
COMPASS ZONE: ## displays.
TO SET
COMPASS ZONE: ## displays.
- Find the vehicle's current
location and variance zone
number on the map.
Zones 1 through 15 are available.
- Press and hold the set/reset button to scroll through and select the appropriate variance zone.
- Press the trip/fuel button until the vehicle heading, for example, N for North, is displayed in the DIC.
- If calibration is necessary, calibrate the compass. See "Compass Calibration Procedure" following.
Compass Calibration
The compass can be manually calibrated. Only calibrate the compass in a magnetically clean and safe location, such as an open parking lot, where driving the vehicle in circles is not a danger.
It is suggested to calibrate away from tall buildings, utility wires, manhole covers, or other industrial structures, if possible.
If CAL should ever appear in the DIC display, the compass should be calibrated.
If the DIC display does not show a heading, for example, N for North, or the heading does not change after making turns, there may be a strong magnetic field interfering with the compass. Such interference may be caused by a magnetic CB or cell phone antenna mount, a magnetic emergency light, magnetic note pad holder, or any other magnetic item. Turn off the vehicle, move the magnetic item, then turn on the vehicle and calibrate the compass.
To calibrate the compass, use the following procedure:
Compass Calibration Procedure
- Before calibrating the compass,
make sure the compass is set to
the variance zone in which the
vehicle is located. See
"Compass Variance (Zone)
Procedure" earlier in this
section.
Do not operate any switches such as window, sunroof, climate controls, seats, etc.
during the calibration procedure.
- Press the vehicle information
button until PRESS
 TO
CALIBRATE COMPASS
displays.
TO
CALIBRATE COMPASS
displays. - Press the set/reset button to start the compass calibration.
- The DIC will display CALIBRATING COMPASS: TURN IN CIRCLES. Drive the vehicle in tight circles at less than 8 km/h (5 mph) to complete the calibration. The DIC will display COMPASS CALIBRATION COMPLETE for a few seconds when the calibration is complete. The DIC display will then return to the previous menu.
Chevrolet Captiva Owners Manual offers detailed guidance on the Compass feature, including the Compass Zone, Compass Variance (Zone) Procedure, and Compass Calibration.
It explains the Compass Zone concept, detailing different geographic zones and their corresponding compass readings to ensure accurate direction display based on the vehicle's location.
The manual provides instructions for the Compass Variance Procedure, allowing owners to adjust the Captiva compass variance setting for areas where magnetic variation affects accuracy. This adjustment ensures that the compass aligns with the correct magnetic north direction for the specific geographic zone.
Additionally, the manual covers Compass Calibration procedures to maintain optimal accuracy. It outlines the calibration process, which may involve driving in a specific pattern or following on-screen prompts to recalibrate the compass accurately.
Captiva Owners Manual serves as a comprehensive resource for understanding and utilizing the Compass feature effectively, providing instructions for adjusting settings and performing calibration to ensure reliable direction readings while driving.
 Rear Window Wiper/ Washer
The rear wiper and rear wash button is on the instrument panel above the climate control system.
(Rear Wiper/Washer): Press to wash and wipe the rear window.
The rear window washer uses the same ...
 Clock
Clock
To set the time and date:
Turn the ignition key to ACC/
ACCESSORY or ON/RUN.
Press to turn the radio
on.
Press and HR, MIN,
MM, DD,
and YYYY (hour, minute, month,
d ...
More about:
Chevrolet Captiva Service & Repair Manual > Body & Frame: Rear Frame Rail
Do not damage any inner panels
or reinforcements.
If the location of the original
plug weld holes can not be determined, space the plug weld holes every 1
1/2 inches apart. Some panels may have structural weld thru adhesive. It
is required to replace the weld thru ...
Chevrolet Captiva Owners Manual
- Introduction
- In Brief
- Keys, Doors, and Windows
- Seats and Restraints
- Storage
- Instruments and Controls
- Lighting
- Infotainment System
- Climate Controls
- Driving and Operating
- Vehicle Care
- Service and Maintenance
- Technical Data
- OnStar
Chevrolet Captiva Service & Repair Manual
