Chevrolet Captiva Owners Manual: Door Locks
From the outside, lock or unlock the door using the key or the Remote Keyless Entry (RKE) transmitter.
See Remote Keyless Entry (RKE) System Operation on page 2-2.
From the inside, push or pull the manual door lock on each door.
Use the power door lock switch on the front doors.
 : Press to lock the doors.
 : Press to unlock the doors.
See Door Locks on page 2-6 and Power Door Locks on page 2-6.
Safety Locks
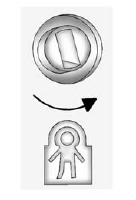
The vehicle has rear door security locks to prevent passengers from opening the rear doors from the inside.

Open the rear doors to access the security locks on the inside edge of each door.
To activate, insert a key into the slot and turn it to the horizontal position.
The door can only be opened from the outside.
To return the door to normal operation, open the door and turn the slot to the vertical position
Door locks system in the Chevrolet Captiva 1-st generation is an integral part of vehicle security and convenience. It allows users to securely lock and unlock doors using various methods, enhancing safety and ease of use.
Captiva typically comes equipped with power door locks that can be operated using the key fob, door lock switch on the interior door panel, or the key cylinder on the driver's side door. The key fob often includes features like remote keyless entry, allowing users to lock or unlock doors from a distance.
Some models may feature advanced locking systems such as keyless entry with push-button start, where the vehicle can be unlocked and started without physically using the key. These systems add a layer of convenience for drivers while maintaining security protocols.
It's crucial for Captiva owners to familiarize themselves with the operation of the door locks system and ensure proper functioning. Regular maintenance and periodic checks can help identify any issues early on and ensure that the door locks operate smoothly and securely, contributing to a comfortable and safe driving experience.
 Remote Vehicle Start
This vehicle may have a remote
starting feature that starts the
engine from outside of the vehicle.
Starting the Engine Using
Remote Start
To start the vehicle:
Aim the RKE transmitter at the ...
 Liftgate, Windows
Liftgate
To lock or unlock the liftgate from
outside the vehicle, press or
twice on the Remote Keyless
Entry (RKE) transmitter. See
Remote Keyless Entry (RKE)
System Operation on page 2 ...
More about:
Chevrolet Captiva Owners Manual > Infotainment System: Phone
Bluetooth
For vehicles equipped with
Bluetooth capability, the system can
interact with many cell phones,
allowing:
Placement and receipt of calls in
a hands-free mode.
Sharing of the cell phone’s
address book or contact list with
the vehicle.
To minimize driver distraction,
be ...
Chevrolet Captiva Owners Manual
- Introduction
- In Brief
- Keys, Doors, and Windows
- Seats and Restraints
- Storage
- Instruments and Controls
- Lighting
- Infotainment System
- Climate Controls
- Driving and Operating
- Vehicle Care
- Service and Maintenance
- Technical Data
- OnStar
