Chevrolet Captiva Owners Manual: Filling the Tank
Warning
Fuel vapors and fuel fires burn violently and can cause injury or death.
- To help avoid injuries to you and others, read and follow all the instructions on the fuel pump island.
- Turn off the engine when refueling.
- Keep sparks, flames, and smoking materials away from fuel.
- Do not leave the fuel pump unattended.
- Do not reenter the vehicle while pumping fuel.
- Keep children away from the fuel pump and never let children pump fuel.
- Fuel can spray out if the fuel
cap is opened too quickly.
This spray can happen if the tank is nearly full, and is more likely in hot weather.
Open the fuel cap slowly and wait for any hiss noise to stop then unscrew the cap all the way

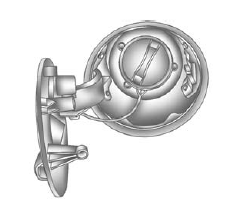
The tethered fuel cap is located behind a hinged fuel door on the driver side of the vehicle. On some vehicles with Remote Keyless Entry, the fuel door is locked and unlocked when the vehicle doors are locked and unlocked.
To remove the fuel cap, turn it slowly counterclockwise. The fuel cap has a spring in it; if the cap is released too soon, it will spring back to the right. To avoid fuel contact on the painted surface of the vehicle when filling the fuel tank, place the tethered cap on the fuel filler door.
Be careful not to spill fuel. Do not top off or overfill the tank and wait a few seconds after you have finished pumping before removing the nozzle. Clean fuel from painted surfaces as soon as possible. See Exterior Care on page 10-74.
When replacing the fuel cap, turn it clockwise until it clicks. Make sure the cap is fully installed. The diagnostic system can determine if the fuel cap has been left off or improperly installed. This would allow fuel to evaporate into the atmosphere. See Malfunction Indicator Lamp on page 5-14.
Warning
If a fire starts while you are refueling, do not remove the nozzle. Shut off the flow of fuel by shutting off the pump or by notifying the station attendant.
Leave the area immediately.
Caution
If a new fuel cap is needed, be sure to get the right type of cap from your dealer. The wrong type of fuel cap might not fit properly, might cause the malfunction indicator lamp to light, and could damage the fuel tank and emissions system. See Malfunction Indicator Lamp on page 5-14.
When filling the tank of your 2015 Chevrolet Captiva, start by parking the vehicle on a level surface and engaging the parking brake for safety. Ensure the engine is turned off along with any electronic devices to prevent ignition risks during refueling. Locate the fuel filler door on the side of the vehicle, typically near the rear, and open it to access the fuel filler neck.
Next, remove the fuel cap by turning it counterclockwise and place it in a safe spot where it won't get dirty or misplaced. Insert the fuel pump nozzle into the fuel filler neck, ensuring a secure fit to avoid spills or leaks during refueling. It's crucial to use the recommended fuel grade for your Captiva, which can be found in the owner's manual or on the fuel filler door.
Once ready, squeeze the fuel pump handle to start filling the tank. Keep an eye on the fuel level gauge on the dashboard to prevent overfilling. When the tank reaches the desired level, carefully remove the fuel pump nozzle and replace the fuel cap securely by turning it clockwise until it clicks into place. This helps prevent fuel vapor leaks and maintains the integrity of the fuel system.
After refueling, close the fuel filler door tightly to protect the fuel system from debris and moisture. Before driving, inspect the fuel filler area for any spills and clean them up promptly to avoid potential hazards. Following these steps ensures a safe and efficient fueling process for your Chevrolet Captiva, promoting optimal vehicle performance and fuel economy.
 E85 or FlexFuel
Vehicles with a yellow fuel cap can use either unleaded gasoline or fuel containing up to 85% ethanol (E85).
All other vehicles should use only the unleaded gasoline as described in Recommended Fue ...
More about:
Chevrolet Captiva Owners Manual > Vehicle Checks: Power Steering Fluid
See Engine
Compartment Overview
on page 10-4 for reservoir location.
When to Check Power Steering
Fluid
It is not necessary to regularly
check power steering fluid unless a
leak in the system is suspected or
an unusual noise is heard. A fluid
loss in this system could indicate a
problem. ...
Chevrolet Captiva Owners Manual
- Introduction
- In Brief
- Keys, Doors, and Windows
- Seats and Restraints
- Storage
- Instruments and Controls
- Lighting
- Infotainment System
- Climate Controls
- Driving and Operating
- Vehicle Care
- Service and Maintenance
- Technical Data
- OnStar
