Chevrolet Captiva Owners Manual: License Plate Lamp, Replacement Bulbs
License Plate Lamp
To replace one of these bulbs:
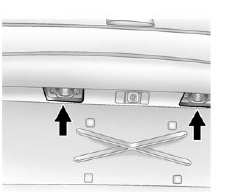
- Remove the two screws holding each of the license plate lamps to the fascia.

- Turn and pull the license plate lamp forward through the fascia opening.
- Turn the bulb socket counterclockwise and pull the bulb straight out of the socket.
- Push the new bulb into the bulb socket and turn it clockwise to lock it into place.
- Push and turn the license plate lamp back through the fascia opening.
- Reinstall the two screws holding the license plate lamp to the fascia.
Replacement Bulbs

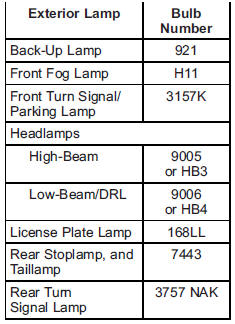
For replacement bulbs not listed here, contact your dealer.
License plate lamp on a Chevrolet Captiva serves the essential function of illuminating the vehicle's license plate, ensuring it is visible in low-light conditions and compliant with legal requirements. When replacing the license plate lamp bulbs, it's important to follow a few simple steps to ensure a smooth and successful procedure.
Firstly, locate the license plate lamp assembly on the rear of the vehicle. This assembly typically houses one or two bulbs, depending on the vehicle's design. Use a suitable tool, such as a screwdriver or a trim panel removal tool, to gently pry open the lamp assembly and access the bulb(s) inside.
Next, carefully remove the old bulb(s) from the socket(s) by twisting them counterclockwise. Be cautious not to apply excessive force, as this could damage the bulb or socket. Once the old bulb(s) are removed, inspect them for any signs of damage or wear, such as darkened or broken filaments.
Before installing the new replacement bulb(s), ensure they are the correct type and wattage specified for the Chevrolet Captiva's license plate lamp. Insert the new bulb(s) into the socket(s) and twist them clockwise until securely in place. Test the new bulbs by turning on the vehicle's exterior lights and verifying that the license plate is adequately illuminated.
With the new bulbs installed and functioning properly, your Chevrolet Captiva's license plate lamp should provide reliable illumination for improved visibility and compliance with road regulations.
 Taillamps, Turn Signal, Stoplamps, and Back-Up Lamps
To replace one of these bulbs:
Back-Up Lamp
Turn Signal Lamp
Stoplamp/Taillamp
Taillamp
Open the liftgate. See Liftgate
on page 2-8.
Remove the two screws holding
in the ...
More about:
Chevrolet Captiva Owners Manual > Child Restraints: Securing Child Restraints (Front Passenger Seat)
The vehicle has airbags. A rear seat
is a safer place to secure a
forward-facing child restraint. See
Where to Put the Restraint on
page 3-36.
In addition, the vehicle may have a
passenger sensing system which is
designed to turn off the front
outboard passenger frontal airbag
under certa ...
Chevrolet Captiva Owners Manual
- Introduction
- In Brief
- Keys, Doors, and Windows
- Seats and Restraints
- Storage
- Instruments and Controls
- Lighting
- Infotainment System
- Climate Controls
- Driving and Operating
- Vehicle Care
- Service and Maintenance
- Technical Data
- OnStar

