Chevrolet Captiva Service & Repair Manual: HVAC Blower Motor Resistor R&R
|

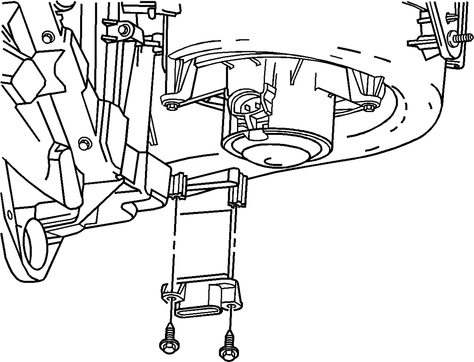
Fig. 1
When removing the HVAC blower motor resistor in a Chevrolet Captiva, you'll need to follow a systematic process to ensure safety and accuracy. Begin by preparing the vehicle, ensuring it's parked on a flat surface with the parking brake engaged, and the engine turned off. This precautionary step prevents any accidents or electrical mishaps during the procedure.
Next, locate the HVAC blower motor resistor, which is typically situated near the blower motor itself, often found under the dashboard on the passenger side. Depending on the model year and trim, you may need to remove interior panels or access covers to reach the resistor assembly.
Before proceeding with removal, disconnect all electrical connections leading to the resistor. These connections include wiring harnesses or connectors that attach to the resistor. Take care to handle the electrical components gently to avoid damage.
Using the appropriate tools, such as a screwdriver or socket wrench, remove the mounting screws or fasteners securing the resistor in place. Keep track of these screws as they'll be needed for reinstallation later. Once the screws are removed, carefully pull the resistor away from its mounting location, paying attention to any clips or tabs that may hold it in place.
After removing the old resistor, inspect it for any signs of damage, such as burnt connectors or melted components. If the resistor is faulty, replace it with a new one to ensure proper functionality of the HVAC system. Align the new resistor in the mounting location and secure it with the mounting screws or fasteners.
Always refer to the specific repair manual or guidelines provided for your Chevrolet Captiva model year (from 2006 to 2018) to ensure you follow the correct steps and safety precautions during HVAC component removal and replacement.
 HVAC Blower Motor R&R
1.
Disconnect electrical connector from
blower motor.
2.
Remove blower motor bolts from HVAC
module, Fig. 1.
...
 Refrigerant Filter, Replace
Caution: Air conditioning R-134a
liquid refrigerant is capable of harming eyes or freezing skin. Always wear
safety goggles and avoid contact with liquid refrigerant. Failure to follow ...
More about:
Chevrolet Captiva Owners Manual > Exterior Lighting: Headlamp High/Low-Beam Changer, Daytime Running Lamps (DRL)
Headlamp High/Low-Beam Changer
(Headlamp High/Low-Beam
Changer): Push the turn signal
lever away from you to turn the high
beams on.
Pull the lever toward you to return to
low beams.
This indicator light
turns on in the
instrument cluster when the
high-beam headlamps are on.
Flash-to-P ...
Chevrolet Captiva Owners Manual
- Introduction
- In Brief
- Keys, Doors, and Windows
- Seats and Restraints
- Storage
- Instruments and Controls
- Lighting
- Infotainment System
- Climate Controls
- Driving and Operating
- Vehicle Care
- Service and Maintenance
- Technical Data
- OnStar
