Chevrolet Captiva Service & Repair Manual: Cooling System Leak, Inspection
| A visual inspection must always
be performed to confirm the presence of aftermarket components, potential
collision damage, or areas of concern. |
| Always clean all external cooling
system components, hoses and lines before starting the inspection. The origination
of an external leak can be narrowed down considerably during cleaning. |
| Caution: To avoid danger of
being burned, do not remove radiator or reservoir cap while engine and radiator
are still hot, as fluid and steam can be blown out under pressure. |
| Before with a radiator pressure
tester, wet relief valve and pressure valve with engine coolant or water. |
| When performing pressure tests,
keep tester at an angle of over 30° above horizontal. |
| Refer to published specifications
to determine proper cooling system operating pressures. |
| 1. |
Remove radiator or reservoir cap. |
| 2. |
Fill radiator and overflow to proper
level with coolant. |
| 3. |
Inspect overflow tube and overflow
bottle for dents, kinks, or internal obstructions. |
| 4. |
Wipe out inside of filler neck. Inspect
lower inside sealing seat of filler neck for nicks, dirt and solder
bumps. |
| 5. |
Inspect cams on outside of filler neck.
If cams are bent down or up, seating of pressure cap valve and tester
seal will be affected. If cams are damaged, have filler neck replaced
by a reputable radiator repair service facility. |
| 6. |
Attach a radiator pressure tester and
rotate tester head until locking ears contact stops on radiator. |
| 7. |
Operate pump until indicator on gauge
reaches just beyond color band for recommended pressure for vehicle,
Fig. 1. |
| 8. |
If pressure drops, inspect hoses, radiator
or water pump for leaks. If no external leaks are found and pressure
drops, inspect heater core, cylinder block and head. |
| 9. |
Once leak has been detected repair
system as required. |
|
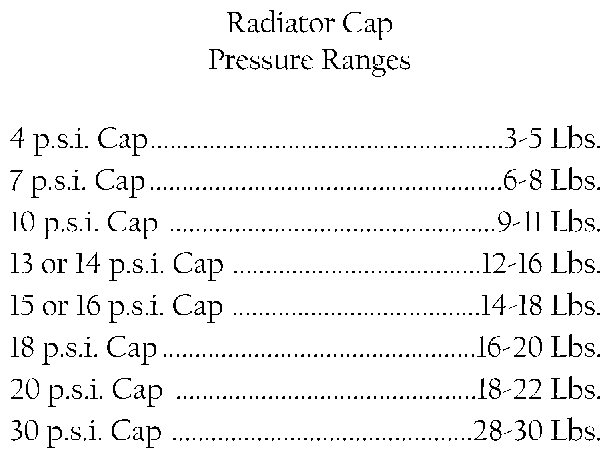
Fig.
1 Cooling system pressure chart
This process is crucial for maintaining the health and performance of a vehicle's cooling system in Chevrolet Captiva 2013, which is responsible for regulating the engine's temperature and preventing overheating.
During a cooling system leak inspection, several key areas are typically examined. These include checking for leaks in the radiator, hoses, water pump, and thermostat housing. Additionally, technicians may also assess the condition of coolant reservoirs and pressure caps to ensure they are functioning properly.
Regular inspections for cooling system leaks are essential because leaks can lead to coolant loss, overheating, and potential engine damage if left unchecked. By identifying and addressing leaks early on, drivers can avoid costly repairs and maintain their vehicle's optimal performance and reliability.
Thorough cooling system leak inspection is a preventative measure that can extend the lifespan of a vehicle and ensure it operates safely and efficiently on the road.
Warning: In order to avoid personal injury, do not remove the cap or open the cooling system drains from a hot system. Allow the system to cool first.
...
Caution: To avoid danger of
being burned, do not remove radiator cap while engine and radiator are still
hot, as fluid and steam can be blown out under pressure.
If radiato ...
 Coolant Drain, Flush & Refill
 Cooling System Pressure, Test