Chevrolet Captiva Service & Repair Manual: Engine Coolant Expansion Tank, Replace
| 1. |
Drain engine coolant into suitable
container. |
| 2. |
Remove coolant expansion tank inlet
hose from expansion tank. |
| 3. |
Remove coolant expansion tank outlet
hose from expansion tank. |
| 4. |
Remove coolant expansion tank nut (1),
bolt (2) and expansion tank (3), Fig. 1. |
| 5. |
Reverse procedure to install. Torque
nut and bolt to 71 inch lbs. |
|
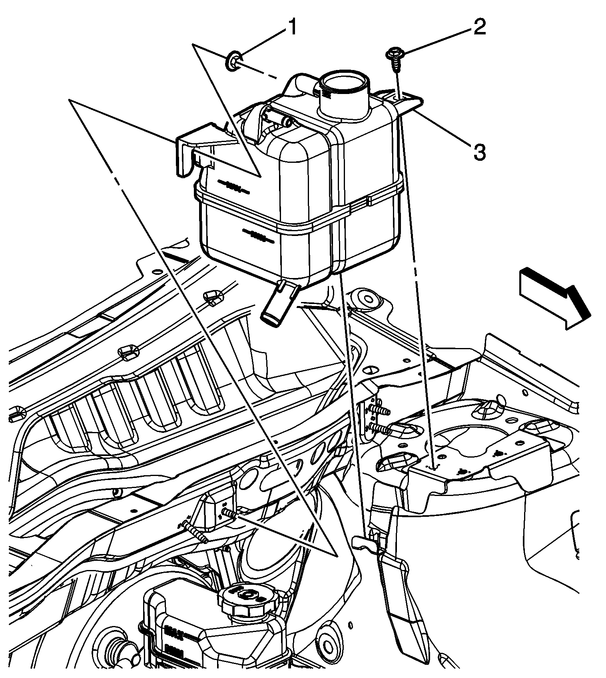
Fig.
1 Engine coolant expansion tank removal
Replacing the engine coolant expansion tank in a Chevrolet Captiva 2014 is a vital maintenance task to ensure the vehicle's cooling system operates effectively. The expansion tank, also known as the coolant reservoir, plays a critical role in managing the coolant levels and pressures within the engine. Over time, the tank can develop cracks or leaks, which may lead to coolant loss and potentially cause the engine to overheat. Addressing this issue promptly by replacing the faulty expansion tank can prevent significant engine damage and maintain optimal cooling system performance.
The replacement process begins with safety precautions, such as parking the vehicle on a level surface, allowing the engine to cool completely, and disconnecting the battery to avoid any electrical hazards. The next step involves draining the coolant from the expansion tank. This can usually be done by removing the cap and allowing the coolant to flow into a suitable container. Once the tank is drained, the hoses and connections attached to the tank must be carefully disconnected. These include the overflow hose and any other lines that may be connected to the tank.
After disconnecting the necessary components, the old expansion tank can be removed by unscrewing or unclipping it from its mounting position. The new expansion tank is then installed by reversing the removal steps. This involves securing the tank in place, reconnecting the hoses and connections, and refilling the tank with the appropriate type and amount of coolant. It's important to ensure all connections are tight and leak-free before starting the engine. Finally, the cooling system should be bled to remove any air pockets and checked for proper operation to ensure the new expansion tank is functioning correctly. Regular maintenance of the cooling system, including the expansion tank, is essential for the longevity and reliability of the Chevrolet Captiva's engine.
Caution: To avoid danger of
being burned, do not remove radiator cap while engine and radiator are still
hot, as fluid and steam can be blown out under pressure.
If radiato ...
1.
Disconnect electrical connector from
blower motor.
2.
Remove blower motor bolts from HVAC
module, Fig. 1.
...
 Cooling System Pressure, Test
 HVAC Blower Motor R&R