Chevrolet Captiva Service & Repair Manual: Front Door
Removal
| 1. |
Disable Supplemental Inflatable Restraint
(SIR) system. |
| 2. |
Remove front door trim panel. |
| 3. |
Remove front door check link bolt. |
| 4. |
Remove water deflector. |
| 5. |
Disconnect electrical connector, if
equipped. |
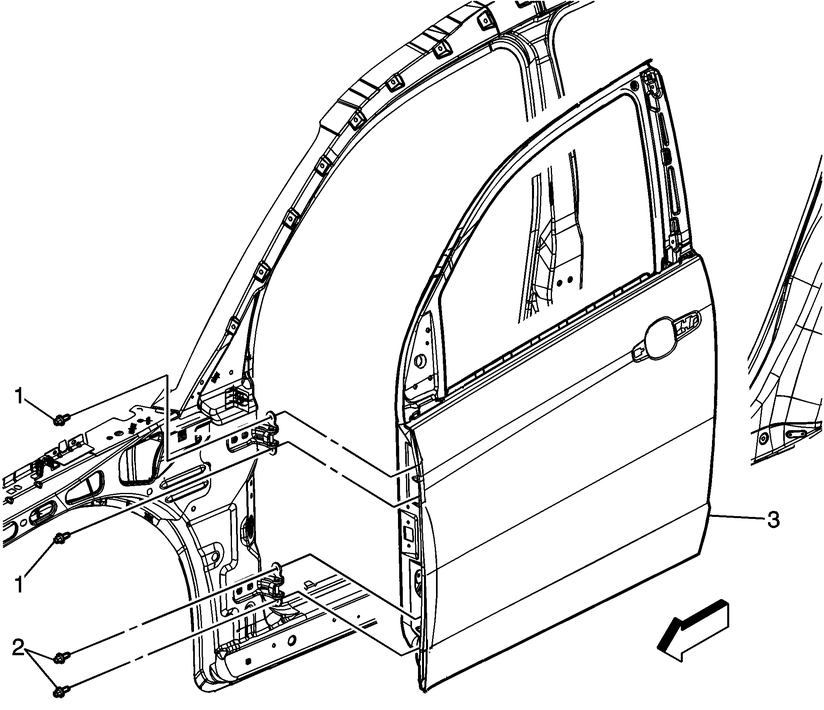
| 7. |
Remove front door upper hinge bolts,
Fig. 1. |
| 8. |
Remove front door lower hinge bolts,
Fig. 1. |
| 9. |
With aid of an assistant, remove door,
Fig. 1. |
|
Installation
| 1. |
Reverse procedure to install. |
| 2. |
Torque hinge bolts to 18 ft.
lbs. |
| 3. |
Inspect door locking system for proper
operation before installing trim panel. |
| 4. |
Adjust door as required. |
|
Adjustment
| Warning: In order to prevent
SIR deployment, personal injury, or unrequired SIR system repairs, do not
strike the door or the door pillar in the area of the side impact sensor
(SIS). Turn OFF the ignition and remove the key when performing service
in the area of the SIS. |
| 1. |
Remove door lock striker. |
| 2. |
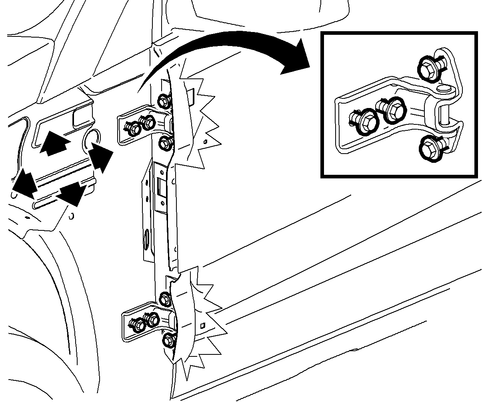
For up, down, forward, or rearward
adjustment, loosen hinge to hinge pillar bolts, Fig. 2. |
| 3. |
Move door within door opening to achieve
best alignment and operation. |
| 4. |
Tighten all of hinge fasteners that
were loosened. |
| 5. |
Install striker to approximate proper
position. |
| 6. |
Adjust door striker as required. |
| 7. |
Inspect door weather-strips for proper
fit. |
|

Fig.
1 Front door removal

Fig.
2 Front door adjustment
To remove the front door of a Chevrolet Captiva, start by ensuring the vehicle is on a level surface and safely stabilized. Begin by disconnecting any electrical connectors, trim panels, weatherstripping, and the door handle associated with the front door. Support the door with a door holder or similar tool to prevent it from swinging freely. Using the appropriate tools, such as a door hinge tool or wrench, carefully remove the bolts securing the door hinges to the vehicle's body. With caution, lift the door off the hinges and place it aside in a secure location.
For the installation of a new front door, verify that it matches the specifications and color of the original door. Position the new door onto the hinges with the assistance of another person to ensure proper alignment with the vehicle's body. Secure the door by reinstalling and tightening the hinge bolts to the manufacturer's specified torque. Reconnect all electrical connectors, door handle, mirror, trim panels, and weatherstripping to complete the installation. Test the door's functionality by opening and closing it to ensure smooth operation and alignment with adjacent panels.
If the newly installed door requires adjustment for optimal fit and alignment, begin by loosening the hinge bolts slightly to allow for movement. Adjust the door vertically and horizontally as needed to achieve even gaps and smooth operation when opening and closing. Once satisfied with the alignment, tighten the hinge bolts securely and perform additional testing to ensure the door closes smoothly and aligns uniformly with surrounding panels. Always refer to the Chevrolet Captiva's repair manual for specific torque values, adjustment procedures, and detailed instructions tailored to your model to ensure a successful front door removal, installation, and adjustment process.
Removal
1.
Remove front bumper as outlined in
Front Bumper.
2.
Remove hood latch bracket.
3.
Remove eight f ...
Removal
1.
Remove front side door water deflector.
2.
Disconnect electrical connector.
3.
Remove access hole plug ...
More about:
Chevrolet Captiva Owners Manual > Vehicle Checks: Battery
Refer to the replacement number
shown on the original battery label
when a new battery is needed. See
Engine Compartment Overview on
page 10-4 for battery location.
Warning
Battery posts, terminals, and
related accessories contain lead
and lead compounds, chemicals
known to the State of Cal ...


 Front Bumper Reinforcement
 Front Door Handle