Chevrolet Captiva Service & Repair Manual: Front Sub-Frame
Removal
| Do not allow radiator to swing
after removing front suspension crossmember. Upper portion of radiator should
be fixed using strings. |
| 1. |
Install engine support fixture. |
| 2. |
Raise and suitably support vehicle
and remove wheels. |
| 3. |
Remove engine shield from underbody
of vehicle, Fig. 1. |
| 4. |
Remove front control arm ball joint
to knuckle nut and pin, Fig. 2. |
| 5. |
Remove front exhaust pipe assembly. |
| 6. |
On 4WD models, remove propeller
shaft. |
| 7. |
On all models, remove outer
tie rod to knuckle nut. |
| 8. |
Remove stabilizer shaft link to strut
nut, Fig. 3. |
| 9. |
Remove power steering gear to front
suspension crossmember bolts. |
| 10. |
Support front suspension crossmember
with a jack stand. |
| 11. |
Remove front suspension crossmember
to transmission rear mount bracket bolts, Fig. 4. |
| 12. |
Remove transmission front mount to
front suspension crossmember bolt and remove mount, Fig.
5. |
| 13. |
Remove front suspension crossmember
to body bolts, Fig. 6. |
| 14. |
Remove front suspension crossmember
support bracket to body bolts, Fig. 7. |
| 15. |
Lower front suspension crossmember
slowly with care. Rotate stabilizer shaft and rod properly to have
enough space during lowering cradle. |
| 16. |
Remove stabilizer shaft clamp to front
suspension crossmember bolts, Fig. 8. |
| 17. |
Remove control arm to front suspension
crossmember bolts and nuts. |
|
Installation
| 1. |
Install front control arm to front
suspension crossmember bolts and nuts, Fig. 9. |
| 2. |
Install stabilizer shaft clamp to front
suspension crossmember bolts and torque to 37 ft. lbs. |
| 3. |
Raise front suspension crossmember
slowly with care using a jack stand. Rotate stabilizer shaft and
tie rod properly to settle front suspension crossmember in correct
position. |
| 4. |
Install front suspension crossmember
support bracket and front suspension crossmember to body bolts. |
| 5. |
Torque front suspension crossmember
to body bolts to 114 ft. lbs. |
| 6. |
Torque front suspension crossmember
support bracket to body bolts to 37 ft. lbs. |
| 7. |
Install front suspension crossmember
to transmission rear mount bolts and torque to 81 ft. lbs. |
| 8. |
Install transmission front mount and
install front suspension crossmember to transmission front mount
bolt. |
| 9. |
Torque transmission front mount
to transmission bolts to 37 ft. lbs. |
| 10. |
Torque front suspension crossmember
to transmission front mount bolt to 81 ft. lbs. |
| 11. |
Install power steering gear to front
suspension crossmember bolts and torque to 81 ft. lbs. |
| 12. |
Install stabilizer shaft link to strut
nut and torque to 48 ft. lbs. |
| 13. |
Install tie rod to knuckle nut and
torque to 37 ft. lbs. |
| 14. |
Install front exhaust pipe assembly. |
| 15. |
Install front control arm ball joint
to knuckle nut and pin. |
| 16. |
Install engine shield to underbody
of vehicle. |
| 19. |
Remove engine support fixture. |
|
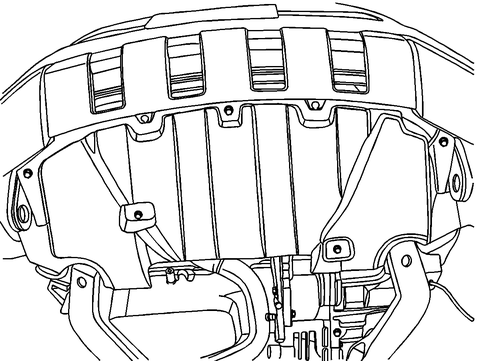
Fig.
1 Engine shield removal
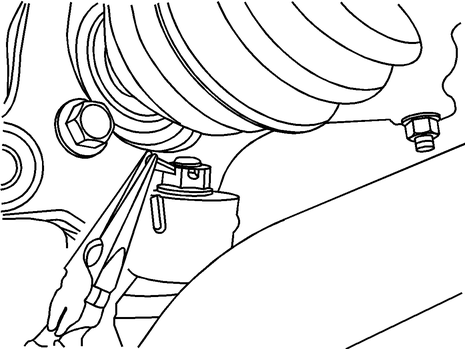
Fig.
2 Control arm ball joint to knuckle removal
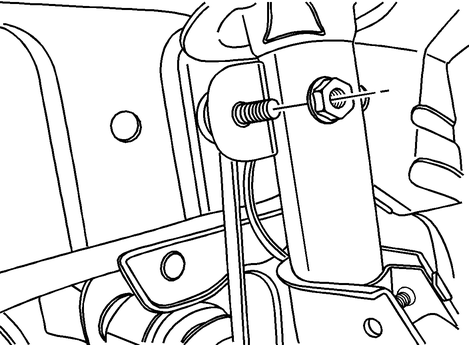
Fig.
3 Stabilizer link to strut removal
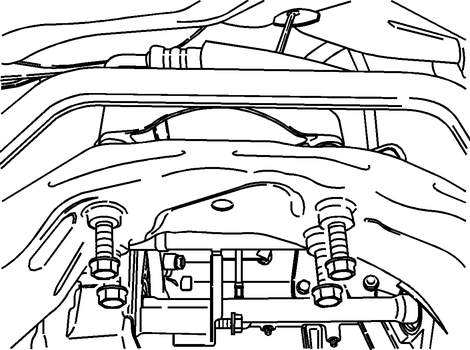
Fig.
4 Transmission rear mount bolt removal
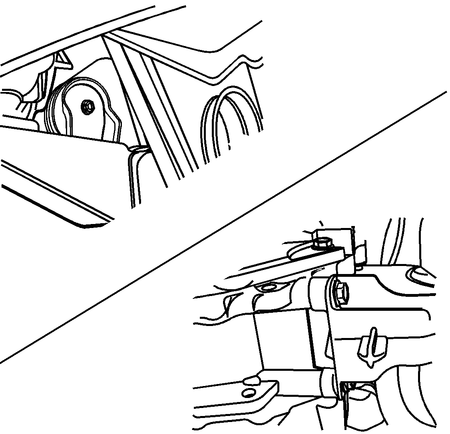
Fig.
5 Transmission front mount removal

Fig.
6 Front sub-frame to body bolt removal
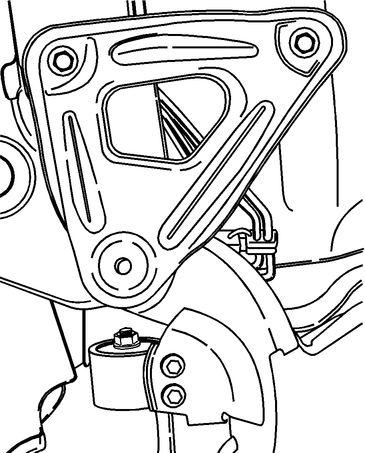
Fig.
7 Front sub-frame support bracket removal
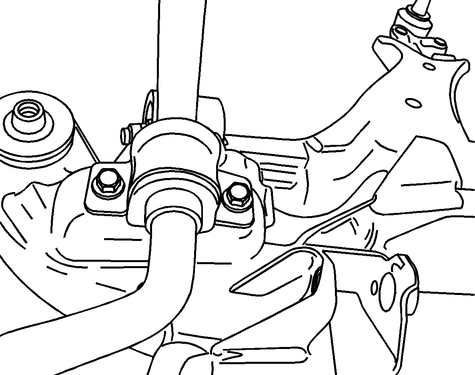
Fig.
8 Stabilizer shaft clamp removal

Fig.
9 Front control arm installation
The front sub-frame in 2014 Chevy Captiva is a vital structural component that supports key elements of the vehicle's front-end, including the engine, transmission, and suspension. This robust framework not only provides a stable mounting point for these critical systems but also helps distribute impact forces in the event of a collision, enhancing the vehicle's safety. Constructed from high-strength materials, the front sub-frame is designed to withstand significant stress and contribute to the overall rigidity and handling of the vehicle.
Over time, the front sub-frame can be subjected to wear and damage due to factors such as road conditions, corrosion, and minor collisions. Common signs of sub-frame issues include unusual noises from the front end, uneven tire wear, and poor alignment. Addressing these issues promptly is crucial, as a compromised sub-frame can affect the vehicle's structural integrity and safety. Replacing a damaged front sub-frame involves a complex process that typically requires lifting the vehicle, disconnecting various components such as the engine and suspension, and carefully removing the old sub-frame before installing the new one.
Regular inspection and maintenance of the front sub-frame are essential to ensure the long-term safety and performance of 2014 Chevy Captiva. Keeping an eye out for signs of damage and addressing any issues early can prevent more serious problems and costly repairs down the line. Ensuring the sub-frame remains in good condition contributes to the overall durability and reliability of the vehicle, providing a stable foundation for all its critical front-end systems.
Do not damage any inner panels
or reinforcements.
If the location of the original
plug weld holes can not be determined, space the plug weld holes every 1
1/2 inches ap ...
Do not damage any inner panels
or reinforcements.
If the location of the original
plug weld holes can not be determined, space the plug weld holes every 1
1/2 inches ap ...
 Front Lower Frame Rail
 Front Wheelhouse