Chevrolet Captiva Service & Repair Manual: Mirror
Removal
|
Installation
| Reverse procedure to install. Torque mirror bolts to 89 inch lbs. |
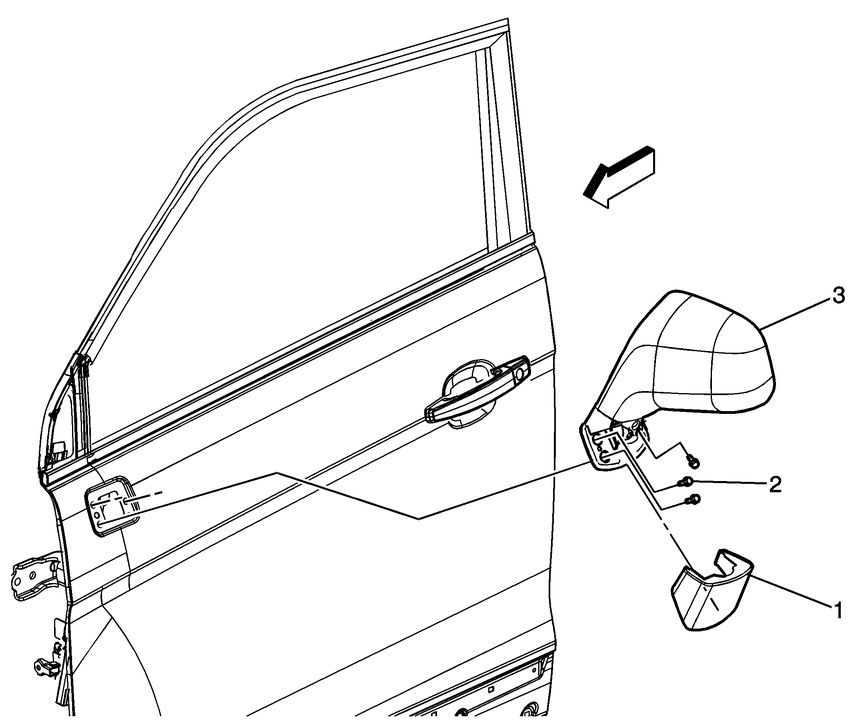
Fig. 1 Mirror removal
Chevrolet Captiva (2006-2018) Service & Repair Manual includes detailed instructions for the removal and installation of the vehicle's mirrors. These instructions are essential for technicians and DIY enthusiasts who need to replace or repair damaged mirrors on the Captiva.
Removal process typically involves several steps outlined in the manual. First, technicians are instructed to disconnect the power source to the mirror, either by removing the fuse or disconnecting the electrical connector. Next, any exterior trim or covers around the mirror assembly may need to be carefully removed to access the mounting bolts or clips.
After the mirror is detached from the vehicle, technicians can inspect the mirror assembly for any damage or wear that may require repair or replacement. If replacement is necessary, the manual provides guidance on selecting the correct replacement mirror and ensuring compatibility with the Captiva model and trim level.
The installation process involves reversing the removal steps. Technicians carefully position the replacement mirror assembly, secure it with the appropriate mounting bolts or clips, and reconnect the power source. They may also need to adjust the mirror's position and alignment to ensure proper functionality and visibility for the driver.
Mirror Removal and Installation section of the Chevrolet Captiva Service & Repair Manual provides comprehensive instructions to help technicians perform these tasks efficiently and accurately. Following the manual's guidelines ensures that mirrors are replaced or repaired correctly, maintaining the vehicle's safety and functionality.
 Liftgate Latch
Removal
1.
Remove liftgate trim panel.
2.
Remove three liftgate latch bolts,
Fig. 1.
3.
Disconnect actuator ...
 Quarter Panel
Section in specified areas only.
Sectioning outside of these areas may compromise the structural integrity
of the vehicle. The door frame can be replaced at factory seams, but requires ...
More about:
Chevrolet Captiva Service & Repair Manual > Maintenance: Battery Cable R&R
Removal
Warning: Unless directed otherwise,
the ignition and start switch must be in the OFF or LOCK position, and all
electrical loads must be OFF before servicing any electrical component.
Disconnect the battery ground cable to prevent an electrical spark should
a tool or e ...
Chevrolet Captiva Owners Manual
- Introduction
- In Brief
- Keys, Doors, and Windows
- Seats and Restraints
- Storage
- Instruments and Controls
- Lighting
- Infotainment System
- Climate Controls
- Driving and Operating
- Vehicle Care
- Service and Maintenance
- Technical Data
- OnStar
Chevrolet Captiva Service & Repair Manual
