Chevrolet Captiva Service & Repair Manual: Drive Belt Tensioner R&R
|

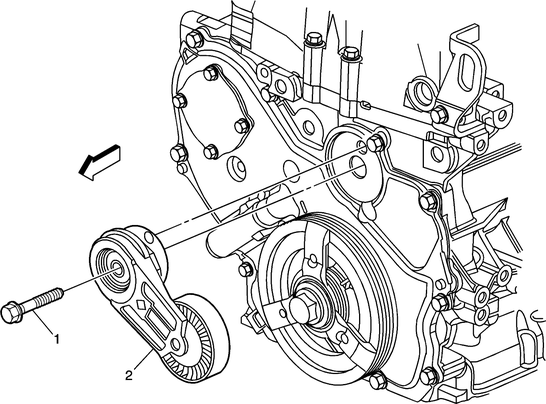
Fig. 1 Drive belt tensioner removal
To remove the drive belt tensioner in a Chevrolet Captiva First generation, follow these steps for a smooth and safe process. Begin by preparing the vehicle on a flat surface, engaging the parking brake, and ensuring the engine is cool before starting work. Disconnect the negative terminal of the battery for safety reasons to prevent accidental starts during the process.
Next, locate the drive belt tensioner, which is usually positioned near the front of the engine, either above or below the alternator. It consists of a pulley system with a spring-loaded arm. Use a suitable tool like a breaker bar, ratchet, or wrench to rotate the tensioner in the direction that releases tension on the drive belt. This action allows you to slip the belt off the tensioner pulley and other pulleys in the system.
Once the tension is released, carefully remove the drive belt from the tensioner pulley and other relevant pulleys in the system. Proceed to remove the tensioner itself by loosening and removing the tensioner mounting bolt(s) that secure it to the engine block or bracket. Use the appropriate socket or wrench for this task.
After removing the tensioner, inspect it thoroughly for any signs of wear, damage, or malfunction. If necessary, replace the tensioner with a new one or service it as needed. When installing the new tensioner or reattaching the serviced one, ensure it is correctly aligned and tightened according to the manufacturer's specifications.
It's crucial to consult your Chevrolet Captiva's specific service manual or seek professional assistance if you're unsure about any step in the process. Working on the engine requires precision and attention to detail to avoid damage and ensure safety.
 Drive Belt R&R
1.
Remove air cleaner assembly.
2.
Remove righthand engine splash shield.
3.
Rotate drive belt tensioner, using
...
More about:
Chevrolet Captiva Service & Repair Manual > Cooling System: Heater Hose, Replace
Inlet
1.
Drain cooling system into a suitable
container.
2.
Reposition hose clamp at heater core
and remove hose.
3.
Reposition hose clamp at heater inlet
pipe and remove hose.
...
Chevrolet Captiva Owners Manual
- Introduction
- In Brief
- Keys, Doors, and Windows
- Seats and Restraints
- Storage
- Instruments and Controls
- Lighting
- Infotainment System
- Climate Controls
- Driving and Operating
- Vehicle Care
- Service and Maintenance
- Technical Data
- OnStar

