Chevrolet Captiva Service & Repair Manual: Rear Body Panel
| Do not damage any inner panels
or reinforcements. |
| If the location of the original
plug weld holes can not be determined, space the plug weld holes every 1
1/2 inches apart. Some panels may have structural weld thru adhesive. It
is required to replace the weld thru adhesive with an additional spot weld
between each factory spot weld. |
Removal
| 2. |
Disconnect battery ground. |
| 3. |
Remove all related panels and components. |
| 4. |
Repair as much damage as possible to
factory specifications. |
| 5. |
Remove sealers and corrosion protection
materials from repair area. |
| 6. |
Locate and drill out all factory welds.
Note number and location of welds for installation of rear body
panel, Fig. 1. |
| 7. |
Remove damaged rear body panel,
Fig. 2. |
|
Installation
| 1. |
Drill 5/16 inch holes for plug weld
as required on service component, in locations noted from original
assembly, Fig. 3. |
| 2. |
Prepare all mating surfaces as required. |
| 3. |
Apply 3M® Weld Thru Coating P/N 05916,
or equivalent, to all mating surfaces. |
| 4. |
Position new component to vehicle using
three dimensional measuring equipment and clamp into place, Fig.
4. |
| 5. |
Plug weld accordingly, Fig.
5. |
| 6. |
Clean and prepare all welded surfaces. |
| 7. |
Apply sealers and corrosion protection
materials to repair area, as required. |
| 8. |
Refinish repaired area. |
| 9. |
Install all related panels and components. |
| 10. |
Connect battery ground. |
|
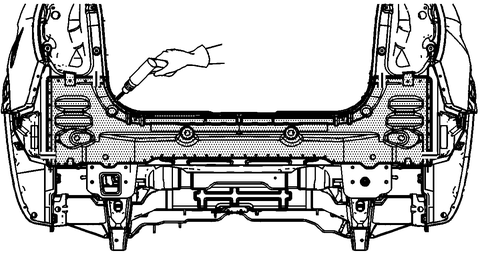
Fig.
1 Rear body panel weld locations
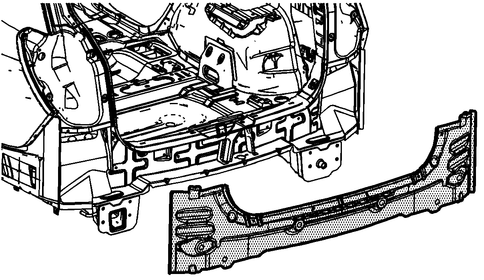
Fig.
2 Rear body panel removal
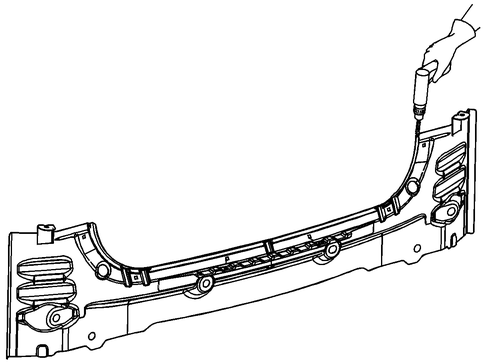
Fig.
3 Rear body panel preparation

Fig.
4 Rear body panel installation
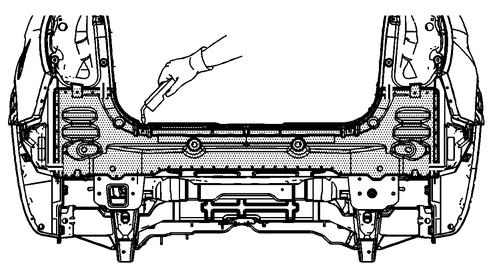
Fig.
5 Rear body panel plug weld locations
Removing and installing the rear body panel on a 2006 - 2018 Chevrolet Captiva First generation (C100/C140) involves a series of precise steps to ensure proper alignment and functionality. Begin by parking the vehicle on a level surface, turning off the engine, and disconnecting the negative battery cable to ensure safety. Access the interior of the rear section and remove any trim panels or interior components that obstruct the panel, including potentially the rear seats. Next, disconnect any electrical connectors or wiring harnesses attached to the rear body panel, followed by removing the rear bumper cover and any other exterior trim pieces.
To remove the panel, locate and remove the fasteners securing it to the vehicle's frame, being careful to keep track of all hardware for reinstallation. With the help of an assistant, gently pull the panel away from the vehicle, mindful of any remaining clips or adhesive. For installation, ensure the new or repaired panel is clean and free of damage, then align it with the vehicle's mounting points. Secure the panel with the original fasteners, reconnect any electrical components, and reattach the exterior and interior trim pieces. Finally, reconnect the negative battery cable and inspect the installation to ensure proper alignment and functionality. This meticulous approach guarantees the structural integrity and aesthetic of your Chevrolet Captiva are maintained.
Removal
1.
Remove tire and wheel assembly.
2.
Remove eight quarter panel liner screws,
Fig. 1.
3.
Remove thr ...
Removal
1.
Disconnect battery ground.
2.
Disconnect connector of rear object
sensor, if equipped.
3.
Remove ...
More about:
Chevrolet Captiva Owners Manual > Radio: Radio Reception
Frequency interference and static
can occur during normal radio
reception if items such as cell phone
chargers, vehicle convenience
accessories, and external electronic
devices are plugged into the
accessory power outlet. If there is
interference or static, unplug the
item from the accessory ...
 Quarter Panel Liner
 Rear Bumper