Chevrolet Captiva Service & Repair Manual: Rear Bumper
Removal
|
Installation
| Reverse procedure to install. |

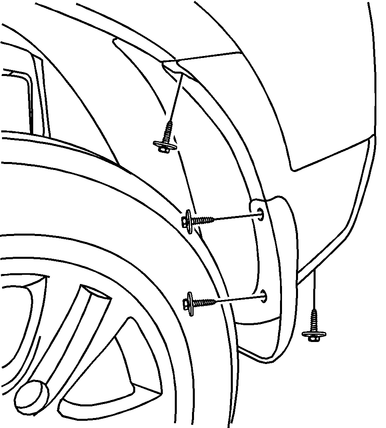
Fig. 1 Rear wheelhouse liner bolt removal

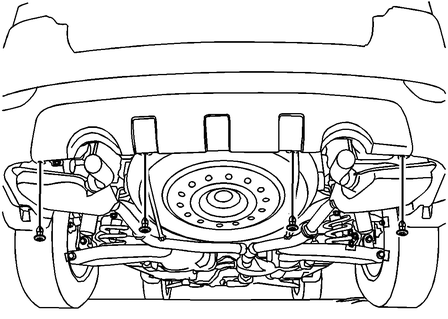
Fig. 2 Rear bumper lower retainer removal

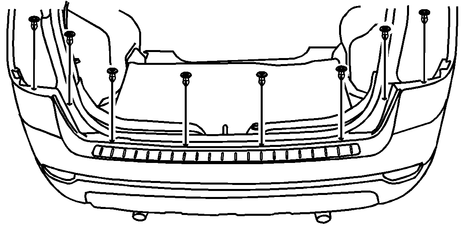
Fig. 3 Upper screws & retainers removal

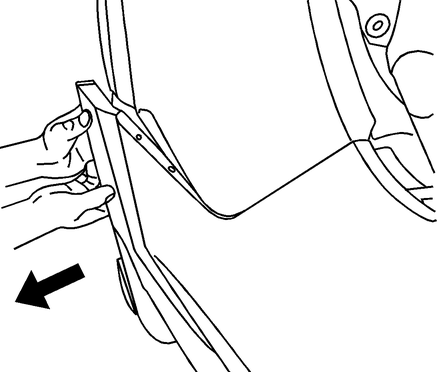
Fig. 4 Rear bumper removal
Chevrolet Captiva's First generation rear bumper is an integral part of the vehicle's design, providing protection and aesthetic appeal to the rear end. Made from durable materials like plastic or composite materials, the rear bumper is designed to absorb and disperse impact energy during low-speed collisions, safeguarding the vehicle's body and rear components.
Many Chevrolet Captiva models come equipped with rear bumpers that integrate with safety features such as parking sensors or a rearview camera. These features enhance the driver's visibility and maneuverability, especially when reversing in tight spaces, contributing to overall safety and convenience.
Routine maintenance of the rear bumper involves regular cleaning and inspection to remove dirt, debris, and signs of wear. If the bumper sustains damage, either from an accident or general wear and tear, prompt repair or replacement is necessary to restore its functionality and appearance.
For owners interested in customization or upgrading their Captiva's rear bumper, there are aftermarket options available. These aftermarket bumpers may offer enhanced protection, different styling elements, or additional features like integrated tow hooks or exhaust outlets, allowing owners to personalize their vehicle's look and functionality.
When replacing the rear bumper, ensuring compatibility with the specific model year and trim level of the Chevrolet Captiva is crucial. Professional installation is recommended to guarantee proper fitment and functionality of the new bumper, maintaining the vehicle's safety and aesthetics.
 Rear Body Panel
Do not damage any inner panels
or reinforcements.
If the location of the original
plug weld holes can not be determined, space the plug weld holes every 1
1/2 inches ap ...
 Rear Bumper Reinforcement
Removal
1.
Remove rear bumper as outlined in Rear
Bumper.
2.
Remove bolts and rear impact bar,
Fig. 1.
Installat ...
More about:
Chevrolet Captiva Owners Manual > Instruments and Controls: Information Displays
Driver Information Center (DIC)
The vehicle has a Driver Information
Center (DIC).
All information appears in the DIC
display in the instrument cluster.
The DIC comes on when the ignition
is on. After a short delay, the DIC
displays the information that was
last displayed before the engi ...
Chevrolet Captiva Owners Manual
- Introduction
- In Brief
- Keys, Doors, and Windows
- Seats and Restraints
- Storage
- Instruments and Controls
- Lighting
- Infotainment System
- Climate Controls
- Driving and Operating
- Vehicle Care
- Service and Maintenance
- Technical Data
- OnStar
