Chevrolet Captiva Service & Repair Manual: Rear Bumper Reinforcement
Removal
|
Installation
| Reverse procedure to install. Torque bolts to 16 ft. lbs. |

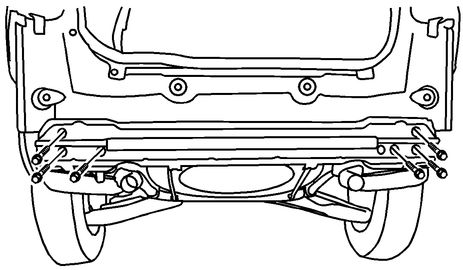
Fig. 1 Rear bumper reinforcement removal
Servicing the rear bumper reinforcement on a 2014 Chevrolet Captiva First generation involves several steps to ensure proper removal and installation. To begin, you'll need to access the rear of the vehicle and safely elevate it using appropriate equipment. Once the vehicle is secured, carefully remove any components obstructing access to the rear bumper reinforcement, such as bumper covers or trim pieces.
Next, disconnect any electrical connections or sensors attached to the bumper reinforcement and support the bumper while removing the fasteners securing it to the vehicle's frame. Carefully detach the bumper reinforcement from the vehicle and set it aside.
When installing a new rear bumper reinforcement, align it correctly with the vehicle's frame and reattach it using the appropriate fasteners. Ensure all electrical connections and sensors are properly reconnected, and test the functionality of any related components.
Reassemble any removed components, lower the vehicle, and conduct a thorough inspection to verify the proper installation of the rear bumper reinforcement. This process helps maintain the structural integrity and safety features of your car.
 Rear Bumper
Removal
1.
Disconnect battery ground.
2.
Disconnect connector of rear object
sensor, if equipped.
3.
Remove ...
 Rear Door
Removal
1.
Disable Supplemental Inflatable Restraint
(SIR) system.
2.
Remove rear door trim panel.
3.
Remov ...
More about:
Chevrolet Captiva Owners Manual > Bulb Replacement: Headlamps
To replace one of the headlamp
bulbs, use the following procedure.
To replace the parking/turn signal
lamp bulb, see Front Turn Signal
and Parking Lamps on page 10-28.
Open the hood. See Hood on
page 10-3.
Remove the filler panel
fasteners (1) and remove the
filler panel.
...
Chevrolet Captiva Owners Manual
- Introduction
- In Brief
- Keys, Doors, and Windows
- Seats and Restraints
- Storage
- Instruments and Controls
- Lighting
- Infotainment System
- Climate Controls
- Driving and Operating
- Vehicle Care
- Service and Maintenance
- Technical Data
- OnStar
