Chevrolet Captiva Service & Repair Manual: Yaw Sensor R&R
|

Fig. 1
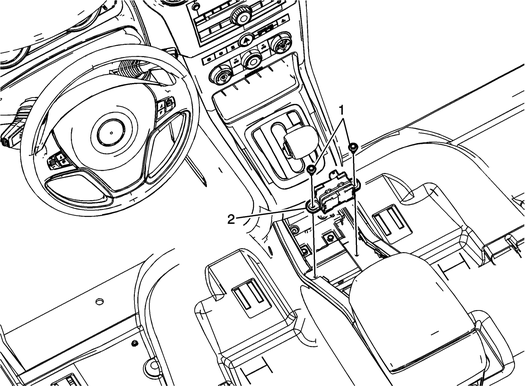
Yaw sensor in the Chevrolet Captiva 2012 is a crucial component of the vehicle's stability control system, helping to detect rotational movements and enhance driving safety. Replacing the yaw sensor (R&R) requires careful attention to ensure proper functionality.
First, ensure the vehicle is parked on a level surface and the ignition is turned off. Disconnect the battery to prevent any electrical issues during the replacement process. Locate the yaw sensor, typically found under the center console or beneath the seats, depending on the model year.
To access the yaw sensor, remove any necessary trim panels or carpeting. Carefully disconnect the electrical connector from the sensor. Using the appropriate tools, remove the mounting bolts securing the yaw sensor to the vehicle.
Install the new yaw sensor by positioning it correctly and securing it with the mounting bolts. Reconnect the electrical connector to the sensor, ensuring it is firmly attached. Reinstall any trim panels or carpeting that were removed earlier.
Reconnect the battery and start the vehicle. It's important to reset the stability control system, which may require a diagnostic tool or following specific procedures outlined in the vehicle's service manual.
Finally, test drive the vehicle to ensure the yaw sensor is functioning correctly and that no warning lights are present on the dashboard. Properly replacing the yaw sensor in the 2012 Chevrolet Captiva ensures optimal stability and safety while driving.
 Wheel Speed Sensor R&R
Front
1.
Raise and support the vehicle.
2.
Remove the tire and wheel.
3.
Remove the wheel bearing and hub assembl ...
More about:
Chevrolet Captiva Owners Manual > Storage: Additional Storage Features
Cargo Cover
For vehicles with a cargo cover, use
it to cover items in the rear of the
vehicle.
To remove the cover and remove it
from the vehicle, pull both ends
toward each other. To reinstall,
place each end of the cover in the
holes behind the rear seat.
Cargo Tie-Downs
Four cargo ...
Chevrolet Captiva Owners Manual
- Introduction
- In Brief
- Keys, Doors, and Windows
- Seats and Restraints
- Storage
- Instruments and Controls
- Lighting
- Infotainment System
- Climate Controls
- Driving and Operating
- Vehicle Care
- Service and Maintenance
- Technical Data
- OnStar
