Chevrolet Captiva Service & Repair Manual: Rack & Pinion Assembly R&R
| Caution: With wheels of vehicle
facing straight ahead, secure steering wheel utilizing steering column anti-rotation
pin, steering column lock, or a strap to prevent rotation. Locking of steering
column will prevent damage and a possible malfunction of SIR system. Steering
wheel must be secured in position before disconnecting following components:
steering column, intermediate shaft(s), steering gear. |
| Caution: After disconnecting
these components, do not rotate steering wheel or move front tires and wheels.
Failure to follow this procedure may cause SIR coil assembly to become un-centered
and cause possible damage to SIR coil. If you think SIR coil has become
un-centered, refer to your specific SIR coil’s centering procedure to
re-center SIR coil. |
| 1. |
With front wheels in straight ahead
position, turn ignition switch to OFF position and remove key from
ignition lock cylinder. |
| 2. |
Rotate steering wheel in order to lock
steering column. |
| 3. |
Remove intake manifold cover. |
| 4. |
Remove as much power steering fluid
from power steering fluid reservoir as possible. |
| 5. |
Separate steering linkage outer tie
rod at steering knuckle. |
| 6. |
Remove power steering gear inlet hose
at steering gear. |
| 7. |
Remove power steering fluid cooler
at steering gear. |
| 8. |
Separate steering shaft coupling at
steering gear. |
| 9. |
Partially lower rear of drivetrain
and front suspension frame to gain enough clearance to remove steering
gear. |
| 10. |
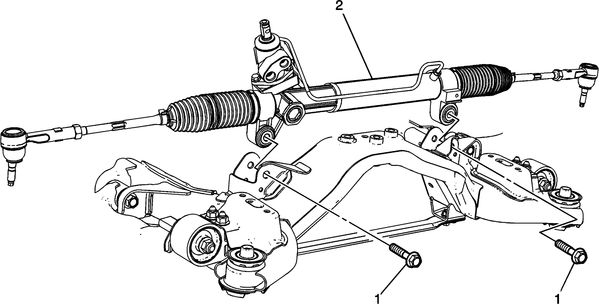
Remove and discard steering gear bolts
(1), Fig. 1. |
| 11. |
Remove steering gear (2), Fig.
1. |
| 12. |
Reverse procedure to install, noting
following: |
| |
a. |
Install NEW steering gear bolts and
torque to 81 ft. lbs. |
| |
b. |
Fill and bleed power steering system. |
| |
c. |
Measure and adjust front toe. |
|

Fig.
1
We covers in detail the process of replacing the rack and pinion assembly, a critical component of the vehicle's steering system. The rack and pinion assembly is responsible for translating steering wheel movements into lateral movement of the front wheels, allowing for precise steering control.
The manual provides step-by-step instructions for removing the old rack and pinion assembly in Chevrolet Captiva First generation (C100/C140) and installing a new one. This involves tasks such as disconnecting the steering linkage, removing the tie rod ends, and unbolting the old rack from the vehicle's frame. It also includes guidance on properly torquing bolts and ensuring proper alignment during installation to prevent steering issues.
Proper maintenance of the rack and pinion assembly is also discussed in the manual, emphasizing the importance of regular inspections for leaks, damaged seals, or worn-out components. It may recommend periodic lubrication of the assembly and checking steering fluid levels to ensure optimal performance and longevity.
Overall, the Chevrolet Captiva repair manual provides comprehensive guidance on maintaining, diagnosing, and replacing the rack and pinion assembly, enabling vehicle owners and technicians to address steering system issues effectively and ensure safe and reliable steering performance.
Most modern cars come equipped
with hydraulic power steering, as systems age they can wear out. Power steering
fluid leaks (depending on severity) will cause the power steering system
...
Front
1.
Remove front tire and wheel assemblies.
2.
Remove front stabilizer shaft insulator
clamp bolt, Fig. 1.
3 ...

 Power Steering System Leak Inspection
 Stabilizer Bar Bushing R&R