Chevrolet Captiva Service & Repair Manual: Stabilizer Bar Bushing R&R
Front
| 1. |
Remove front tire and wheel assemblies. |
| 2. |
Remove front stabilizer shaft insulator
clamp bolt, Fig. 1. |
| 3. |
Remove front stabilizer shaft insulator
clamp, Fig. 1. |
| 4. |
Remove front stabilizer shaft, Fig.
1. |
| 5. |
Reverse procedure to install. Torque
front stabilizer shaft insulator clamp bolts to 37 ft. lbs. |
|
Rear
| 1. |
Raise and support vehicle. |
| 2. |
Remove stabilizer shaft insulator bolts,
Fig. 2. |
| 3. |
Lower rear suspension support. Lower
rear suspension support enough to remove stabilizer shaft clamp
bolt. |
| 4. |
Remove stabilizer shaft insulator clamps,
Fig. 2. |
| 5. |
Remove stabilizer shaft insulators,
Fig. 2. |
| 6. |
Reverse procedure to install. Torque
stabilizer shaft insulator clamp bolts to 52 ft. lbs. |
|
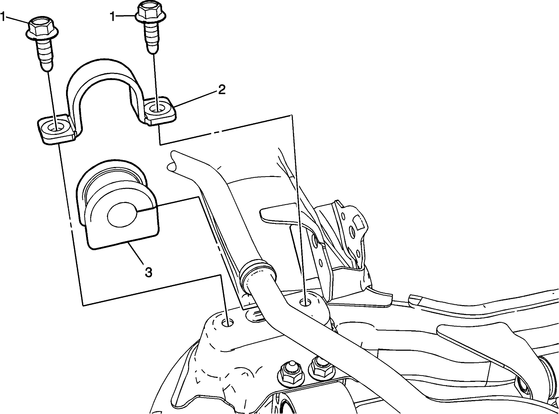
Fig.
1

Fig.
2
Servicing the stabilizer bar bushings on a 2014 Chevrolet Captiva involves several key steps. Begin by preparing the vehicle on a flat surface and gathering the necessary tools and replacement parts. Lift the front or rear of the vehicle as needed and secure it with jack stands for safety.
Locate the stabilizer bar underneath the vehicle, which connects horizontally across the front or rear suspension via bushings. Remove the old bushings by loosening and taking out the bolts or nuts that secure them. Clean the area thoroughly and inspect the stabilizer bar for any damage before installing the new bushings.
Apply lubricant to the inner surface of the new stabilizer bar bushings and position them correctly on the bar, aligning them with the mounting points on the suspension components. Secure the new bushings in place with bolts or nuts, tightening them according to the manufacturer's torque specifications. Lower the vehicle, remove the jack stands, and take Chevrolet Captiva for a test drive to ensure proper installation and smooth handling. If you're uncertain about these steps, consider seeking assistance from a professional mechanic or service center to ensure the job is done correctly and your vehicle's suspension remains in top condition.
Caution: With wheels of vehicle
facing straight ahead, secure steering wheel utilizing steering column anti-rotation
pin, steering column lock, or a strap to prevent rotation. Locking o ...
Front
Use proper size Allen wrench to
keep front stabilizer shaft link ball stud from rotating while removing
or installing front stabilizer shaft link nut.
...
 Rack & Pinion Assembly R&R
 Stabilizer Bar Link Kit R&R