Chevrolet Captiva Service & Repair Manual: Suspension Control Arm Bushings R&R
Front
| 1. |
Remove front lower control arm. |
| 2. |
Place front lower control arm in a
vise or suitable holding device, Fig. 1. |
| 3. |
Remove front lower control arm bushing
front (2) from front lower control arm, using remover/installer
tool No. J-44971, or equivalent (1), Fig. 1. |
| 4. |
Reverse procedure to install. |
|
Rear
| 1. |
Remove front lower control arm. |
| 2. |
Remove front lower control arm rear
bushing nut (1), Fig. 2. |
| 3. |
Remove front lower control arm rear
bushing (2), Fig. 2. |
| 4. |
Reverse procedure to install, noting
following: |
| |
a. |
Torque front lower control arm
rear bushing nut to 111 ft. lbs. |
| |
b. |
Measure and adjust wheel alignment. |
|
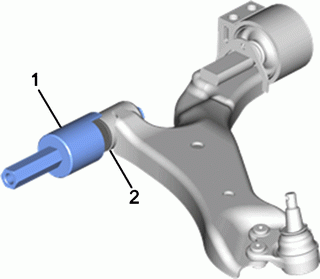
Fig.
1
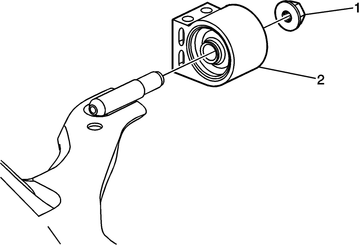
Fig.
2
Removing suspension control arm bushings from a 2014 Chevrolet Captiva involves several systematic steps to ensure safe and effective maintenance of the vehicle's suspension system. Begin by preparing the vehicle on a level surface and securing it with jack stands after lifting the front or rear end, depending on which control arm bushing requires removal. It's essential to engage the parking brake and ensure the vehicle is stable before proceeding.
Once the vehicle is safely elevated, identify the control arm housing the bushing you need to remove. This component is typically situated between the wheel hub and the vehicle's frame or body. If necessary for better access, remove the wheel associated with the control arm you're working on using a lug wrench or impact driver to loosen the lug nuts.
After removing the bushing, take the opportunity to clean and inspect the mounting points on the control arm for any wear, damage, or corrosion. Additionally, inspect other suspension components for potential issues. Install the new suspension control arm bushing carefully, ensuring it is securely seated in the control arm and aligned correctly with the mounting points. Finally, reassemble any components you removed, lower the vehicle, and conduct a thorough test of the suspension system to ensure everything is functioning correctly.
Front
Disassembly
Caution: Do not allow absorber
rod to rotate during disassembly/assembly. Use hand tools to keep absorber
rod from rotating. If air tools are used, and rod is allowe ...
Front Suspension
Lower
Removal
1.
Remove front tire and wheel assembly.
2.
Remove front lower control arm ball
stud cotter pin. Discard ...
 Suspension Coil Spring R&R
 Suspension Control Arm R&R