Chevrolet Captiva Service & Repair Manual: Suspension Strut Assembly R&R
Front
Removal
| 1. |
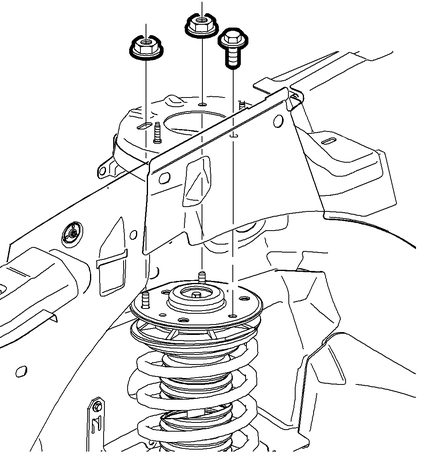
Remove front suspension strut mount
nuts and bolt, Fig. 1. |
| 2. |
Remove front tire and wheel assembly. |
| 3. |
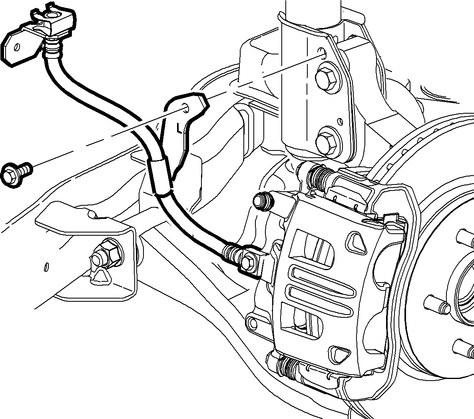
Separate front brake hose bracket at
strut assembly, Fig. 2. |
| 4. |
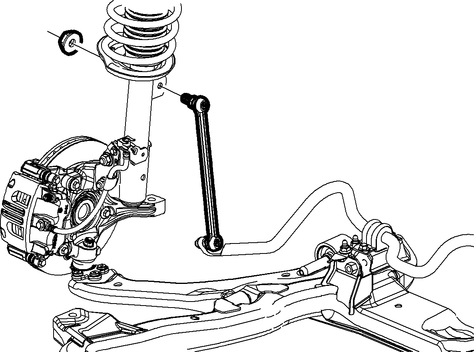
Separate front stabilizer shaft link
at strut assembly, Fig. 3. |
| 5. |
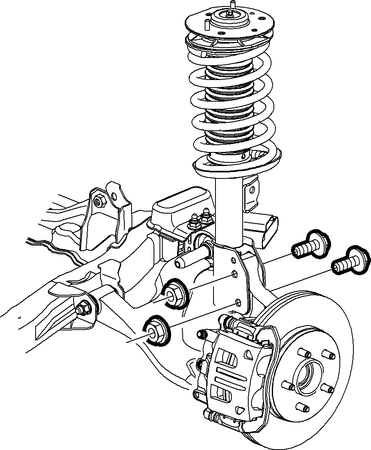
Remove front suspension strut nuts
and bolts, Fig. 4. |
| 6. |
Remove front suspension strut assembly
from vehicle. |
| 7. |
Transfer components, as required. |
|
Installation
| 1. |
Position front suspension strut assembly
on vehicle. |
| 2. |
Install front suspension strut bolts
and nuts and torque nuts to 137 ft. lbs. |
| 3. |
Install front suspension strut mount
nuts and bolt and torque to 18 ft. lbs. |
| 4. |
Install front stabilizer shaft link
at strut assembly. |
| 5. |
Install front brake hose bracket at
strut assembly. |
| 6. |
Install front tire and wheel assembly. |
| 7. |
Measure and adjust wheel alignment. |
|

Fig.
1

Fig.
2

Fig.
3

Fig.
4
Removal and installation of the suspension strut assembly in a 2014 Chevrolet Captiva is a critical maintenance task that ensures the vehicle's handling and safety. The process begins with proper preparation, including parking the vehicle on a level surface, engaging the parking brake, and using wheel chocks to prevent movement. Once the lug nuts on the wheel corresponding to the strut assembly are loosened, the vehicle is lifted with a hydraulic jack and secured on jack stands. After ensuring the vehicle's stability, the wheel is removed, exposing the strut assembly.
To access the strut assembly, open the hood to locate the strut mount bolts in the engine bay. These bolts should not be removed yet but will be critical later. The next step involves disconnecting several components attached to the strut. The brake line and ABS sensor wire are detached, typically held in place by clips or brackets. The stabilizer bar link is then disconnected using a suitable wrench, followed by the removal of the bolts connecting the strut to the steering knuckle. Due to the high torque on these bolts, a breaker bar may be necessary. With these components disconnected, the strut assembly is supported by hand while the strut mount bolts are removed, allowing the strut assembly to be carefully lowered and removed from the vehicle.
Installing the new strut assembly reverses the removal process. Begin by positioning the new strut in the strut tower and loosely attaching the strut mount bolts in the engine bay to hold it in place. The strut is then aligned with the steering knuckle, and the bolts are inserted and tightened to the manufacturer's specified torque. Reattaching the stabilizer bar link to the strut and reconnecting the brake line and ABS sensor wire ensures all components are securely in place. Fully tightening the strut mount bolts in the engine bay is crucial for maintaining the proper alignment and functionality of the suspension system.
Finally, the wheel is reinstalled onto the hub, with the lug nuts hand-tightened initially. The vehicle is then lowered off the jack stands using the hydraulic jack, and the lug nuts are fully tightened in a star pattern to ensure even pressure distribution. After double-checking all bolts and connections for security, it is advisable to get a wheel alignment to ensure proper handling and tire wear. By following these detailed steps, the suspension strut assembly on a 2014 Chevrolet Captiva can be effectively removed and installed, ensuring the vehicle remains safe and performs optimally.
Rear
1.
Raise and support vehicle.
2.
Remove rear tire and wheel assembly.
3.
Remove lower shock bolt, Fig.
...
Front
Disassembly
Caution: Do not allow absorber
rod to rotate during disassembly/assembly. Use hand tools to keep absorber
rod from rotating. If air tools are used, and rod is allowe ...


 Suspension Shock Absorber R&R
 Suspension Strut Bearing Assembly R&R