Chevrolet Captiva Service & Repair Manual: Grille
Removal
|
Installation
| Reverse procedure to install. |
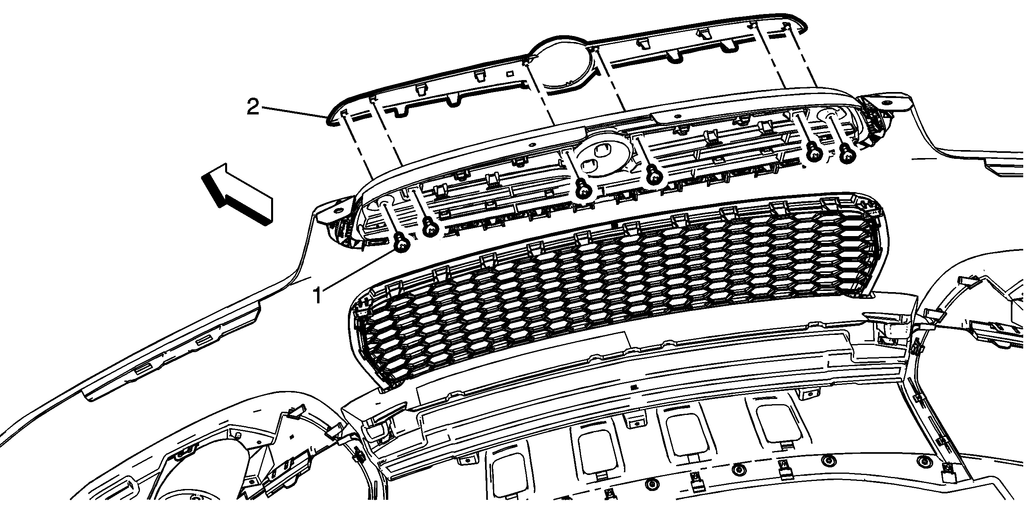
Fig. 1 Grille removal
Replacing the grille on a Chevrolet Captiva is a straightforward process that can give your vehicle a fresh appearance. Start by parking the Captiva on a flat surface and turning off the engine. Open the hood to access the grille area. Depending on the model year and design of your Captiva, you may need to remove screws, clips, or bolts securing the grille. Use the appropriate tools to carefully remove these fasteners without damaging the surrounding areas.
After removing the fasteners, detach the old grille from the front of the vehicle. Take note of any electrical connections or sensors attached to the grille, such as parking sensors or front cameras. Disconnect these connections as needed before fully removing the old grille. Align the new grille with the mounting points on the front of the Captiva and reconnect any electrical connections or sensors. Secure the new grille in place using the original fasteners or any hardware provided with the replacement grille.
In the end, conduct a visual inspection to ensure the new grille is securely attached and aligned correctly. Close the hood and admire the refreshed appearance of your Chevrolet Captiva First generation (C100/C140) with its newly replaced grille. If you're uncertain about any steps or encounter difficulties during the process, consulting the vehicle's manual or seeking assistance from a professional auto technician can ensure a smooth and successful grille replacement.
 Fuel Door
Removal
1.
Remove two fuel door bolts, Fig.
1.
2.
Remove fuel door, Fig. 1.
Installation
Reverse procedure to ...
 Hood
Hood
Warning: When a hood hold open
device is being removed or installed, provide alternate support to avoid
the possibility of damage to the vehicle or personal injury.
Removal
...
More about:
Chevrolet Captiva Service & Repair Manual > Steering & Suspension: Tire & Wheel Assembly Balance
A statically balanced wheel is
balanced in one plane, around center line of wheel. This prevents simple
up and down movement relative to center line of the wheel. A dynamically
balanced wheel is balanced on both sides of hub. This reduces the chance
of wobble off axis. Dynamic ...
Chevrolet Captiva Owners Manual
- Introduction
- In Brief
- Keys, Doors, and Windows
- Seats and Restraints
- Storage
- Instruments and Controls
- Lighting
- Infotainment System
- Climate Controls
- Driving and Operating
- Vehicle Care
- Service and Maintenance
- Technical Data
- OnStar
Chevrolet Captiva Service & Repair Manual
