Chevrolet Captiva Service & Repair Manual: Door Lock Cylinder
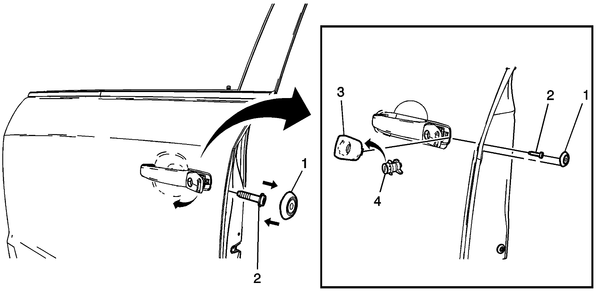
| Refer to Fig. 1
when performing following procedures. |
| 1. |
Remove front door trim panel as outlined
under "Door Trim Panel." |
| 2. |
Remove front door exterior handle screws
access cover. |
| 3. |
Remove water deflector. |
| 4. |
Disconnect lock rod from cylinder. |
| 5. |
Do not remove cylinder screw completely
from housing; remove screw to hard stop and remove cylinder. |
| 6. |
Remove front door exterior handle lock
cylinder cover. |
| 7. |
Remove front door exterior handle lock
cylinder. |
| 8. |
Reverse procedure to install. Torque
front door exterior handle lock cylinder screws to 44 inch lbs. |
|

Fig.
1 Door lock cylinder removal. Captiva Sport
Servicing the door lock cylinder on a Chevrolet Captiva typically involves addressing issues with key insertion, rotation, or overall functionality. Begin by ensuring the vehicle is parked on a flat surface and the engine is turned off. Open the affected door and locate the door panel.
To access the door lock cylinder, you may need to remove the interior door panel. This process usually involves removing screws or clips securing the panel and gently prying it away from the door frame. Take care not to damage the panel or any electrical components attached to it.
Once the door panel is removed, locate the door lock cylinder assembly. Depending on the issue, you may need to lubricate the cylinder mechanism, adjust the linkage, or replace the cylinder altogether. Use a suitable lubricant recommended for door locks to lubricate the cylinder and keyway. Check for any obstructions or debris that may be affecting the cylinder's operation.
If the cylinder needs replacement, carefully disconnect any electrical connectors or linkage connected to it. Remove the retaining clip or fasteners securing the cylinder in place, and then extract the old cylinder from the door. Install the new cylinder by reversing the removal process, ensuring all components are properly aligned and secured.
After installing the new cylinder or servicing the existing one, test the door lock operation with the key to ensure smooth and reliable functionality. Reinstall the door panel and any removed components, and conduct a final check to verify that the door lock cylinder is working correctly.
Front
1.
Remove front door trim panel.
2.
Remove water deflector.
3.
Release front inside door handle cable
...
Front
1.
Remove three front door trim panel
bolts, Fig. 1.
2.
Disengage door lock cable.
3.
Disconnect trim ...

 Door Lock Actuator R&R
 Door Trim Panel